Projects
Creating a Project
After logging into the LCPcertified Professional program for Contractors the ‘Projects’ screen will display. To create a Certified Payroll Report (CPR), a project must be entered into the system. To create a project, select the ‘Add New Project’ option. 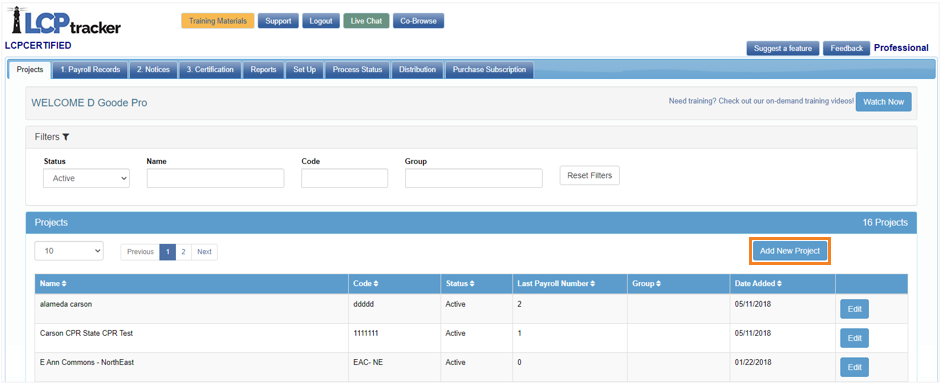
On the new project screen fill in the required information (marked with a red asterisk) and choose the proper CPR format needed (this may be changed if the incorrect option is selected).
Open the ‘CPR Details’ tab to fill out additional information about the project, this section is optional, and this information is also editable after the project is created, if needed.
Once this section is complete, select ‘Save’ to complete the project set-up.
Note: Users within the State of California, the Bid Advertisement Date will need to be entered, as well as the location(county) of the project before system will allow the project information to be saved.
Project Filters
Project Filters are available with LCPcertified Professional, under the ‘Projects’ tab, projects can be filtered and easily located based on:
- Status – Filter based on ‘Active’, ‘Pending’ and ‘Closed’ Project Status
- Name – Filter by Project Name
- Code – Filer by Project Code
- Group – Filter by Project Group (Groups much be established for this filter, see Setting Up Groups section further down in this article).

Set Up Tab
Add/Edit Employee
Employees can be added or edited in the ‘Set Up’ tab under ‘Add/Edit Employee’. This information can be added manually or the upload file/option in ‘Payroll Records’ will create your employee roster along with your payroll records.
Note: there may be notices/warnings on the Payroll Records if certain information is missing from the Add/Edit Employee screen. Edit the employee section and manually input the missing information, then save. This will clear any notices.
It is recommended that all users should know how to manually upload an employee.
The top section of the ‘Add/Edit Employee’ screen is convenient after you’ve certified at least one week of payroll records to produce your CPR Report. You can choose to filter employees that worked a specific project or live within a certain city or zip code.
Add / Edit Employee Information
Fill out the employee’s basic personal information in this section, all fields with a red asterisk are required.
Basic Information: Required information such as, first name, last name, address, gender, and Social Security Number.
Employee ID: Required Some Agencies prefer this over SSN. No Employee IDs can be duplicated, a message from the system will appear if a number is entered that already exists.
Note: Either the SSN or Employee ID field must have value, this will be the unique identifier for each employee. If SSNs are not used use an Employee ID number for each employee (this could be a unique number created for each employee or a variation of the employee SSN such as the last four).
Exemptions: Optional field, numerical format only.
Status: Optional field, Active / Inactive – all employees entered and have CPR’s will be Active. If an employee that retires or quits, edit this field to mark them Inactive. Employees cannot be deleted once they are created however they can be marked Inactive and will not show on the drop-down list when entering Payrolls.
Ethnicity: Required, Agencies may want this information.
Date Hired: Optional field, some Agencies may want this information.
Date Fingerprinted: Optional field, some Agencies may want this information.
Phone Number: Optional field, some Agencies may want this information.
Driver’s License State/License number: Optional fields, some Agencies may want this information.
Worker’s Comp Code: Optional field, some Agencies may want this information.
Electricians License: Optional field, some Agencies may want this information.
Hiring Source: Optional field, some Agencies may want this information.
Disadvantaged: Optional field, some Agencies may want this information.
Owner/Operator: Optional fields, to be used if the employee is an owner/operator (independent Contractor) and check with the Agency the CPR report is being sent to and ask them for specific direction in this matter.
I9 Verification: Optional field, some Agencies may want this information, check this box if employees are being I9 verified.
Demographic Classification
Employee Demographic Classifications is an optional section. If ‘Add Classification’ is selected in this section fill out the required information on the pop-up box. 
Apprentice Information
If the employee being entered is an Apprentice, the Apprentice information can be added here.
Default Hourly Paid Fringes (As paid to fund on behalf of employee)
In this section you enter hourly rates paid for fringe benefits paid into funds. This data is used to streamline data entry. Payment to several funds might have to be combined into one field. Some Agencies do not allow this type of entry. You may use this section when entering your employees into setup. The Fringe Benefit Maintenance table may be used in lieu of this section only after you have all other employee information setup and saved in the system.
Edit Login Password
To edit your login password, in the Set Up tab select the Edit Login Password option.
The password can be changed at any time, the following password requirements must be met:
- More than six (6) characters, less than twenty (20).
- Must contain at least one capital letter and one lowercase letter.
It is recommended that you create a password with the following characteristics:
- At least eight (8) characters long.
- Contains at least one (1) uppercase and one (1) lowercase letter.
- Contains at least one (1) number digit (0-9).
- Contains at least one (1) special character (@#$%^&+=).
To change the password, you will need the current password.
If you have forgotten your password, go to the LCPcertified login page, select ‘Forgot Password’ and the system will email a link to reset.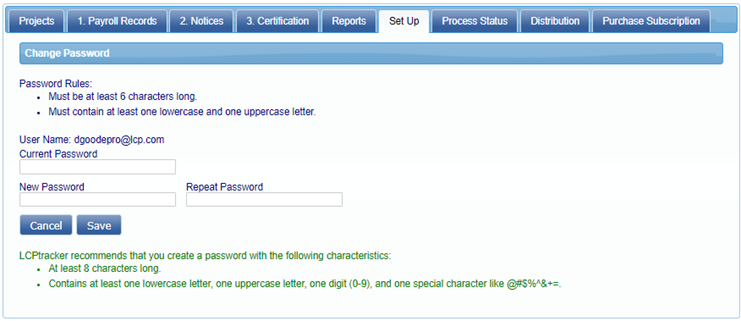
Edit/Reset eSignature
To edit or reset your eSignature, go to the ‘Set Up’ tab and select the ‘Edit/Reset eSignature’ option. An eSignature is required when certifying your payroll.
The same Password Rules shown above apply when creating or changing your eSignature. Your log in password and your eSignature are two different items in LCPtracker, if one is changed it does not change the other.
Company Information
Your Companies information can be added or updated in this tab such as name, contact, phone numbers, email, and address, that was initially set by you when signing up for LCPcertified.
Add/Edit Additional Users
LCPcertified Professional has the functionality to allow unlimited users to the account with assigned roles, the main user may add the additional users.
In the ‘Add/Edit Additional User’ section, select the drop down (the original user ID will display at the top of the list and should not be changed). The original user contact information is in the Company Information page.
There are two different user roles that can be created, Account Manager and Payroll Admin.
- Account Manager: this role will have the same abilities as the original role, and will have their own user ID, password, and eSignature password.
- Payroll Admin: this role will have the same abilities but will not have access to change the Company Information or Add Additional Users. They will have their own user ID, password, and eSignature password.
To add additional users, insert their e-mail, name, phone number, and select their user role. Once this Additional User is saved, the system will send an e-mail to the user with their user ID and a temporary password.
Add/Edit Rate Sheets
Adding a Rate Sheet(s) is not mandatory, but it is recommended to better assist you in checking your payroll and wage information.
For the users outside the state of California and those within the state that are not using State Wages, you have the option to add your rate sheet(s) to the system. By uploading the wages your payrolls will have the proper wages in the system to check against.
CALIFORNIA STATE RATES – The LCPcertified/LCPtracker Data Wage Team maintains the California State Rates, nothing needs to be uploaded for this.
It is important when entering you Project(s) that the correct Bid Advertisement Date and County are input. This will ‘tell’ the system the wage determination and county to check wage rates against.
To load wages into the system you will need to obtain the following information (this information is needed whether you are using local wages or Davis-Bacon https://sam.gov/).
If you are unsure of the rates being, it is helpful to contact your Prime, Project Manager or the Agency you are producing the reports for and ask for assistance.
Below is the information needed to populate your Rate Sheet:
- Construction Type: The are the standard Construction types listed on the DOL website. If you are using local wages the types may differ.
- Building Construction: Includes construction of sheltered enclosures with walk-in access for the purpose of housing persons, machinery, equipment, or supplies; all construction of such structures; the installation of utilities and of equipment, both above and below grade levels; as well as incidental grading, utilities, and paving. Such structures need not be "habitable" to be building construction. Also, the installation of heavy machinery and/or equipment does not generally change the project's character as a building.
- Heavy Construction: Includes those projects that are not properly classified as either "building," "highway," or "residential." Unlike these classifications, heavy construction is not a homogenous classification. Because of this catch-all nature, projects within the heavy classification may sometimes be distinguished based on their project characteristics, and separate schedules may be issued for dredging projects, water and sewer line projects, dams, major bridges, and flood control projects.
- Highway Construction: Includes construction, alteration or repair of roads, streets, highways, runways, taxiways, alleys, trails, paths, parking areas, and other similar projects not incidental to building or heavy construction.
- Residential Construction: Includes the construction, alteration or repair of single-family houses, apartment buildings of no more than four stories in height. This includes all incidental items such as site work, parking areas, utilities, streets, and sidewalks.
Some contracts or projects may require more than one general schedule to be included depending on the nature and extent of the work.
- General Decision: Other wording used could be Bid Award, Bid Advertisement, Determination.
- Modification: May be known as the Wage Decision Number.
- Publication Date; Issue Date; and Expire Date.
- Craft and Classification Titles: As example only, Truck Driver is a Craft, however there are different levels of Classifications – Group 1, Group 2, Group 3, etc. and there could also be Apprentices which may also have different levels (1, 2, 3, etc.). If you have different Classifications that fall under one Craft, be sure that the Craft name is identical for each Classification you add.
- Example:
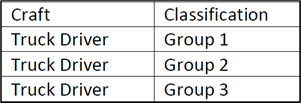
- Example:
- Basic Rate /Base pay/Basic Hourly rates: the base pay will not include fringes.
- Fringes: Fringe Benefits, even if you are a non-union shop and do not pay fringes, you will want to have this information to enter in the Wage Rate Sheet. Do not combine the values and enter all in the Base Pay field.
- Total Hourly Rate: should be equal to the Base + Fringes.
- Total Overtime Rate: should be equal to the Base x overtime multiplying factor + Fringes.
- Total Doubletime: should be equal to the Base x doubletime multiplying factor + Fringes.
Note: most areas use the multiplying factor of 1.5 overtime and 2.0 for doubletime, this is used as an example. There are some areas that may use a different factoring rate, adjust if needed.
Fringe Benefits Maintenance
This feature allows employees’ fringes to be set up on the backend. This area is beneficial to use if:
- Reporting for multiple projects with different rates
- Setting up future predetermined increases
- If all/some of your employees earn the same fringe benefit package
*Note: Employees must be set up prior to using this function, these rates will override anything setup in the ADD/EDIT EMPLOYEE section. *
CREATE DEFAULT FRINGES
In the Set Up tab, click on ‘Fringe Benefit Maintenance’ then select a Project, Effective Date and Employees the rates will apply to (there is a ‘Check All’ option available).
Enter the Hourly Rate for each fringe benefit, then select Save.
Once Saved, a table will appear confirming the system will utilize the fringe rates for the employees selected upon the effective date entered.
If some or all fringe benefits are paid to employee or vac/hold/dues are included in the employee’s gross pay, check off the appropriate boxes. Checking the boxes will then list those options as TRUE, leaving them unchecked will result in FALSE.
REVIEWING PREVIOUSLY ENTERED RATES
In the ‘Setup’ tab under ‘Fringe Benefits Maintenance’, select the Project and Employees needing to be reviewed and select ‘Load Data’. This will display the current Fringe Benefits entered. These rates can be edited and deleted in this area.
Creating a Rate Sheet
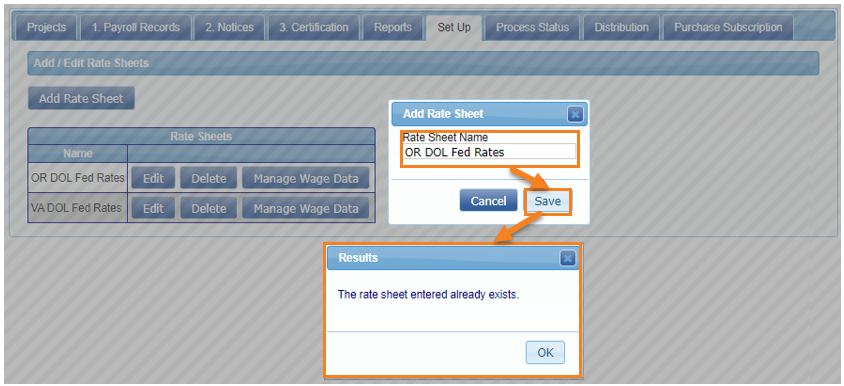
Navigate to the Set Up tab and select Add/Edit Rate Sheets.
- Select Add Rate Sheet, type in a name for the Rate Sheet, and click Save. If there is more than one project and each has different rates, each projects rate sheet will need a unique name. A message from system will pop up if the name already exists.
- Once the Rate Sheet is saved, enter your Craft/Classification and wages. Select Manage Wage Data and choose Add Classification.
- Enter the information from the DOL Wage Decision, and/or Local Rate sheet.
**For assistance on the proper Wage Decision/Determination/Prevailing Wage Lock-in Date information, please contact your Prime; Project Manager or the Agency you are producing the Payroll Reports for.
Key for filling in the Wage Decision information:
- Construction Type
- General Decision Number
- Modification Number
- Publication Date
- Issue Date
- Craft
- Classification
- Basic Rate
- Fringes
- Total Hourly Rate (Basic Rate + Fringes)

Once the information is entered into the system, select Save, if you have more to add select ‘Add Another’, if you are finished select ‘Finished’.
After the Rate Sheet is completed, it will appear in the ‘Add/Edit Rate Sheets’ section. Select ‘Manage Wage Data’ next to any Craft/Classification, to Copy, Edit or Delete the information.
When the Rate Sheet is complete, in the Projects tab and click Edit on the project to assign the Rate Sheet and click Save.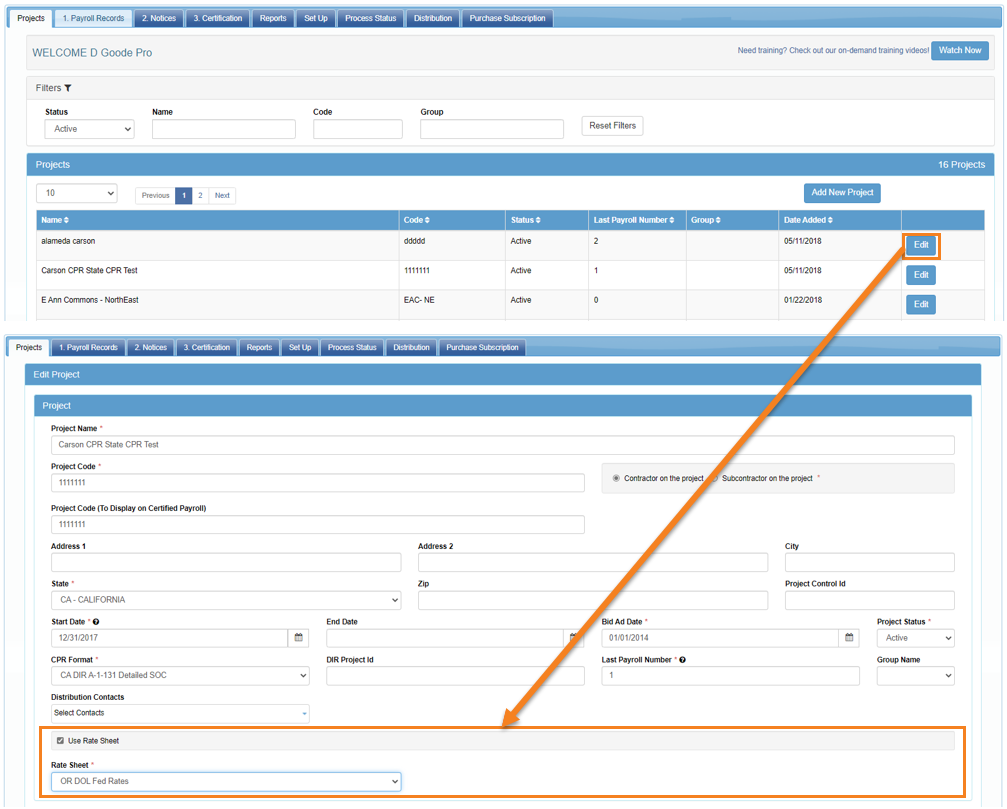
Note: A rate sheet can only be added to a project if no records have been certified and/or sit as pending under the ‘Edit uncertified payroll records’ for this project.
Project Groups
Projects can be assigned to Project Groups, this feature will make it possible to quickly certify a group of projects and distribute them in bulk.
To create a Project Group, in the Set Up tab, select Project Groups and click the ADD button. In the pop-up type in a Group Name, a description can also be added if desired, click Save.
Once the ‘Group Name’ is created, go back to the ‘Projects’ tab and Edit the project to assign the specific project to a group and Save your selection.
Distribution
Distribution Contacts – Create Contacts
Distribution contacts can be set up in advance to allow for CPRs to be sent to different entities. In the Distribution tab, select ‘Distribution Contacts’. Select Add to fill out the form with the recipient’s information, the Internal Contact will be the ‘reply to’ contact. ![]()
Assign Contacts
To assign the contacts to projects, go to the Distribution tab and select Assign Contact. Click on Assign, then select the Project and the Distribution Contact to be assigned.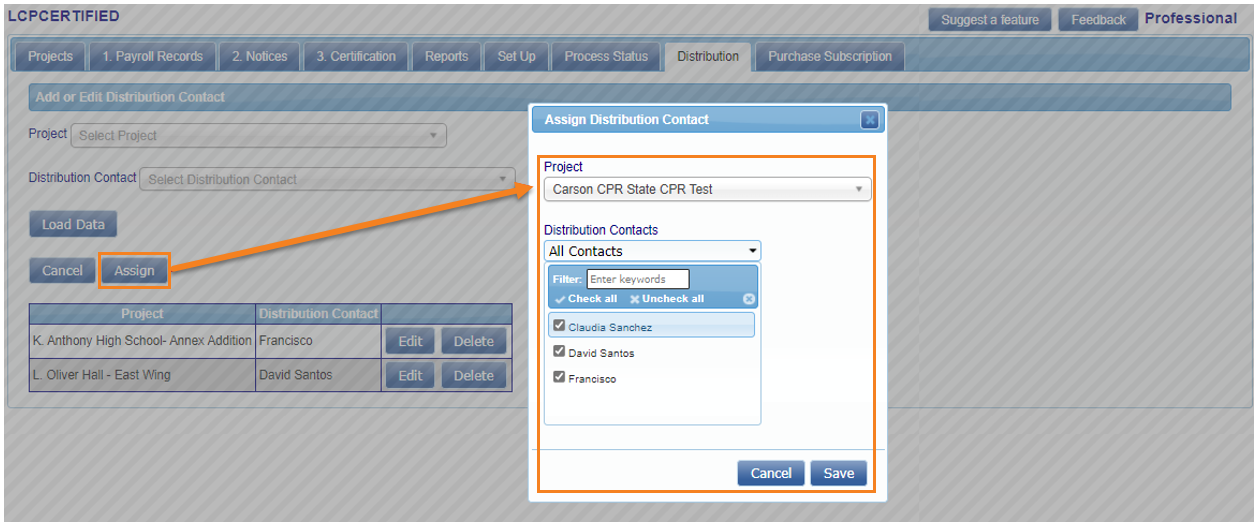
Sending CPRs to a Distribution Contact
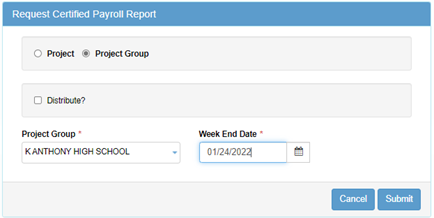
To send a created CPR to a Distribution Contact, go to the 3. Certification tab and select Request Certified Payroll Report.
Select a Project or Project Group to send the CPRs to, however CPRs will only be sent on projects that have distribution contacts assigned to them.
Select the Distribute? option to send CPRs, then select the project/project group you’re requesting.
Select the week end date/week date range you’d like to retrieve and click Submit.
1. PAYROLL RECORDS
The Payroll Record screen provides access to the payroll entry, editing and uploading process.
Manual Record Entry
Now that the Project(s) and employee roster have been setup, there is an option to enter payroll records manually. It is suggested that even those that choose to upload records know how to manually enter a payroll record.
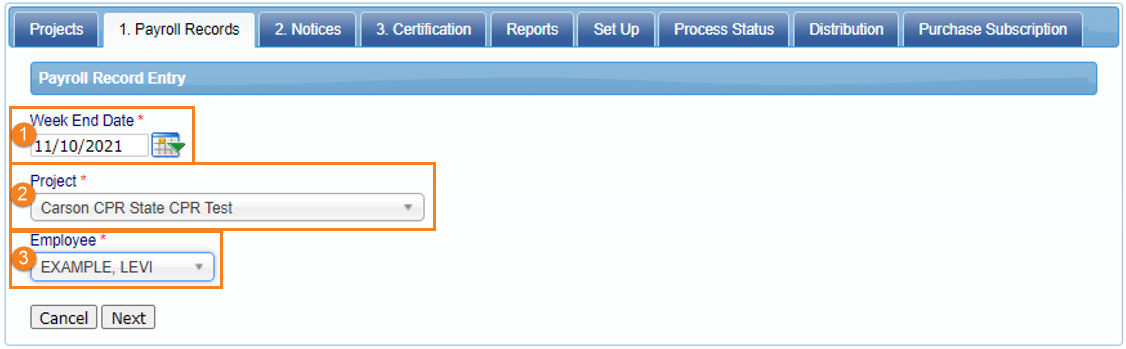
To manually create a payroll record, select ‘Enter Records’ and enter:
- Select the week end date using the calendar icon, or type the date in formatted as MM/DD/YYYY.
- Select your Project from the drop down.
- Select an Employee from the drop down.
Week end date examples:
- Monday through Sunday = Sundays are your week end date.
- Tuesday through Monday = Mondays are your week end date.
- Wednesday through Tuesday = Tuesdays are your week end date.
- Thursday through Wednesday = Wednesdays are your week end date.
- Friday through Thursday = Thursdays are your week end date.
- Saturday through Friday = Fridays are your week end date.
- Sunday through Saturday = Saturdays are your week end date.
Be aware that the week end date cannot be edited past this page/step.
When entering payroll manually, this screen is used to enter payroll records one at a time.
Each section and field of the Payroll Record Entry Form is explained below.
- Hours Worked Each Day: should ONLY be the hours physically worked on the project for this week, this does not accumulate.
- In the ‘Hours Worked Each Day’ enter the number of Regular Time (Straight-time), ‘Overtime’ and ‘Double-Time’ hours worked each day for the payroll period.
- Gross Employee Pay this Project should be equal to the hourly rate fields x the hours posted on this payroll record. This amount does NOT include fringes. It is usually the amount that is provided by your payroll system. Only Overtime Hourly and Doubletime hourly rates need to be entered if those types of hours were worked; if not, they can be left at 0.
- Wages Paid in Lieu of Fringes should be equal to the Rate in Lieu of Fringes x the hours posted on this payroll record. Wages Paid in Lieu of Fringes are those amounts paid to the employee when no fringe benefits are paid or when the fringe benefits paid are insufficient to meet the required total hour rate of pay.

Enter the appropriate amount for each of the categories in this section. If there is no data for a box, leave it blank (or enter zeros).
Noted below in red, is an example of what the hourly values would equal (total fringe amount divided by hours on payroll record).
The More… links below the Vac/Hold/Dues and Pension explains additional detail on each.
Vacation / Holiday Directions
Entering of information for Vacation and Holiday pay may cause some confusion. The following is a more detailed explanation of the entering of Vacation and Holiday pay.
Case 1
Vacation and Holiday is paid to the employee as additional wages. Enter the paycheck gross amount as part of the Gross Employee Pay This Project. Enter $0.00 in the fringe benefit area and check the Vac/Hol/Dues in Gross Emp. Pay box.
This would be what is considered the employees Hourly Rate of Pay. It is being paid as part of the wages and would be factored as part of overtime/double-time factoring if hours worked. The hourly rates x the hours posted would equal the Gross Pay This Project field.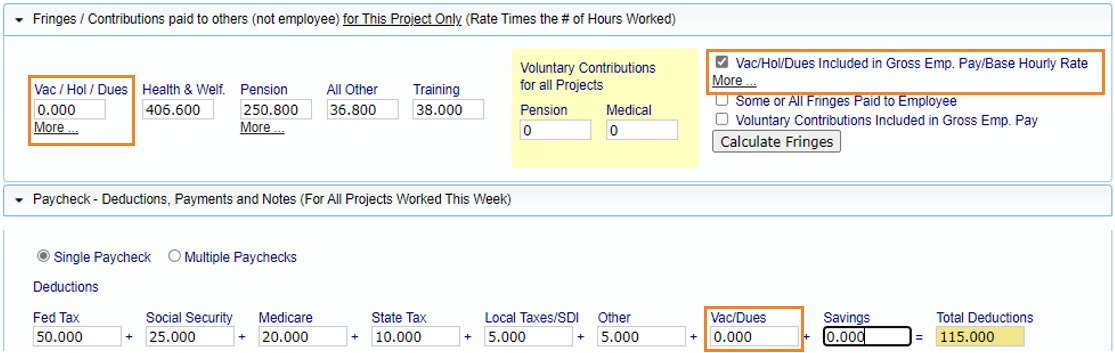
Case 2
Vacation and Holiday is included in the paycheck to calculate taxes but is paid to another fund (union) and thus deducted from the paycheck.
Enter the paycheck gross amount as part of the Gross Employee Pay This Project. Enter the dollar value in the fringe benefit area and check the box that says Vac/Hol/Dues Included in Gross Emp. Pay.
In this scenario the deduction would also show in the Deductions, Payments and Notes (taxes) section under the Vac/Dues field.
Case 3
Vacation and Holiday is not included in the paycheck.
The Vacation and Holiday is only paid to a fund and taxes are assessed when paid.
Enter the amount of the Vac/Hol in the field. Check the ‘Vac/Hol/Dues Included in Gross Emp. Pay’ box. It would only be part of the ‘Gross Pay This Project’ if the employee takes the vacation and is being paid for it.
If showing the Fringe value, however it is not sent to any fund (union) or assessed taxes until it is taken.
Case 4
Vacation and Holiday is accrued, and taxes are assessed when paid. Enter the amount of the Vac/Hol/Dues in the field. This approach may not be accepted by some agencies.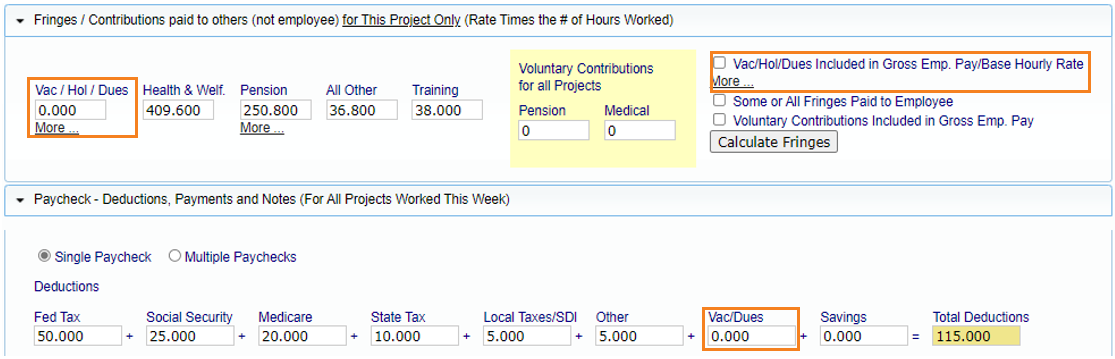
Voluntary Pension and Medical Contributions
Voluntary Pension and Medical Contributions are additional payments to an approved pension and/or health care funds that the employee elects to take out of his/her Gross Employee Pay this period before taxes.
These voluntary contribution amounts are part of the Gross Employee Pay this period, but some payroll systems do not show this. Most agencies wish to only know the dollar values for the project on the CPR report.
If the accounting system does not include these amounts in the Gross Employee Pay, and it figures the hourly rate amount and multiply by the hours on the payroll record, enter those total values in the appropriate fields.
Do not include it as part of the health & welfare and pension payments made on the employee’s behalf (fringe benefits a company pays into an entity/union that benefits the employee).
Deductions, Payments and Notes
Enter all fields based on the paycheck information, regardless of hours worked on other projects.
Most agencies require that any other deductions have an explanation listed in Other Deduction Notes for LCPcertified to save the payroll record, this is not a required field in LCPcertified.
The user can save the record without the notes. If there is a recurring ‘other’ deduction (garnishment/child support, etc.), for an employee this can be edited in the employee setup. There, it can be added in the ‘Other Deduction Section’, and it will populate each time a payroll record for the specific employee is created.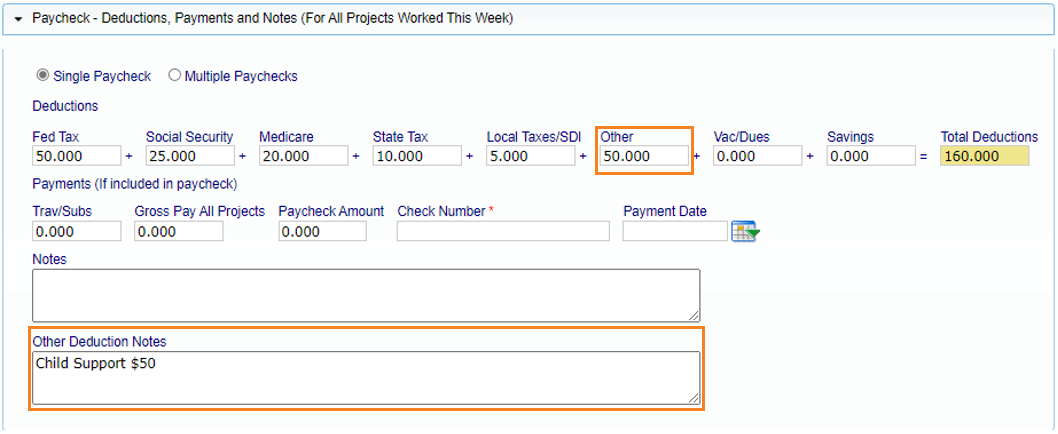
When the Payroll Record is saved, the system will alert the user of any Notices on the current record.
NO may be chosen and the user will remain on the same payroll record to fix any notices before proceeding to the payroll record.
For work flow purposes it is easier to choose YES and enter the next record, continue the payroll record entry process until all records have been entered for the week. Then go into the NOTICES tab and check for any Notices/Warnings and resolve (see NOTICES section).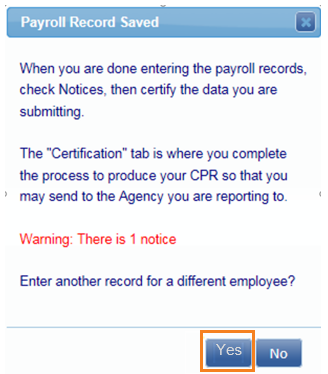
Copy a Previous Payroll
This feature is commonly used for those that manually enter payrolls.
*For those using an upload option, the previous week payroll can be copied, however the uploading abilities will include new check numbers and edits the payrolls will not need to be made to update the check number field.
Once at least one payroll has been certified, payroll can be copied. In 1. Payroll Records select Copy Previous Payroll.
Select the Project you wish to use and select the Payroll No/Week to be copied, then click Next.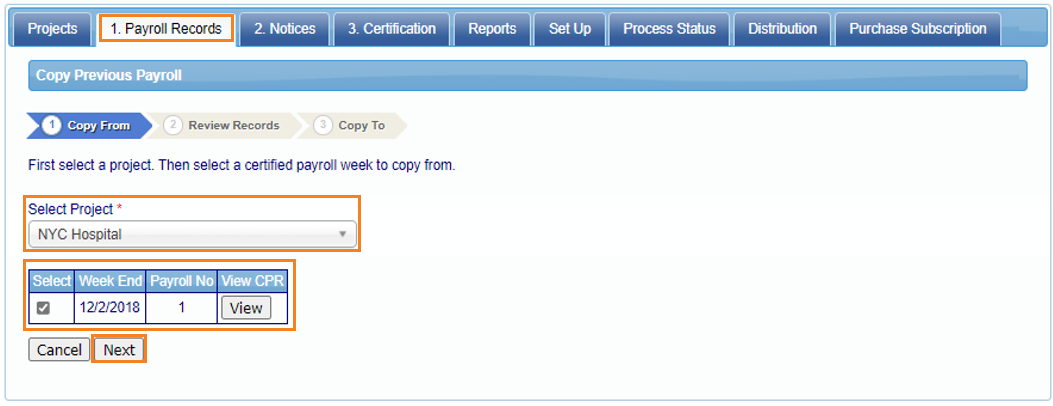
Review the records in the payroll to be copied, then select Next.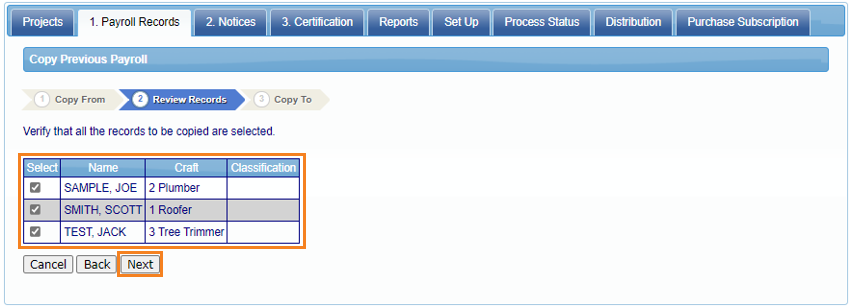
Select the week end date for the new payroll and select Save. There is a notice on this page stating that one check number needs to be added to this payroll to certify. The system will automatically direct to the Payroll Edit Page for this. 
In the ‘Edit Uncertified Payroll Records’ page, select ‘Edit’ for each employee, verify the information copied is correct and make edits as needed.
Under the Paycheck – Deductions, Payments and Notes (For all Projects Worked This Week) tab, enter the Check Number and click Save.

Editing Uncertified Payroll Records
To edit a payroll record that is not yet certified (pending record), select Edit Uncertified Payroll Records.
Select the Project to edit records for, in this section only uncertified entries will be listed. These entries may be edited or deleted. Select ‘Save’ after editing any record. 
Uploading Records
There are two basic methods for uploading data into LCPcertified Professional.
The first method is built-in integrations with numerous payroll and accounting software. See the Accounting Systems button in the Upload Record screen for current available accounting system formats, here is also where a request for a different accounting system can be requested.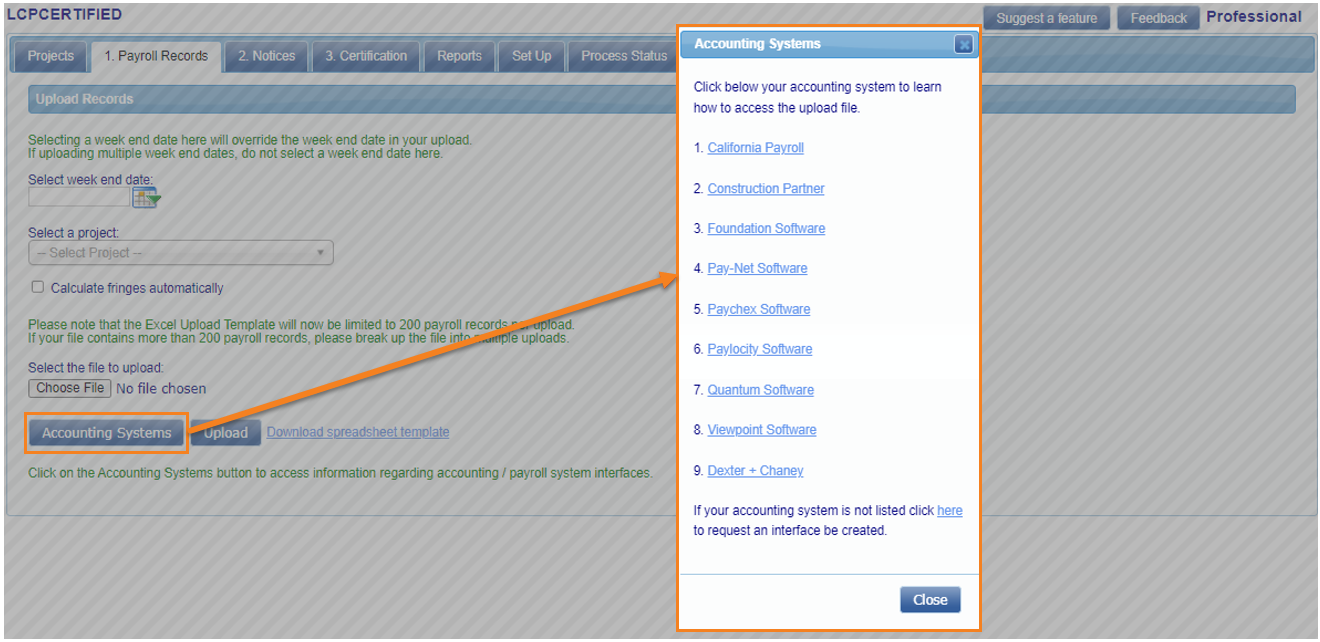
To submit a request for interface of a new Accounting System:
- Click the ‘here’ link,
- Fill in the information on the pop up and select Send.
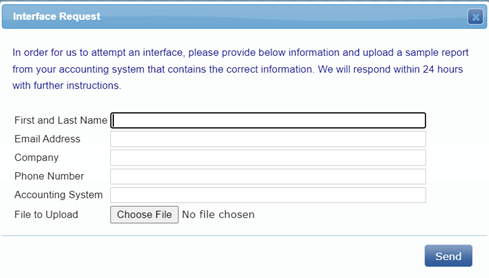
The system will confirm that the request has been sent to LCPcertified and a representative will contact you if more information is needed.
The second method is to use the standard interface defined by LCPcertified. This is an Excel spreadsheet template with specifically defined columns.
The Upload Records function is intended to provide for the uploading of payroll records from a spreadsheet. This can not only improve the speed of the upload, but the accuracy as well.
To find the excel template go to:
- The ‘Payroll Records’ tab.
- Select ‘Upload Records’.
- Select Download spreadsheet template, this will open the Excel spreadsheet for download.

Instructions to use the spreadsheet are included in the excel download. If further assistance is needed contact LCPcertified support.
Uploading Process
Go to Payroll Records navigation tab and choose Upload Records -
- Select the week end date (this can be left blank if uploading several weeks at once and the upload includes week end dates) and choose the project the upload is for (this can be left blank if uploaded for more than one project).
- Browse for file to upload; and
- Select Upload, as the file uploads, the data check validations checks will appear as they run (A, B & C).
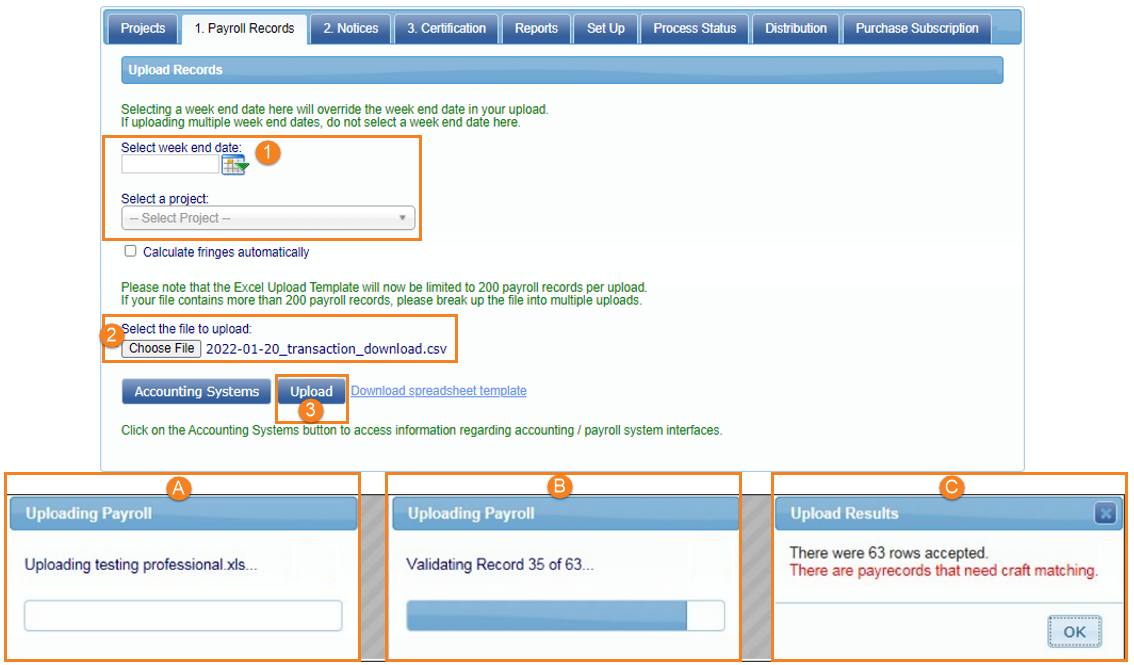
If there are any issues on the file, the system will trigger a pop-up message (example below). 
Craft Matching
The first time, or anytime a new employee is added, a craft match must be done. 
*This is for anyone in the State of California using the California State rates or those that entered their own Rate Sheet information under the Setup and applied that rate sheet to a project.
To complete craft matching:
- Go to 1. Payroll Records and select Edit Uncertified Payroll Records
- Select Craft Match in the pop up.
- Select the Craft and Classification in the dropdown.
- Click Save.

Once Craft Matched, subsequent uploads will auto-fill the selection.
For those that do not choose to enter a Rate Sheet to Craft Match to:
- It is optional to edit each record that was uploaded.
- If editing, enter the Craft /Classification manually.

Subsequent payrolls will automatically save what was entered and editing and adding the Craft and Classification for new employees or for new projects will only need to be done once.
2. Notices
Under the Notices navigation tab, based on data completeness or wage verification, payroll records will show up here if there are any discrepancies on those records.
The complete list of notices can be viewed: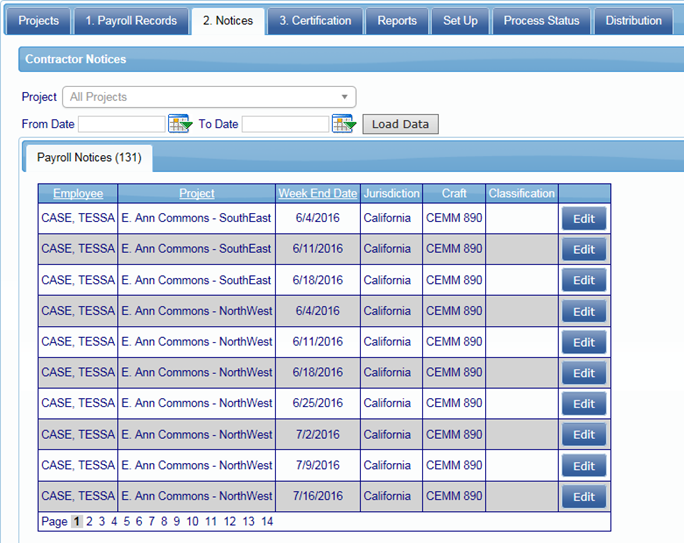
This can also be viewed by Project (select project and Load Data):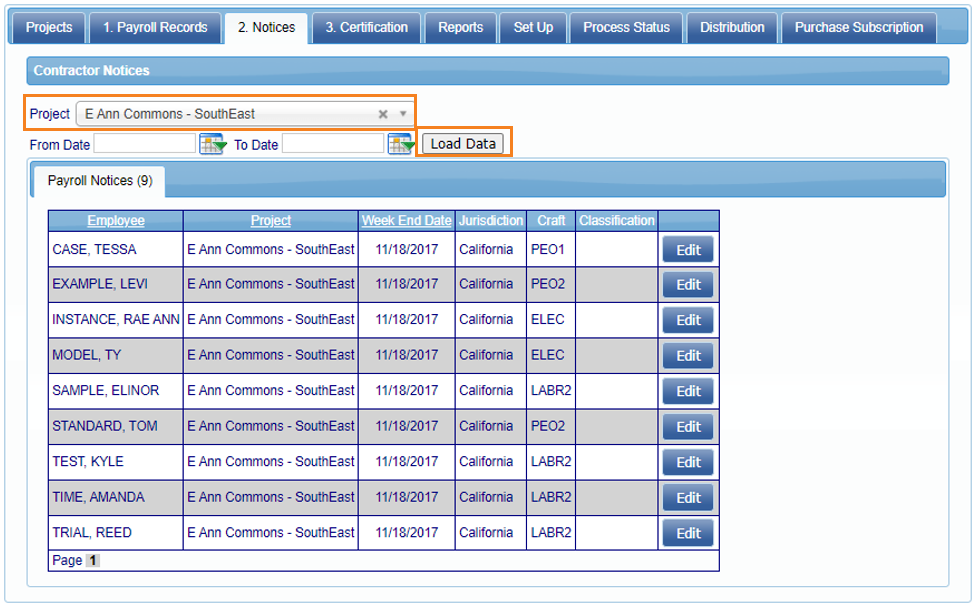
As discrepancies are resolved, they will fall off the notices tab.
3. Certification
Certify Payroll Records
In the ‘Certification’ tab, select the ‘Certify Payroll Records’ option.
Designate how to calculate the payroll number by:
- Using the Last Payroll to Calculate the Payroll Number – the payroll number will be sequential from the last payroll payroll number entered on the Project setup screen.
- Using the Start Date to Calculate the Payroll Number – the payroll number will be calculated using an equation based on distance from Start Date entered on the Project setup screen.

A Single Project or a group of Projects may be certified at the same time:
- When certifying a Single Project, multiple week end dates may be certified at one time:

- Or an entire project group can be certified at a time, but only one week end date may be certified using this method:

Note: Once one (1) week has been certified, simply choose the next week end date to certify and click Submit again. Keep repeating this process to certify multiple week end dates you may have entered for that project group.
- Fill in the rest of the required information and enter your E-Signature password.
- There is an option to add a ‘Signature Stamp’, this is optional (shown below):

- Once completed, select ‘Submit’.
After submitting, a numeric Process ID will be provided:
This can be referenced on the ‘Process Status’ tab to monitor the progression of the certifications.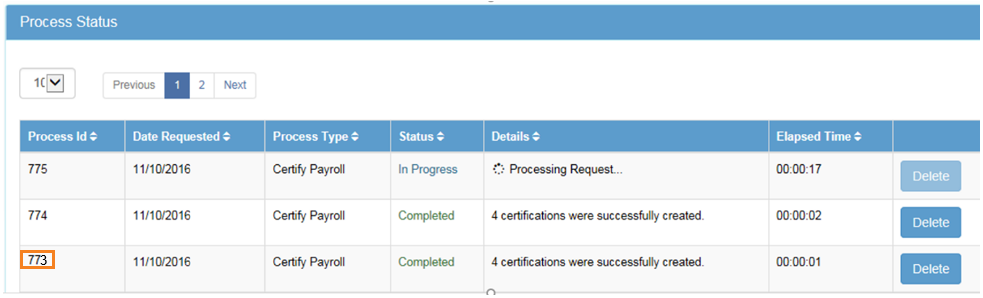
Non-Performances
Non-Performing reports are generated automatically when a project is included in the selection criteria for certification that does not have pending records in it.
Edit Certified Payroll Records
To edit any certified payrolls, go to the 3. Certification tab and select ‘Edit Certified Payroll Records’.
The CPRs can be filtered by the following options:
- Project Status.
- Project Name (manually).
- Week End Date (select on calendar/manually).
- Performing (yes/no).
- Pending Edits (yes/no).

Once the CPR needing changes is located, select Edit next to that record. Make the changes to the CPR and re-certify at the bottom of the page. 
Request Certified Payroll Report
A Certified Payroll Report can be ran, and this feature allows for multiple reports as one PDF. To run a report in the ‘3. Certification’ tab, select ‘Request Certified Payroll Report’.
CPR PDF filter options:
- Filter by Project (both of the following options allows information for closed projects to be run as well).
- A date range can be selected when running a report for a single project:

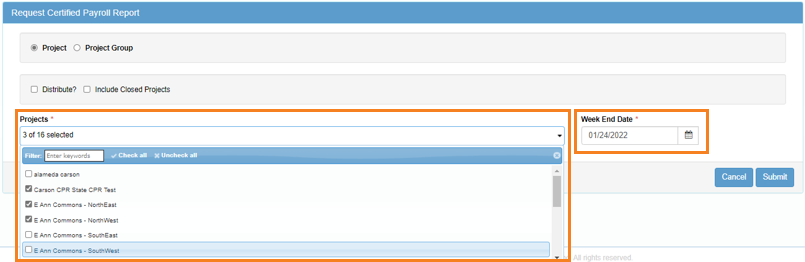
- Multiple projects can be selected, but only one week end date can be selected:
- A date range can be selected when running a report for a single project:
- Filter by Project Group:
- With this option, one or multiple project groups can be ran at once, both options will only allow one (1) week end date to pull:
- With this option, one or multiple project groups can be ran at once, both options will only allow one (1) week end date to pull:
Requesting any of these reports will produce a process ID that will display in the ‘Process Status’ tab.
Export Certified Payroll Report
To open an individual CPR report, go to the ‘3. Certifications’ tab and select the ‘Export Certified Payroll Report’ option.
The CPR can be filtered with the following options:
- Project Status.
- Project Name (manually).
- Week End Date (select on calendar/manually).
- Performing (yes/no).
- Export Type.

After selecting filters, select Export to generate the report.
Support
Should you need additional assistance please contact the LCPtracker support team:
- 714-669-0052 option 4, or
- Live Chat, or
- Support@LCPtracker.com
Please Note:
- This is intended as general information only and does not carry the force of legal opinion.
- Please consult your own legal and accounting advisors with any relevant questions.
- LCPtracker makes no express or implied guarantees.
- The Federal Register, the relevant State rules, and the Code of Federal Regulations remain the official source for regulatory information.
Was this article helpful?
That’s Great!
Thank you for your feedback
Sorry! We couldn't be helpful
Thank you for your feedback
Feedback sent
We appreciate your effort and will try to fix the article