Here at LCPtracker (Labor Compliance Program Tracker), we are aware that using a prevailing wage software may be a new undertaking for many Awarding Bodies/Agencies as well as Prime Contractors and Subcontractors. We have designed this guide to explain what LCPtracker is used for, how to setup your database, and how to start using the software. The setup within LCPtracker is typically handled by an Awarding Body/Agency or a Prime Contractor. Throughout this guide we will reference the “Admin” as the entity that works with LCPtracker to configure the database settings and manages the database going forward after initial setup. (It is understood that a Prime Contractor may also be an “Admin”.)
LCPtracker has been in business since 2001, and we are constantly changing to better suit your labor compliance needs. LCPtracker is used by over 500 clients, including Government Agencies and Prime Contractors.
LCPtracker is an online, cloud-based software company that provides users with the proper tools to easily ensure that each contractor is meeting prevailing wage guidelines as well as to easily create the detailed reports that can be required by agencies like the United States Army Corp of Engineers (USACE) or the Federal Highway Administration (FHWA).
Whether it is Davis-Bacon laws that are set by the United States Department of Labor (USDOL), California prevailing wages set by the Department of Industrial Relations (DIR), or any other labor laws set by a specific state or local government agency, LCPtracker makes it easy to guarantee that every Contractor is compliant.
How Does LCPtracker Work?
The LCPtracker service is a paperless, online system of entering Certified Payroll Reports (CPRs). Payroll data may be entered directly into the system or uploaded from major construction accounting systems or payroll programs. This service eliminates the need for Contractors to submit paper documents and forms while providing an online database that stores all CPRs.
All contract-specific wage rates, fringe rates and worker crafts/classifications are online within the system, and Contractors may then select craft/classifications from a drop-down menu. Potential errors in wage rates or work classification entries are flagged to Contractors preemptively, allowing them to correct data prior to submittal. (This is contingent on how you as the Agency/Admin set up your database specific validations.) Once the Contractor submits their CPR, an electronic version will be available, and you as the Admin will have access to a multitude of Workforce reports using the data submitted by the Contractor/Subcontractor.
Once you have purchased the LCPtracker software, an Implementation Project Manager or Account Manager will work with your team to assist you with setting up the database to handle your specific requirements. This guide is designed to provide both an instruction manual and a reference manual for the use of the LCPtracker database system.
LCPtracker recommends administrators practice Least Privileges which is a foundational principle in computer security that advocates for restricting users, applications, and processes to only the bare minimum permissions necessary to perform their tasks. This approach aims to minimize the potential impact of security breaches by limiting access to sensitive resources and functionalities. By adhering to the principle of least privilege, organizations can reduce the risk of unauthorized access, data leaks, and malicious activities. Essentially, it means granting individuals or systems access rights based solely on their essential functions, thereby mitigating the potential damage that could result from misuse or exploitation of unnecessary privileges. This principle promotes a proactive security posture, emphasizing the importance of thoughtful access control measures to safeguard digital assets and infrastructure.
Login Process
Access to LCPtracker will be granted to the main contact provided when purchasing the software. This user will be sent an email letting them know they can now access LCPtracker with their username and temporary password provided in the email. The Agency/Admin will then be able to add additional users and the appropriate roles for database access. The following URL: www.lcptracker.net is how the Agency/Admin, as well as Contractors, will access LCPtracker once access is granted.
When accessing LCPtracker, the preferred web browsers for best results are Microsoft® Edge, Google Chrome, Firefox, or Opera

Microsoft® Internet Explorer is no longer a supported internet browser.
Adobe® PDF reader should also be installed on your computer. Depending on your settings, pop-ups may be blocked. It is our recommendation to add https://prod.lcptracker.net/ to your safe/exceptions list.
After logging in to www.lcptracker.net, enter your User ID and Password, then click “Sign In”. Please ensure that you do not share your password with anyone including LCPtracker when accessing our support team.

Note: if you should forget your password, the system gives you five (5) attempts before you are locked out for thirty minutes. Please click “Forgot Password?” BEFORE the 5th login attempt.
Forgot Password
If you have forgotten what your password is, you can reset your password very quickly. On the login screen, click on “Forgot Password?”. You will need to enter your User ID and email address and then click “Submit”.

Once you have submitted this form, you will receive a system generated email. Within the email, you can click on the link to direct you to the reset password page, or you may copy/paste the link into your browser.
After you have clicked on the link you will be asked to type in your new password twice and then save password.
Password Rules: Must be at least six (6) characters long and contain at least one lowercase letter and one uppercase letter.
It is our recommendation that you extend your password length to at least eight (8) characters long and include the above requirement as well as a number and one special character.
Now that you have reset your password, you can go back to the LCPtracker login screen and log in with your new password.
Announcement Page
An announcement page may appear once you have logged into LCPtracker. This is used to notify system Users of scheduled maintenance or to announce a new feature within the system.
Once you have read the notice, click Ok and proceed to your CPR entry.

Contract Compliance Hyperlink
For those that are LCPtracker and B2GNow users, the Contract Compliance hyperlink will automatically take you to the B2GNow login, as long as such has been defined.
Only if applicable, some users will see this hyperlink at the top of their LCPtracker screen, upon logging in.

Contacting LCPtracker Support
Once you have logged into LCPtracker, the navigation menu bar at the top of the screen will assist you with contacting our support team.

There are three (3) ways to contact the LCPtracker Support team, Monday through Friday, from 5:00 am PST until 5:30pm PST:
- Phone: 714-669-0052 option 4; or
- Email: Support@LCPtracker.com; or
- Live Chat
The Co-Browse button is a feature that can be activated by you and a Support team member with a code to allow our team to see your screen. During a Co-Browse session, our team will only be able to see the LCPtracker Webpage and are unable to see personally identifiable information (PII) contained within LCPtracker.
If you prefer to call in, instead of waiting on hold, you are now able to leave your number and one of our Support team members will call you back.
When sending an email or chat, we ask that you include the following information to allow us to better assist you.
- Your Company Name
- Your User ID
- Your Name and Phone Number
- What the Issue is – please be a specific as possible so we can re-create the issue
Training Materials/Training Classes
Complete and full training support is offered directly to Administrators and Contractors by LCPtracker for any technical questions on the use of the software.
Users may access the various options for training after receiving a User ID and password. Training documents are available within our “Training Materials” button on the home page or additional trainings can be accessed through the “Projects” tab by clicking on “Watch Now”.


When clicking on the “Watch Now” button, select the Administrator “Watch Now” button. You will then click on the “Watch Now” button and can do the On-Demand Training which are available Anytime, Anywhere!
An Admin has multiple trainings resources they can access. These On-Demand trainings include; Admin Overview Training, Admin Reports Training, Admin Wage Data Training, and the Prime Approver Training, should you have this module turned on and require this training.

Set Up
The “Set Up” navigation tab provides access to the various account setup functions that are available. Depending on the assigned Admin User Role you have, this will define the capabilities and security rights available to you. For more information on the various Admin user roles, see Administrator Logins under Training Materials.
Please note, in order to address security concerns, LCPtracker does not allow the use of the following five characters: < (less than), > (greater than), ‘ (apostrophe), “ (quotation mark) and = (equal sign).”
Navigate to the “Set Up” tab.

Each of the following activities will be explained in the proceeding pages.

Note: depending on the access provided by the database Administrator, you may not have all the above listed buttons available to you.
Some accounts within the State of California will have an Override Wage Data link (not shown) and may not see the Prevailing Wage Setup link (shown above in Full Admin view).
Add/Edit Projects
When adding a new project, the fields flagged with a red asterisk are required before the entry can be saved. All other fields are optional. Once you have completed your entry, click “Save”.
To edit your project information, choose the project from the drop-down menu, edit the information, and click “Save”. After the initial project setup, you will not be able to change the “Budget” amount. To do so, email support@lcptracker.com and they will be able to assist you with your written request.
If you are using B2GNow to sync your projects over to LCPtracker, please reference the B2G Sync Instructions guide under training materials which explains the steps you need to take.
Note: when syncing over from B2Gnow, it is imperative that after you have synced over your project, the Project Code field should NEVER get modified.
Tips:
- Double click the center of any blue section to expand all sections.
- Double click again to collapse all sections.
- Single click to open/close each section separately.

The Agency/Admin would complete the project setup by navigating through the required fields below highlighted in yellow.
The green highlighted field is a requirement for projects located within the state of California ONLY and requires checks against CA state prevailing wages.


The following information will explain the required fields highlighted above.
- Project Name – This field identifies the project that is being entered. You may choose to repeat the project code in front of the project name if your contractors identify the project more by the code.
- Project Code – This field should be a unique identified code for each project. The project list will sort by the project code. Please note when using B2Gnow that the project code cannot be modified after the project sync.
- Department – This is a feature that can be used if you have various types of projects. The LCPtracker Implementation Project Manager or Account Manager will help explain the benefit to utilizing different departments.
- Budget – The awarded contract amount should be entered in this budget field. If you made a mistake during your entry, you would need to reach out to support@lcptracker.com and include the following:
- Project Name
- Current dollar amount listed in Budget field for the above noted project
- The new dollar amount requested for the above noted project
- Reason for this requested change
- Jurisdiction – The jurisdiction is typically setup to be equivalent to the type of funding for your project. If you have a new type of project with different funding, i.e., state prevailing vs federal prevailing, you will need to fill out the Jurisdiction/Location Request Form located within the Training Materials to have a new one entered.
- Jurisdiction: Dual/Multiple Funded Projects
Selecting two or more Jurisdictions will prompt the "Default Jurisdiction to Show First on CPRs" box. You can choose which jurisdiction craft/classification is listed first on your certified payroll reports.
- Jurisdiction: Dual/Multiple Funded Projects

- Location – The location will typically be the county where the work will be performed. For California projects, the locations will already be pre-loaded. Any other locations will need to be requested by filling out the Jurisdiction/Location Request Form located within the Training Materials.
- Prevailing Wage Lock-in Date – This date is sometimes referred to as the Bid Advertisement Date or the Bid Opening Date. The date entered here is what date locked the wages into your particular project.
- Bid Advertisement Date – Some accounts located within the state of California may require this field be entered and other date fields.
- Project Contact section – This section requires name, phone number and email address of the Labor Compliance/Prevailing Wage Administrator. It may also be the Prime Approver if using that functionality. The information entered here will be visible to the Contractor on their landing page.
The remainder of the project setup screen allows you to set a variety of goals for each individual project. Apprentices, Minorities, Women, etc. There is also the ability to assign Wards, Districts, Community areas or Disadvantage for projects with these goal settings. These fields are not required to save the Project Setup and may be left blank if you so choose.
Once you have confirmed that all the data entered is correct, click the Save button to record your data input. Our system always allows you to go back and edit the data as needed except as noted above.
After you have saved your project, depending on your contract terms, you may see that your project status is set to “Suspended”. To activate your project, go to the projects tab and click on “Pay Now” to initiate the invoice. Once you have clicked on the box for your project you want to activate, you should be able to create the invoice then click the x button to take you back to your projects page. Your project should now show active. If you have problems, please reach out to support@lcptracker.com for assistance.
Contractor/Subcontractor Setup
The contractor/subcontractor setup process has two steps.
- The first step is to setup the contractor if they do not already exist.***
- The second step is to assign the contractor to the project(s).

Step 1: Contractor Setup > Add/Edit Subcontractors
The Add/Edit Contractor screen allows the Agency/Admin to enter a contractor that will be working on their project(s) and submitting certified payroll records (CPRs) for review. 
*** Before adding your contractor, ask if they are a current user.
- If so, ask them for their exact User ID that they currently use to log into the LCPtracker system. This is to prevent them from having to use multiple user IDs for different accounts.
- If not, continue with entering their contractor license, or ten-digit phone number.
You will still move forward with setting up this company as a “new” account under the database you are working in. Enter their current User ID in the “Contractor License No. or 10-digit Phone Number” field. The system will then automatically link their accounts for them.
Note: the field labeled “Contractor License No. or 10-digit Phone Number” becomes the end users User ID.

To add a contractor, enter the name, and all the relevant information as required during the database setup. The fields marked with a red asterisk will be required before saving a contractor entry.
To edit a contractor, select the Contractor name from the drop down. Generally, the administrator only enters the prime contractor information, and the prime contractor enters their subcontractors, and the subcontractors enter their lower tiered subs, etc.
We have highlighted the minimal fields to save the contractor setup although additional fields can be set as a requirement. An LCPtracker Implementation Project Manager or Account Manager goes through a series of questions to set these requirements when a new database is created for a client.

The Contact E-mail field information should be the contractor’s main user of LCPtracker. It is important that this entry is correct, prior to saving, as LCPtracker is designed to communicate with system users through this email address. This should be the person responsible for handling certified payrolls for that contractor.
The following fields that have the red asterisk are already fulfilled with the entry made and do not need to be changed unless the specific situation requires an override. Please contact your LCPtracker Implementation Project Manager or Account Manager before making changes.

The Standard Hours per Day field provides an override value for that contractor only to the hours set in the prevailing wage table. For example, the prevailing wage table says that 8 hours per day is the standard workday, but a contractor has been approved 10 hours per day /agreement. The “Standard Hours per Day” field could be set to 10.

Notice enforcement is a setting that only Administrators can make that overrides the settings made in the Set UP under Validation settings. Please contact your LCPtracker Implementation Project Manager or Account Manager before changing this setting as this will have an effect on how the system runs the validations.

Administrator Settings for Owner/Operator

Owner operators are treated in various ways in LCPtracker –
- They are required to report as subcontractors and report weekly payroll dollars and hours worked;
- They are treated as special employees and must report weekly payroll dollars and hours worked;
- They are required to report as subcontractors but report only hours worked;
- They are treated as special employees but report only hours worked;
- They are required to report as subcontractors but report only payroll dollars for project;
- They are treated as special employees but report only payroll dollars for project;
- They are treated as employee and will not be required to report wages or hours;
- They are required to report as subcontractors but submit a blank payroll record; or
- They are treated as special employees but submit a blank payroll record.
Administrators can set which combination of reporting above they want to do. The Agency/Admin will set their requirement at the department settings page.
The business certifications section is a way to collect if the contractor has a business certification such as DBE, LBE, WBE, MWBE, etc., as well as the certifying agency where the contractor acquired the certificate.

The drop-down list available for certifications and certifying agencies is configurable by the database Admin under Setup.
If business certifications are set as a required field, even if the contractor does NOT have a business certification, you will still be required to select None and Not Available and click “Add Certification”.

This information entered will be displayed on the Contractor Report.
Once you have completed your entry, click Save.

You will receive a pop-up telling you “Contractor has been sent an email notifying them. Don’t forget to assign this Contractor to project”. You will now move to step 2 of the contractor setup.
LCPtracker will automatically email the subcontractor their User ID and Temporary Password.

Step 2: Contractor Setup > Contractor Assignment
The contractor cannot see the project until assigned. Under the Set Up navigation tab, choose Contractor Setup then Contractor Assignment. 
The next step after you have setup your contractors/subcontractors in the system is to assign them to the project(s).

You will start by assigning your prime contractor to the project. To do this, first select the department and project. Once you have entered that, you will see the project in the lower left side of your screen.
Hover over the project and you will see a green + sign. Click the + and a new entry page will appear to the right.
Select the Contractor you wish to assign as the Prime. The Contract ID field will be a mandatory field to complete.

You may see additional fields that have a red asterisk. These fields will be required to complete before you can save your entry. You may choose to enter information in the fields even if they are not required.

Once you have completed your entry, click on Save.
After you have completed your entry, you will now see the Prime listed under your project. 
Repeat this step for all the subcontractors and lower tiered subcontractors that will be working on the project.
Select a department – Select the department that is assigned to the project.
Select a project – You need to choose the project that you are assigning your Contractor/Subcontractor to.
Assign Contractor using + or x - Click on the + to add a subcontractor or x to delete an assignment.
Contractor to be assigned – Choose the Subcontractor you need to assign to the project as your subcontractor. This is usually the subcontractor you just set up in the system. Some, however, are already in the system and you just need to assign them to the project as your subcontractor.
Contract ID – The Contract ID is the contract number between you and the subcontractor. This field will help the subcontractor identify the contract to enter payrolls for if that contractor has multiple accounts under one project. If you do not have a Contract ID or numbering system, you will still need to assign a contract ID for each subcontractor. The number does not need to be unique unless the same subcontractor has two or more contracts within the same project.
Responsibility Code – Optional field, some Admins will require this information. Typically used with an USACE project.
Contract Amount – Optional field, some Admins may want this information. This is the amount of the contract between you and your subcontractor.
Start Date – The date that your subcontractor is starting work on the project. This field can be changed after the initial save has been done. The Late CPR Summary report utilizes this field for later CPR reporting.
End Date – Optional field, some Admins may want this information.
Notes – Optional field, some Admins may want this information, or you may choose to add your own notes.
After you have entered all required information, be sure to click Save. Your subcontractor will now be sent a second email informing them they have been assigned to a project.

You will see the saved contractor assignment listed in the Contractor Assignment Setup screen.

Department Settings
Using the Department feature is a way to group your projects. You could group by Organization Departments (example - Parks & Recreation; Public Works, etc.), Funding Sources (City, State, Federal, Private, etc.), Project Managers, etc. Each Department can set Validations and Department Settings differently.
Your Implementation Project Manager or Account Manager with LCPtracker would be able to explain this more during the original database configuration meeting when the account was originally set up. For those that are new or are creating a new department on your own, while some fields are self-explanatory, we will go through them here. It is highly suggested you do not make any changes without first consulting LCPtracker.
Add/Edit Departments
First, you create Department(s) under the Set Up navigation tab and click the Add/Edit Departments.

You will see the Default Department that is in the system. You should NEVER edit/delete the Default Department; you may use this as a department if you wish or create your own and use them, ignoring this default.
When creating Departments, the name (what you want to name your department), contact name and email address are required fields to save and create a department.

If you have already setup your default department or another department name for a previous type of project, it is recommended to use the “Clone” button to copy over the settings which will save you time with your setup.
Department Settings
Department settings can be set differently per department. These settings where carefully considered when you originally set up the database account. We will walk through the setup information, but it is our recommendation to first consult with LCPtracker before making any changes to your settings.


When first setting up a database, the following default settings will show. An LCPtracker Implementation Project Manager or Account Manager will go through a series of questions to determine the changes that will be made to your Department Settings based on your needs.
Note: the following screen shots are the default settings and should ALWAYS be updated for each individual department.

When accessing Department Settings, the default Department will show “Default Settings“. It is important to ALWAYS change this selection to an actual department name before making any changes even if you decide to only use “Default Department”.

The “Select the logo to upload” section is only visible to an LCPtracker Implementation Project Manager or Account Manager. If needed, this allows you to add a different logo that you want displayed on the certified payroll reports (CPRs). You may create a separate database for a joint venture and want to use the logo that is different than the logo uploaded to the database.

Following is an explanation for each of the items listed within the Top Section of the Department Settings.
If the box is Checked = Yes/On and un-checked = No/Off.
E-mail Certification Rejection Notices? – Do you want the system to send an email to subcontractors when you reject CPRs?
Enforce eDocument Requirements? – Under the Set Up navigation tab, you have the Add/Edit eDocument Types. The Types of documents you wish end users to upload into the system.
Send Primes E-Mail Notices? – If you want your Primes to receive system generated emails when rejecting a subcontractor’s CPRs.
Require eSignature on HUD Additional Data Entry Submittals – For HUD (Housing and Urban Development) projects / Departments. If you wish to require an eSignature from a subcontractor when submitting Additional Data Entry.
Require Start Dates on Contractor Assignments? – Adds a red asterisk (required field) to the contractor/subcontractor start date field when assigning them to a project. This field is used with the Late CPR Summary report to help identify late CPRs.
Require Responsibility Code on Contractor Assignments – Created and used by those specifically working on projects for USACE (United States Army Corps of Engineers). System will require the Responsibility Code when assigning subcontractors to projects.
Require Contract ID on Contractor Assignments – The Contract ID is the contract number between you and the subcontractor. This helps the contractor identify which contract to enter payrolls for when there are multiple contracts on the same project.
Require Contract Amount on Contractor Assignments – Ability to collect the contract amount for each contractor/subcontractor assigned to the project. Checking the box will make this a required entry.
Require Payroll Payment Date – If checked, contractors will be required to enter the payroll payment date for the CPR they are saving and certifying.
Do not allow CPR Export until Prime Approver accepts CPR – This feature is only available if the Prime Approver module is turned on. This is typically used only in California. Having this checked will require the Prime Approver to approve the CPR before the contractor can export the data for their upload requirement to the DIR (if applicable).
Do not allow CPR Export until Administrator accepts CPR – This feature is typically used in California. Having this checked will require the Admin/Agency to accept the CPR before the contractor can export the data for their upload requirement to the DIR (if applicable).
Prevailing Wage Lock-In (do not allow project wage data changes) – This setting is not shown in all databases. Only available if the Admin wants to turn on the functionality to lock wages after assigning them to the project. This will prevent anyone other than a full admin from making changes.
Do not allow CPR edit after status changed to ACCEPTED – Once a CPR has been certified and the Agency/Admin has changed the status to “Accepted”, the contractor no longer has the ability to make any changes. They will need to reach out to the Agency/Admin and request to have the CPR status changed to “Permit Edit” to allow changes.
Enable Subcontractor Certification Acknowledgement – This turns on an additional step for all lower tiered subcontractors (not required of prime contractors). They will be asked “Did your company employ Subcontractors on the project this week?” Yes or No. This information will then be available to the Agency/Admin using the Subcontractor Acknowledgement Report.

Disable the Payroll Calculate Fringes Feature for Contractors (When using this setting, LCP recommends using the “Default” Fringe Display Format for CPRs below) – This feature is not widely used. Please speak with an LCPtracker Implementation Project Manager or Account Manager before turning on. Typically, only used when not all fringe boxes are able to be counted towards meeting the total prevailing wage rate.
Use Issue Dates for Prevailing Wage Look Ups? – Will force the system to look at the most recent issue date PRIOR to the week-end date of the CPR. It is recommended to ALWAYS have this box checked to be turned on.
Use Expiration Dates in Prevailing Wage Look Up (Change only if recommended) – This may not show in your database as it is not turned on for all databases. If available, this looks at the expiration date for prevailing wages and does not allow a contractor to select Do you want the system to send an email to subcontractors when you reject CPRs?
Wage Rates Referred to in Local Data List (Change only if recommended. Changing without consulting with LCPtracker could disable your access to wage rates data) – Created specifically for accounts that have wages maintained at the master level typically by the LCPtracker wage team. DO NOT MAKE CHANGES TO THIS SETTING WITHOUT CONSULTING WITH YOUR LCPTRACKER IMPLEMENTATION PROJECT MANAGER OR ACCOUNT MANAGER FIRST.
The following are settings regarding standard hours for your funding type, the Statement of Compliance required, Owner Operator settings and the number of days you allow a contractor to make changes to their CPR.

Standard Hours Per Day – This is the hours an employee can work in a day before double-time kicks in. If you do not have this rule, then 24 = null. See Validation 12b
Performing CPR Form Type – This selection will only appear if a custom CPR form type has been added to your database.
SOC Type – The standard Statement of Compliance (SOC) setting for this is “Fringe Payment Check Boxes” which is the standard WH347 SOC requiring that the contractor check either the 4a or 4b checkbox for how fringes were paid before the system will allow them to certify their payroll. Leaving this as Default will not allow the contractor to select. If your project requires a custom SOC, please contact your LCPtracker Implementation Project Manager or Account Manager.
Non-Perform SOC Type – The standard setting for this is “Fringe Payment Check Boxes” which is the standard WH347 SOC allowing the contractor to check either the 4a or 4b checkbox for how fringes were paid. For non-performing SOCs, the contractor can certify without checking one of the two checkboxes.
Does not allow for the contractor to select. Both boxes are automatically selected. 

Allows for the contractor to select.


CPR Edit Time – This is the amount of time you will allow the contractors to edit their CPRs if needed. If you are using the above feature, “Do not allow CPR edit after status changed to ACCEPTED”, the amount of time entered here may not apply once the Agency/Admin accepts the payroll.

Owner Operator Settings – The Agency/Admin can set this to what they require to be collected for an owner operator trucking company. The options are:
Health Percent – This was specifically created for one Agency. While the default number states 20; this is only ON if validation 28 is turned on. Please contact LCPtracker if you want more information.
Emp Std Hrs – This is the hours an employee can work in a day before overtime kicks in. If you do not have this rule, then 24 = null. See Validation 11b
Emp Week Hrs – This is the hours an employee can work in a week before overtime kicks in. Default is set to 40.
The following information will go through the Bottom Section of the Department settings.
This will be the information that appears on the CPRs when your subcontractors view/print. While you may collect specific information regarding the employees on the project, you can choose to only show some of that information on the CPR when they view/print. For example, you may require the full SSN be collected but only choose to show the last 4 digits on the CPR.
If you do not have the system set to require the pertinent information, then it will only show if the subcontractor happens to enter it. It is our recommendation to configure your database to collect more information than not enough in the event that you need to report on specific information at a later time.

** see below will give you more information regarding this setting.
The above section will NOT set the requirement but only be where you select what you want to show on the CPR.
Show hours worked on all projects – If an Agency/Admin requires the contractor to show hours worked all projects, this will be a manual entry by the contractor for hours worked all projects.

Show YTD accumulated sick pay hours – If the project is a Davis Bacon Act (DBA) project and has the requirement to adhere to Executive Order 13706, Paid Sick Leave, the Agency/Admin may turn on the following functionality. They would also need validation 66 turned on. This value would then show on the CPR as well as the Paid Sick Leave Accrual Report.

Show resident hours on CPR – If the Agency/Admin has one city they want to show city residence hours for, that city would get entered under Set Up >> Client Information >> enter the specified city. Once this feature is turned on, the CPR will show the hours for city and non-city residence based on the city entered for the employee address and the city entered within the client information page.
Note: this city cannot be changed by project. The city entered would be for the whole database.

Fringe Benefit Display examples are as follows:
Default

Minimal

Extended

Validation Settings
Validations are the mathematical and logical data checks that are performed on all the payroll data entered in LCPtracker system. Many checks are made on the payroll data when entered to ensure accurate data is captured correctly. The Validation Settings feature provides a way for the Administrator to control exactly what checks are made on payroll data, how this information is presented to the contractors, and how the Certification/Submittal process is controlled.
Only those administrators with FULL ADMIN rights can view or change Validation Settings. LCPtracker recommends giving very few people Full Admin rights.
This function is located under Set Up > Validation Settings. For any questions prior to making changes to your validations, please contact your LCPtracker Implementation Project Manager or Account Manager.
Validation settings may be set by Department and/or Jurisdiction. The Department feature is a way you can group by Organizational Department, Funding Source, Project Managers, etc. It is not mandatory to use Departments.
Limitations of Validation Checks in LCPtracker
In the following limited conditions, LCPtracker validation rules may not provide an accurate check of wages paid:
- When benefits are calculated as a percent of wages paid and overtime is worked;
- When benefits are calculated based on hours paid rather than hours worked, and overtime is worked;
- When overtime rate is not 1.5 times base rate of when double time rate is not 2.0 times base rate and overtime is worked.
Any other unusual or unique rules for calculating benefits and/or overtime may or may not be adequately checked by LCPtracker. If you have such unusual rules, please check with LCPtracker Staff to confirm LCPtracker’ s ability to check the rules.
Validation Controls
The Administrator can control four aspects of each validation. An explanation of how these controls work is presented below. Note: if a control setting is changed, then a payroll record that had an existing NOTICE or WARNING must be edited and saved so the new settings can be applied to the payroll record.

Perform Validation
YES/NO – controls if validation is done.
Notice / Warning
A NOTICE and ENFORCE indicates something is wrong based on the validation rules. Contractors will not be able to certify a report if this message occurs. An example of a NOTICE is when the Basic Hourly Rate paid is less than the pre-determined prevailing wage rate; which indicates a violation of prevailing wage.
A WARNING and ALERT indicates something may be wrong, but insufficient information is available to the program to determine further. However, contractors can certify the payroll under this setting. An example of a WARNING is when straight time is paid for Saturday work which, depending on the craft/classification, may or may not apply under this validation setting.
Note: Once the end users submit their CPR through system, Warnings will appear under the Administrators Violations Navigation Tab. For further information, see VIOLATIONS section of this manual.
Enforce / Alert / Hide / Discard
Enforce – Enforce will force notices to be cleared before certification.
Alert – Alert will only warn of the existence of notices when certifying and will be displayed to the admin user under the Violations Tab.
Hide – Hide will hide the warning or notice from the contractor and will not notify them when they enter/certify their payroll, but it will be displayed in administrator violations navigation tab; now the administrator is the first person to see the notice/warning generated.
Discard – Discard will only warn of the existence of notices/warnings when certifying and will NOT be displayed to the administrator under their Violations navigation tab. This option is very seldom used.
Most commonly used setting combinations - Yes /Notice/Enforce, Yes/Warning/Alert, or No
Validation Overrides/Exceptions
If you wish to allow a contractor, with special circumstances, to have a different setting on a certain validation check, you may create what is called a validation override.
To create overrides, click the ‘Add’ button in the top right. You will get a pop-up window to enter your information. Make the appropriate choices. First, start with the validation code you want to make the exception for. You will then continue with what change you want to make to the current setting for your specific contractor. To perform the validation, select Yes and to turn off the validation completely, select No. The Notice or Warning selection is the type of enforcement to run at time of Certification. Next, the Applicable For? is the contractor this override will be applicable to. Lastly, you can enter the display order to either show up top or move this to the bottom by selecting a high number. If you are using Departments, you will need to decide if you will Allow Jurisdiction/Departments to override.
Allow Jurisdiction/Department Overrides
If you leave the box checked, it will allow departments to set the validations as needed for their department. Depending on funding there may be different rules and requirements as to what validations are on/off or set as Notices or Warnings.
Prime Approver Validation Settings
If you have chosen to use the Prime Approver module for your database, you will see an additional column in your validation settings. A Full Admin can hide validations from a Prime Approver by selecting yes on the desired validation. Please note this is not a commonly used feature.

Validation Explanations
For a detailed explanation regarding each validation within LCPtracker, please reference the “Validation Settings” document under Training Materials >> Administrator Support Documents >> Validation Settings.

Client Information
The client information is typically the Main Administrator or Contact for the account/agency. This should be updated if you have an internal change. This data is used on standard reports such as the HUD 60002 in the system. Some of the information will be entered when the database has been created. It is our recommendation to ensure the full address is entered as the City is used with the Show resident hours on CPR functionality. The Org./Client Name entered will be what is showing as the database name. Once you have entered your organization data, click Save.

Prevailing Wage Setup
LCPtracker has been designed two different ways as it pertains to prevailing wages loaded in the system. The first way is strictly for the State of California prevailing wages, which are maintained by LCPtracker. The second way are for all other databases with local, state, and/or federal prevailing wages that are not using the State of California wage rates.
When a new database is created in LCPtracker, your Implementation Project Manager or Account Manager will setup your Jurisdiction, Location (County), and Construction Type based on the prevailing wages that will be assigned to your project. The client will need to submit a copy of the General Wage Decision, which modification number applicable and the issue/publication dates for the wages that will need to be entered. With the purchase of your database, typically the first four hours of wage entry by our Wage Data Team will be free of charge. If the wage determination is larger and requires more time than what is allocated in your contract, your LCPtracker Implementation Project Manager or Account Manager will discuss the options available to you.
While some Agencies may choose to pay LCPtracker for continued data entry of new or additional information, most Administrators take over the procedure. It is our recommendation if your project has state prevailing wages that update regularly, to speak with your account manager regarding a yearly cost proposal for wage maintenance.

Note: think of a Jurisdiction as the funding type and a way to tell the ‘backend’ what rates to look at when checking your subcontractors’ payrolls. If an Agency has both federal and state prevailing projects, you should then have two Jurisdictions created. The typical naming convention would be; State Prevailing Wages – Database Name and Federal Prevailing Wages – Database Name.
Some clients may have what are called “Dually Funded” projects. For these types of projects, the system must check against two sets of rules and two sets of wages, such as a USDOL (United States Department of Labor) wage determination and a State, City or Local wage determination. In these instances, both sets of wage determinations will need to be entered in LCPtracker.
The project would have two jurisdictions assigned and would require the Agency/Admin to pick which Jurisdiction to show first on the CPRs. 
Once the project is setup with the dual jurisdictions, the contractor would be required to pick a craft/classification from both jurisdictions.
Jurisdiction and Location are LCPtracker settings only. After your initial database setup, if you need an additional Jurisdiction and/or Location, please fill out the request form that is located under Training Materials >> Administrator Support Documents >> Jurisdiction/Location Request Form and send to support@lcptracker.com.
Creating a New Master
A typical Craft/Classification entry will contain a Base Hourly Rate, an Hourly Fringe Rate, Total Hourly Rate and Total Overtime Rate. In some cases, a Doubletime and Training rate will also be entered.
The first step is to check the Master that is in the system. To do this, go to Reports >> Special Reports >> run the Master Wage Data Report. You can compare what is in the system to what you need for a new wage decision or modification, etc., and note what needs to be updated when you create your new Master.


Copying Master to Master
To create a new wage data master, we have built a time saver method for this process. Please refer to the Wage Data Entry Guide located under Training Materials >> Administrator Support Documents >> Wage Data Entry Guide for step-by-step instructions.
Add/Edit/Copy/Delete Master Wage Data
Now, that you have copied from one master to another, you can go back and Add, Edit, Copy or Delete your Master Wage data if necessary. You will need to go back to your setup navigation tab and choose the Add/Edit Master Wage Data and pull up the information you just created and update any dollar values, add anything if necessary or delete what you may not need for this new Master.

You can click the “Copy” button on any craft and a new window will pop-up. The top portion of the screen will auto-populate based on what is already in the system. You can now edit the craft/classification, rates, and anything else, if necessary, and always make sure to hit Save.
Note: if you use expiration dates in your database and you are adding a new craft/classification with a new expiration date, it is very important to NOT modify the craft and classification name.
Once you have clicked Save, a new pop-up window will appear asking you if you are finished or if you would like to add another record. If you are done, click “Finished”. If not, click “Add Another”. Repeat these steps as many times as necessary until you are finished.
When deleting craft / classifications, you may choose to delete individual lines, or you can select All by clicking the top blue checkbox for that column.
For more information on Prevailing Wage Setup, please refer to the Wage Data Entry Guide located under Training Materials >> Administrator Support Documents >> Wage Data Entry Guide for step-by-step instructions.
A Full Admin has the ability to “lock” wages after they have been assigned to a project. This prevents anyone other than a Full Admin from making changes to even the project wage data.

Project Wage Data
Each project entered into LCPtracker will have a unique set of wage data that will be “locked in” to the project by an Administrator.
The prevailing wage data will be identified in the system with a specific set of information that is either pulled from the wage decision published by the USDOL, the State, County or City.
Each wage decision will have a Jurisdiction, Location, Construction Type, General Decision Number, Modification Number, Publication Date, Issue Date, and Expiration Date.
When adding Apprentice craft/classifications, you should ALWAYS add to the Project Wage Data screen and NOT the Master Wage Data screen.
Assigning Wages to a Project
Once the correct Master Wage Data has been added to system, either by LCPtracker or by you the Agency/Admin, the wages can now be assigned to a Project.
There are two places in the system where you can assign the wages to a project.
1. The first is in the Add/Edit Project screen. You will see this button available once you have created and saved your project:

2. The second place is under the Prevailing Wage Setup section:
To do this you will click on Set Up >> Prevailing Wage Setup >> Assign Prevailing Wage button
Both places will take you to the same screen where you will assign the wages to the project.

You will enter the project and source information regarding your project wages, click “Select All” and then Assign Wages to save.
Adding Additional Crafts/Apprentices
Step one - Gathering Project Wage Information
Start by going back to the Set Up navigation tab; click on the Prevailing Wage Setup button then click the Add/Edit Project Wage Data.

Choose the Project you want to add Classifications to; also, you may Edit or Delete Classifications from a project in this same screen. The system will then auto-populate with what is currently loaded to THAT specific project. Here you may click “Add Classification”, but it is also a good practice to add a classification by copying a previous classification.
If you are going to use the “Add Classification” button, you may want to make note of the Jurisdiction, Location, General Decision, and Modification (click on Edit for the Modification number); as well as the Publication, Issue and Expiration Dates so you have that information for step two. If you use the “Copy” button, all this information will populate based on the entry you are copying.
Step two - Entering a New Craft
After clicking on the “Add Classification”, you will select or enter the EXACT same information from the drop-down menus or will fill in the blank fields. Manually enter in the Craft, Classification & wages (Doubletime, Training and the Notes section are optional and may not apply). If you are copying from an existing craft/classification, the box will have all the information already filled in. Change the information to match what you are entering for your new craft/classification and click save.
Note: if you are entering an Apprentice, make sure to put the word “Apprentice” in the Classification field. It is acceptable to put the word “Apprentice” in the Craft field but in order for the system to recognize the word “Apprentice”, for approval and reporting purposes, its required that it goes in the classification field, so the system does not get confused when it gathers data for Apprentice Reports.

TIP: If you are entering an apprentice for one specific company, you may want to put the company’s name in the “Notes section” so they know which craft/classification is assigned specifically to them. When you are finished make sure to click SAVE.

Once you click save, you will be asked if you want to Add Another classification or if you are Finished. If you need to enter more than one Craft/Classification, then simply click Add Another leaving the top portion filled in that already has the Project information. Type the information for your next Craft/Classification and rates and save. Repeat as many times as needed and click Finished.

Step three - Checking to See if the Wages Were Added Successfully
Go to your Set Up tab >> Prevailing Wage Set Up >> Add/Edit Project Wage Data (bottom button). Select the Project and the system will automatically populate for you.
Double check to make sure your new Craft/Classifications you entered are visible and correctly entered!

New Jurisdiction &/or Location Request / Definition Process
Agency/Admins may request a new jurisdiction and/or location (county). This would occur when an Agency or prime contractor gets a new contract in a new area and needs a new Location created and potentially a new Jurisdiction if it has different funding.
Note: think of a Jurisdiction as the funding type and a way to tell the ‘backend’ what rates to look at when checking your subcontractors’ payrolls. If an Agency has both federal and state prevailing projects, you will then have two Jurisdictions created. The typical naming convention would be; State Prevailing Wages – Database Name and Federal Prevailing Wages – Database Name.

Some clients may have what are called “Dually Funded” projects. For these types of projects, the system must check against two sets of rules and two sets of wages, such as a USDOL (United States Department of Labor) wage determination and a State, City or Local wage determination. In these instances, both sets of wage determinations will need to be entered in LCPtracker.
The project would have two jurisdictions assigned and would require the Agency/Admin to pick which Jurisdiction to show first on the CPRs.

Once the project is setup with the dual jurisdictions, the contractor would be required to pick a craft/classification from both jurisdictions.

Jurisdiction and Location are LCPtracker settings only. After your initial database setup, if you need an additional Jurisdiction and/or Location, please fill out the request form that is located under Training Materials >> Administrator Support Documents >> Jurisdiction/Location Request Form and send to support@lcptracker.com. When filling out the request form, be sure that all information is correctly spelled out, as your request will be entered in system as you have noted.
Some Agencies have more than one account and/or more than one jurisdiction that may need the location defined and the security access granted. Usually, it will only be their own account. Please have a separate request for each jurisdiction and/or location. Use of this procedure will significantly reduce confusion by the person setting up the new information.
Requestor Assigns Prevailing Wages to Accounts.
Once the new information is defined and can be establish, the new prevailing wage list can then be created and assigned to the appropriate project. Assigning wages to the project is the responsibility of the database administrator.
Add/Edit Geographic Types & Areas
As the Administrating Agency it is possible to track your subcontractor’s employees by Ward, Community Area, Congressional District or State Senate District. The steps to set this up and track this manually will be explained below.
If you choose not to track this information, you can skip this section within your Set Up page. Note: if you are not utilizing this, you can request to have the GIS section not visible on the employee page. Please contact your Implementation Project Manager or Account Manager to make this change.
Auto Geo Assignment using KML Map
We also have the functionality to auto assign the Geographic assignment by using a KML (Keystone Markup Language) map file. If you would like more information on this functionality, please contact your Implementation Project Manager or Account Manager.
Add/Edit Geographic Areas
The Geographic Areas designation is independent of other boundaries and assigned in a separate process. After a Geographic Area Type is created, it is then important to enter the Geographic Areas that will be selected by your Contractor when entering their employee information. This is a manual process (if KML Maps as mentioned above are NOT used)
The Agency/Admin would need to create the list that will be made available to the Contractor to make their selection. To make this entry required, the Agency/Admin would need to ensure that Val_50 is turned to Yes/Notice/Enforce to require the manual entry to be made before proceeding. Note: if the Agency/Admin has made the decision to purchase the Auto-Geo Assignment, the setup is slightly different and will require your PM to work with you.
An alternative approach is to use a list of ZIP codes instead of exact political boundaries to approximate the ward/ district areas. We have reports that use a list of ZIP codes available.
To Add your Geographic Areas, go to the Set Up >> Add/Edit Geographic Areas >> Click Add >> enter the name of your Geographic Area >> choose the Geographic Area Type to assign it to and Save. Enter as many as needed.

Note: if you wish to require your Contractor / Subcontractors designate their employees to a specific Geographic Area & Type, once you have completed the above steps, you will need to turn on Validation 50 to Yes/Notice/Enforce and ensure that the GIS area is not hidden on the add/edit employee screen.

Add/Edit Admin Logins
When a database is first created, the main contact will be setup with a Full Admin role. A Full Admin role may set up any role and is the only role that may set up other Full Admin roles; whereas the Business Manager may set up all other Admin User roles, except Full Admin roles.
Currently, at time of publication, there are nine (9) different Administrator roles available within LCPtracker. The list of roles is in order from highest to lowest regarding the capabilities available within the system. If the database has turned on the Prime Approver functionality, you will see that additional role as a selection.
- Full Administrator
- Business Manager
- Limited Administrator
- Project Manager
- Read-Only User
- Job Coordinator
- Limited Read-Only
- Limited Job Coordinator
- Demographic Coordinator
To enter an Admin user, you will go to Set Up >> Add/Edit Admin Logins >> Enter the users email address, name, and choose their role and save. For any other roles than Full Admin, you can assign a user to either all projects or you can limit their access down to a particular department or project(s).

For a detailed explanation regarding each Admin role within LCPtracker, please reference the “Administrator Logins” document under Training Materials >> Administrator Support Documents >> Administrator Logins.
Below you will find a helpful chart to show the access the various roles have within LCPtracker.
Administrator User Role Capabilities


Add/Edit eDocument Types
The eDocument Types allow for you as the Agency/Admin to collect pertinent documentation from your contractors and organize those documents within an electronic filing cabinet. An eDocument type must first be set up before the contractor can select the category for upload.
You must first define the documents you want to collect. Your Implementation Project Manager or Account Manager will work with you when first setting up your database to provide you with ideas of eDocuments other Agency/Admins have previously used. Some examples may include but are not limited to Fringe Benefit Statement, Apprentice Certification, Apprentice Program Documentation, Employee Consent for Wage Deductions, and Restitution Documentation. You may upload, as an Administrator, any type of documents where you wish to have an electronic copy (see Restrictions below).
Steps to Set up an eDocument Type
To set up the eDocument type go to Set Up >> Add/Edit eDocument Types. You will be able to view any previous eDocument Types you have already setup or if you are just beginning, click on Add eDocument Type.


Now you will begin the setup and name your eDocument as well as selecting the parameters for each eDocument to be setup.
Document Name – Enter the name of the document you want to show within the Contractor’s drop-down selection.
Select By – You can set an eDocument to be available by Departments or Projects. Depending on your selection, you can set an eDocument to be only available for a specific project(s) or department(s) or for all projects/departments that are added to the database. This will be demonstrated in the next step under Projects/Departments.
Projects – Depending on your previous selection, this will either be listed as Projects or Departments. Here are the various ways you can assign an eDocument type.
- Ability to select single specific projects or departments. Click on individual projects or departments that you want this eDocument available for.

- If you want an eDocument to be added to all projects added to your database or all departments, you can click “Check all” and every time a new project or department is added, it will automatically have this eDocument available.

Expire Frequency – If the eDocument has an expiration frequency, select the expire frequency from the drop-down menu. Note: Expire Frequency will be counted from date of document when uploaded. Document date is a system-wide required field.
Submit Delay in Days – The default is set to 0. If you want to require a document at the end of the month rather than prior to the initial CPR submittal, this can then be set with a value of 30.
Is this a required document? – An Agency/Admin can set this requirement three different ways:
- Required (Y) – request that all contractors/subcontractors submit this eDocument but does not stop them if they do not submit prior to certification.
- Not Required (N) – for those documents that you want to collect for specific situations but may not be required for all users. An example may be an Apprentice Certification. It is required if a contractor has an Apprentice but not all contractors may have an Apprentice.
- Required Prior to Certification (R) – this setting will require that EVERY contractor / subcontractor submit this eDocument before they can certify their first CPR. If they have not submitted the eDocument, they will have a hard stop when then go to certify their payroll. Note: when using this function, please ensure that EVERY contractor must comply before they can move forward. You would not want to use this setting for documents such as an Apprentice Certification as not every contractor may have an apprentice working on the project.

Is document expire date required? – Select this if a document has an expiration date that you want entered at time of upload. If a document expires, it is then listed as a missing required document. If it is required to be submitted prior to certification, then the contractor cannot certify any CPRs until the valid document is submitted.
Is CPR week-end date required? – When requiring this, a contractor must enter a weekend date when uploading the eDocument. You would only want to use this when the document being submitted refers to a specific W/E date e.g., check stub.
Is employee required – For documents that are specific to an employee, it is highly recommended to require this field e.g., Apprentice Certification or OSHA card. We have developed an Employee eDocument report that can be used to determine which employees have submitted or not submitted the particular eDocument as long as this is turned to required.
Apply uploaded document to all projects? – If this is turned to yes, the eDocument would apply to all projects the contractor works on within your database. If you require a new eDocument per project, this should then be set to no which means the contractor would need to submit the eDocument each time they are on a new project.
Document Description – Set the expectations for your contractor for this eDocument or provide your explanation of the eDocument created.
Restrictions – This functionality will allow the Agency/Admin to define the users that will be uploading this eDocument and access of the document by making one of the following selections. The default is set to Allow CONTRACTOR to Upload, View, and Report.

- Allow ADMIN only to see Document Name in Upload, View, and Report. This would apply to ADMIN only documents that are private and should not be seen by Contractors.
- Allow ADMIN only (Except Prime Approver) to see Document Name in Upload, View, and Report. This is the same as above but would restrict the Prime Approver from seeing as well.
- Allow ADMIN only to UPLOAD but contractor can View and Report status. This allows the ADMIN to control what is submitted e.g., Approved Subcontractor Form that Admin uploads.
- Allow CONTRACTOR to Upload, View, and Report. This is the default setting although an Admin can also upload in addition to the Contractor.
Submitted By – When allowing a Contractor to Upload, View, and Report, you have the ability to allow only Primes, Subcontractors, or Both the ability to upload. The default is Both.

Submitted By Union Status – You can set an eDocument to only be required based on their Union Status. For those documents only required for Union or Non-Union, this will allow you to set the eDocument to be seen based on the selection made when the Contractor was setup in LCPtracker. Note: You will only see this option if you have turned on the requirement to collect union status. This is a setting that can only be turned on by an LCPtracker Implementation Project Manager or Account Manager.

Editing or Deleting an eDocument Type
Once you have set up an eDocument, you can Edit or Delete your entry.

Add/Edit eDocument Templates
The Add/Edit eDocument Template’s function allows an Agency/Admin to load documents in their LCPtracker database that contractors can download, fill out and upload back to an eDocument type. These could be common forms to be filled out, standard instructions to contractors or any document that you require to be used by the contractor/subcontractor.
To Add/Create an eDocument Template:
- Set Up >> Add/Edit eDocument Templates
- Enter a New Template Name
- Choose what group of Projects or Departments you would like this template available to (able to select a single project / department or click “Check All” to make available to all projects/departments.
- Browse for your appropriate file on your computer
- Select the Update button to create

To Edit/Delete an Existing Template:
- Set Up >> Add/Edit eDocument Templates
- Select Template Name from drop down menu
- Choose field you wish to edit (Name, Projects / Departments, or file – browse for template needing to update)
- Select the Update button or Delete if desired

Add/Edit Notice Type
Admin Notices are a function to allow an Admin/Agency to create a custom email template within LCPtracker to send communications to the Contractor through LCPtracker. An Admin Notice allows the Agency/Admin to store notices sent and allows for all Admins working in LCPtracker to be able to see repeat offenders that might have multiple notices sent. The Admin Notice functionality also allows for a contractor to respond back to the Agency/Admin regarding the notice generated.
To create a custom Admin notice type, go to Set Up >> Add/Edit Notice Type. Simply enter the name in the Notice Type field and enter the standard text you want created for this notice template.

Currently, the Standard Text for Letter is not currently functioning.
Once the Admin Notice Type is created, you can use this template to communicate with Contractors via email. Note: you can make edits to the template at the time you generate the Admin Notice to send to the Contractor.
To edit or delete a Notice Type, select the notice type from the drop-down menu. You can now edit the Notice Type or Delete it if required.

Note: any Notices that were created using the Admin Notice prior to the deleting of the Notice Type, will NOT be deleted and will still be accessible.
Once you have created a Notice Type, you can access these Admin Notice templates under the Admin tab >> Admin Notice Processing.
LCPtracker has system defined notice types that are automatically created and available within the system. These will also show under the Admin Notice Processing button.
- Payroll Notice – payroll notice, created automatically on validation of payroll records
- Rejection Notice – CPR Rejection Notice, created automatically when a CPR is rejected
- Permit Edit Notice – when a request by the contractor is made to allow edits to a CPR, this notice is created automatically and will show under the Admin Notice Processing tab.
- eDocument Notice – if an Agency/Admin has rejected an eDocument, an Admin Notice will automatically be generated.
- Apprentice Rejection Notice – an Apprentice Rejection Notice is created automatically upon rejection of employee Apprentice.
Add/Edit Minimum Wage
An Agency/Admin may choose to enter the minimum wage amount to ensure that workers are not getting paid less than the posted minimum wage amount. Note: if the minimum wage amount changes each year, you will need to enter the new rate for the next posted year.
If you are working on a direct Federal project, you may have the requirement to adhere to Executive Order (EO) 13658: Minimum Wage for Contractors. For those contracts, please ensure you are entering the yearly update each year.

When entering a minimum wage, go to Set Up >> Add/Edit Minimum Wage. You must choose the jurisdiction, but the project and location can be entered for one project/location or can be left at All.
Select the Effective Date and the Minimum Wage amount and click Save.

When utilizing this functionality, you will need to also ensure that Val_10 is turned on to a Yes/Notice/Enforce or Yes/Warning/Alert in order for the minimum wage to work effectively.
Add/Edit Craft List and Craft Match
Using the matching functions in LCPtracker, allows prevailing wage craft categories to be matched with the set FHWA reporting craft categories. FHWA provides a standardized list of 11 trades that all craft/classifications on certified payrolls must be matched to. FHWA does not allow for edits or additions of other trades other than the 11 provided crafts.
Craft Matching needs to be completed for the FHWA reports to pull correctly. There are two parts to Craft Matching. Part 1 is reviewing that the standard FHWA Craft List is loaded into your account and Part 2 is matching submitted crafts to a broad craft from the preloaded FHWA Craft List.
The matching functions are used to match the prevailing wage categories with required reporting categories. For example, FHWA and HUD both have reports that require hours worked to be reported under specific craft / classifications that do not match the prevailing wage classifications. The match function allows this definition.
Any account that is created in LCPtracker that is a DOT account should ensure that the 1391/1392 Project Checkbox gets checked when setting up the project. There is also a box on the jurisdiction setup that needs to be checked by your LCPtracker Implementation Project Manager or Account Manager. This will then have the FHWA Craft List auto populated to their account for use. For those that may have not been set up as a DOT, and then choose to use Departments and have some highway work that requires FHWA reporting, contact LCPtracker to request that the list be added to your account. The FHWA is done this way because of their requirement to have the Crafts listed in a specific matter. For those with HUD you may create your Craft List then add craft /classifications and do the matching function.
The FHWA Craft List will be pre-populated in DOT accounts that have the jurisdiction set to yes for FHWA.

You may click on the Add/Edit Craft List to view.
You can then move to the Add/Remove Craft match to complete the required craft matching for the reports to work correctly.
Add/Edit Craft List
From the ‘Set Up’ tab, click ‘Add/Edit Craft List’ then click ‘Add Craft List/Craft’ to create a new Craft List name.
- Enter the new Craft List Name.
- Enter the new Craft Name
- Save and repeat until you have all Craft Names in system that you need to Craft Match

For FHWA reporting, using the matching functions in LCPtracker allows prevailing wage craft categories to be matched with the predetermined FHWA reporting craft categories. The FHWA provides a standardized list of eleven trades that all craft/classifications on certified payroll reports (CPRs) must be matched to.
The only craft names that will be recognized by the FHWA are:
1. Carpenters
2. Cement Masons
3. Electricians
4. Equipment Operators
5. Ironworkers
6. Laborers-Semiskilled
7. Laborers-Unskilled
8. Mechanics
9. Painters
10. Pipefitter/Plumbers
11. Truck Drivers

These EXACT craft names must be utilized; this includes spelling, capitalization and spacing.
FHWA does not allow for edits or additions of other trades other than the eleven provided crafts.
There are four non-prevailing wage categories that data may be entered separately by contractors under the “FHWA Additional Data Entry” page. “Craft Matching” needs to be completed for the FHWA Reports to pull correctly. There are two parts to Craft Matching. Part 1 is reviewing that the standard FHWA Craft List is loaded into your account, and Part 2 is matching submitted crafts on CPRs to a craft from the pre-loaded FHWA Craft List.
Add/Remove Craft Match
The matching functions are used to match the prevailing wage categories with required reporting categories. Now you are ready to go to the Add/Edit Craft Matching function.

You may choose to view all items for any 1391/1392 Project (FHWA) by checking the box and selecting a specific project.
Once you have your list populated, click on one that does not have a Match and choose your Craft List then choose Craft Name and Save.
The system will list all available classifications on a project so administrators can preemptively handle the craft matching process. It is important to note, if a new classification is added to the project, the administrator will need to go back to this list to complete the craft match for that newly added classification.
The following images show where you click to match a craft from a CPR to the FHWA default Craft List.

A drop-down appears to select a default FHWA Craft.
You can always un-match and match again should you need to make any corrections.
Once the project has been setup as 1391/1392, and Craft Matching is completed, the 1391/1392 reports may be run.
Remember that the FHWA 1392 Report is a “roll up” of all the 1391 reports and is what should be submitted to the Federal Highway Administration (FHWA).

Repeat this step as many times necessary to match all Crafts. Once Subcontractors have completed their certified payroll as well as the FHWA Additional Data Entry, you can run your 1391/1392 reports.

Add/Edit Rec. Act Emp. Type
The Recovery Act / HUD and other reports may require reporting of hours worked and amount paid for crafts that are not prevailing wage craft. This information can be input by the contractor against the employee types specified here. Different organizations will have different types of employees.
After initial setup of these types are complete, they should not be changed. You may add an employee type at any time. If you must change something that has been setup contact support to help evaluate the impact on data already entered.
As an example, hospitals will have nurses and school districts will have teachers. You define your own list here.

Add/Edit Departments
We included the directions for Adding /Editing Departments at the beginning of the Department Settings section.

Departments cannot be deleted once a project has been assigned. To delete a department, you will need to edit the Add/Edit Projects section and reassign any project under the department you wish to delete to another department.

The administrator can designate a project as a work order project and define the work orders. Since the continual entry of new work orders may be operationally awkward, the Prime Contractor is permitted to enter work orders also.

Designate a Project for Work Orders
For work orders to be available for a project, the project must be designated as a work order project during the project setup.
Work Order Validation Rule
A validation rule exists to ensure uploaded data has work order information.

Define a Work Order
Admin or Prime Contractor may define a work order. To setup a new work order, go to Set Up >> Add / Edit Work Order to open the form below.

Note: The information entered in the Work Order ID field will be what displays to the contractor and listed on the CPR.
If the information entered is lengthy, some of the detail may bet cut off on the CPR form.
Contractor Submittal of Work Order Information
Prime Contractors
Prime contractors can define work orders. Click Set Up >> Add/Edit Work Order to input the information. The setup of the work order is the same as the Admin.

All Contractors
The contractor submittal of work order information is simple. They simply select the work order appropriate on the payroll entry form.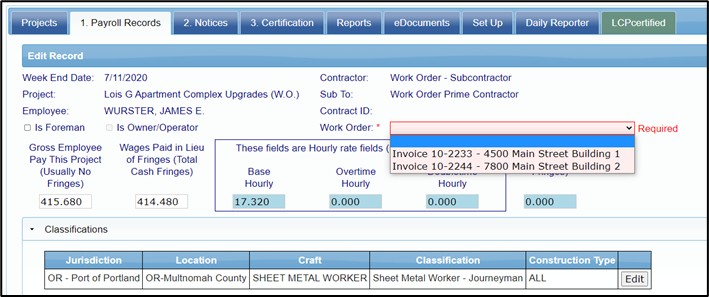

It is important that you enter all of the employee’s time for the full week under the various work orders BEFORE certifying the full week’s payroll. The work order information appears on the Certified Payroll Report grouped by work order.

Once information has been submitted for a work order, the certification tab for the Admin will display the work orders to select from as a filter.

Note: when using work orders, you will not be able to assign different wage determinations by work order. The wages assigned to the project will be utilized for all work orders setup and utilized.
Zip Code Setup
This feature is used for workforce reporting to track employees who reside in specified zip codes.
Upload ZIP Code List
Here you have the option to upload a list of zip codes all at once from an excel file, instead of entering them one at a time in the system. You will simply enter the zip codes you would like to upload in the first column of your excel file.
Add/Edit ZIP Code List
This option allows you to manually adjust the zip code lists you have in the system. You can add, edit, or delete the information.
ZIP List Category Setup
When creating a category, you will need to provide a name as well as a description.
The category was designed if you want to create targeted areas. A good example of an account that has multiple categories setup might be a college that reports information at various levels. One client of LCPtracker has three levels for their reporting: Primary (College), Secondary (District) and Local (Local-County)
Assign ZIP List to Project
Once the category has been set up, next you will need to assign the zip list to your project. Click on Assign ZIP List to Project >> Add Assignment >> select your project >> choose the zip list to be assigned >> select the category to be assigned and click Save. Note: you can only have one zip list per category assigned.

Once you have completed this step, you will be able to see all of the assignments created.
Add/Edit Certification Type
In this area, you have the ability to add additional Business Certification Types you may want to assign to your contractors. An Admin will first need to setup the Business Certification before it will show in the drop down for the Business Certification section under Contractor Setup.

By default, your options include:
- Disadvantaged Business Enterprise (DBE)
- Disabled Veteran Business Enterprise (DVBE)
- Local Business Enterprise (LBE)
- Minority Business Enterprise (MBE)
- Small Business Enterprise (SBE)
- Women Business Enterprise (WBE)
- None

You can edit and add to this list of choices at any time.

To add a new option, simply enter the Certification Type and Description. Then click Save. If you have multiple certifications to add, after you have saved your entry, click Clear Form to add another entry.
To edit or delete an existing type, select it from the drop down and click Delete.
Add/Edit Certifying Agency
Here you can add names of the certifying agencies. By default, Not Available is listed and shown to the contractor. You can add additional Agencies here to make available in the drop down on the contractor setup page.

Reports Setup
In this section, you can adjust how the reports are listed in your Reports tab.
Add/Edit Report Categories
Here you can add different categories that your reports can be organized and filtered into. You can edit and delete the categories here as well. Only a Full Admin or Business Manager role will have the ability to make changes to the categories.
Edit Reports
On this screen, you can edit information regarding the reports location and who has the security to see the reports. You can edit the category where the report is located as well as assign the reports by Role OR by User. This is a one or the other. It is recommended to assign reports by Role but can be changed by User if required.

A report is only available to the roles that are checked. Make your selections accordingly and then remember to save your entry.
As a reminder, Reports not assigned to a category are not displayed to the user to utilize.
Demographic Setup
Add/Edit Demographic Types
Demographic types can be established to gather various additional data that is not already set up to be collected in the LCPtracker software. The Demographic Type is typically referred to as the question.

Here you can add different types that the employees on your project can be categorized under. You can edit or delete the types here as well.
The Demographic type can be set to be required for all employees on all projects or it can be set to only be required for specific projects. We will discuss this more under the Project Demographic Requirements section.
Add/Edit Demographic Classifications
Demographic classifications allow you to filter the demographic types even further with subcategories for each type. The Demographic Classification is typically referred to as the answer to the above question.
To add the classifications, first select the type and then the classification will be what is available to the contractor in the drop down. You can add a description and require a start and end date if needed. 
Project Demographic Requirements
When utilizing demographic classifications, an Admin can make a specific demographic required for a particular project instead of being required for all projects. This can be done by utilizing the project demographic requirements functionality.
If using the Add Department button, the demographic classification will be assigned to all projects that currently are assigned to a department. Once this has been setup, any projects added and assigned to the specific department will NOT automatically be assigned and will need to be setup separately by utilizing the Add Projects button.

Project Groups
Project Groups is a way to add a filter to the project page to group particular projects by this group. The naming for project groups can be whatever the Admin wants to setup.
These can be setup with the officers names responsible for the project, the specific department the project falls under or by any other grouping that the Admin wants to utilize.

Project Types
Project Types is additional way to add a filter to the projects page. The Admin may utilize both the groups and types to meet their specific needs.

Project PLA Types
When utilizing PLA’s, a Full Admin will have the option to “Add PLA Types” or Edit existing items. Users will only be able to delete items if they have not been assigned to projects that have CPRs submitted.

On the Add/Edit Project page, any Admin user with rights to add or edit projects will be able to view and select from a new PLA Type drop-down menu. Only one option can be selected per project.

Set Project Goal Amounts
Users with a full administrator role can now establish goal amounts by department under Set Up > Set Project Goal Amounts. The goals that can be established are:
- Goal Report:
- Apprentice % Goal
- Minority % Goal
- Women % Goal
- EEO Report:
- Minority Journeyperson % Goal
- Minority Apprentice % Goal
- Minority Laborer % Goal
- Female Journeyperson % Goal
- Female Apprentice % Goal
- Female Laborer % Goal
- City Residency Goal %
- New Hiring Goal %
- Economic Disadvantaged Goal
- Veteran Goal
- Pre-Apprentice Goal
- OJT Goals %
- Disincentive $
- Diversity Goal %
Currently, if a database has the B2Gnow sync turned on, the project goals will need to be setup manually under the Add/Edit project as this will not flow over to projects that are synced over.
Other Deductions
LCPtracker has developed an “Other Deductions Detail” feature which will help increase your ability to track specific details for what a contractor is entering in the other deductions field. An Admin may want to enhance the collection of Other Deduction details by turning on this new other deduction details functionality. This new “Other Deductions” setting, once enabled, will be database-wide and is a setting your Implementation Project Manager or Account Manager will need to assist in turning on and implementing. (We highly recommend you develop a role out plan if you are an existing user.)
Once this is turned on, there will be an additional button called “Other Deductions” on the setup page. You will want to ensure that validations 30, 30a, and 30b are all turned on when using this functionality.
Other Deduction Categories
Each database will have a default category of DOL which can be used, or you can create specific categories if needed. This allows you to group types of Other Deductions under a specific category.

Other Deduction Types
Other deduction types will be what the contractor selects when withholding deductions from an employee’s paycheck.

The details are setup by the Database Admin and can be done manually or by using an upload spreadsheet.
Once a type has been added in the system and used on a payroll, you will NOT have the ability to delete the other deduction type anymore. You can disable it but not delete it.
Upload Other Deduction
LCPtracker has a spreadsheet available for upload which is an internal sample USDOL list. You can override, add, or delete the data in the spreadsheet as needed prior to uploading within your database.

To start, click on “Upload Other Deductions”, download the template, and enter the relevant data, save to your desktop, and then click on browse. Find the Excel file created and then click on “Upload”.
Once your entry has been uploaded, a pop-up box will appear showing how many records have been uploaded.
Sick Pay Tracking
For work on DBA projects, Executive Order 13706 requires federal contractors to allow their employees to earn and use up to 7 days paid sick leave each year. It requires covered contractors to allow employees to accrue 1 hour of paid sick leave for every 30 hours worked on or in connection with a covered contract, up to 56 hours (7 days) per year and to use accrued leave as covered in 29 CFR 13.2 and 13.3(a)(2).

Onsite Status
If the OnSite module has been purchased to perform employee interviews that sync with the submitted CPR submittals within LCPtracker, the Admin will see an additional tab called OnSite Status.

This tab is where the Admin will see the status of the submitted interview forms once the contractor has submitted a CPR. The options the Admin will see are Submitted, Manual Override Pass or Auto-Validation Fail.

For more information regarding OnSite, you can find the following guides under Training Materials.
Projects Tab
LCPtracker provides Administrators the ability to view and modify all existing Projects, define Contractors, assign and un-assign Contractors to and/or from Projects, review the certified payroll input for each contractor on each project, and manage the compliance issues associated with any Project/Contractor. Each step is described in this manual.
The first screen to display when logging into LCPtracker as an Admin, is the Projects screen. The Projects tab will display only Active projects and does not show any Closed or Suspended Projects.

The Projects tab is strictly informative. The list helps the User to see the overall picture of how many projects they are managing within LCPtracker.
The list of Projects will also be user specific. The list may be different depending on the user rights given to each Admin or Prime Approver and what projects/departments they have been assigned to view.
The screen is read only; you cannot add, modify, or delete a Project from this screen. Project management processes are found under the Set Up menu item. To open the Set Up menu, click the Set Up button from the main menu toolbar.
Certifications Tab
The CERTIFICATIONS tab is where all Certified Payrolls can be viewed. There are multiple filters to view the CPR information you need to review and accept. This table will look slightly different if the Agency/Admin has turned on the Prime Approver functionality.
Any users with the appropriate roles assigned, can change the different status menus from this screen. This includes the Process Status and the Accept Status. If Prime Approver is turned on, there will be an additional column for the Prime Approver status as well. You can also filter the CPRs you are looking at based on these status values. 
With Prime Approver turned on.

Delete CPR Button
This button provides the ability to delete a CPR and all associated payroll records. Use with caution. Typically, the only two occasions where the delete button should be used is: 1) when a Contractor has selected the wrong week-end date, or 2) when a Contractor has selected the wrong project.
Any other reasons should be rejected back to the Contractor or utilize the Permit Edit button for changes to be made. When clicking the delete button, you will be asked to confirm the deletion prior to it being deleted out of the system. Please ensure you want to delete the payroll prior to the confirmation. When utilizing the Prime Approver module, the Agency can hide the delete button from the Prime Approver only allowing this function to be done by the Agency.

Process Status
The Process Status function provides you with the ability to check in and set the status of the certified payrolls that have been submitted to you. This function can be set as desired by clicking on the drop-down arrow. It is designed to provide the ability to track various review steps that might be involved in the administrating of a prevailing wage program.
Process Status values can be:
- CERTIFIED (default on submitted CPRs by contractors)
- PENDING- for contractor's response or documents
- RECEIVED- already in database
- VALIDATED-viewed by administrator
- VIOLATION-underpayment, training funds contributions, apprentices registered, etc.…
Process status selections can be used differently by various Admins. It is up to the Admin/Agency to decide how/if they want to utilize this function.
If used, an Admin/Agency can filter the certified payroll reports (CPRs) based on the Process Status.
Check the box that you want to filter by and click “Load Data” to only see those with the selected process status.

Accept Status
The Accept Status was designed to provide a fast way to ACCEPT multiple CPRs as well as track who accepted the CPR and when it was accepted.

Accept Status values can be:
- SUBMITTED (default and appears once the payroll has been certified by contractor)
- RESUBMITTED (value auto-assigned by system when contractor re-submits a CPR)
- UPDATED (value auto-assigned by system when a CPR has had a payroll # or Final status change by contractor but no major payroll changes involving eSignature)
- ACCEPTED (does not send an email to contractor)
- PERMIT EDIT (stores status under the Admin processing tab)
- REJECTED (sends an email to contractor by default)
- REVIEWED (depending on setup, contractor is sent an email letting them know the CPR was reviewed)
You as an administrator, you can request LCPtracker to send an e-mail to the contractor when the Accept Status changes. Note: when requesting this setting, the contractor will receive MULTIPLE emails. You can also specify if a copy of the e-mail goes to the Prime Contractor.
If the Accept Status is set to REJECTED, an Admin Notice is created, and the contractor automatically receives an email by default.

The CPR is flagged for the contractor as rejected. A special message in RED is displayed to the contractor on login that REJECTED CPRs exist.
The Permit Edit Status is used when the time allotted to the contractor to edit a submitted CPR expires. The PERMIT EDIT setting will allow them to edit and will show the status under the certifications tab as well as under the Admin Notice Processing button.
The amount of time in which a contractor can edit a CPR on their own accord, is set by the number of days chosen in the Department Settings for your database. After this number of days has passed, the system will lock the payroll for editing and this PERMIT EDIT status must be selected to allow the contractor to make any edits. 
Once the payroll has been unlocked for editing, the contractor now has the chosen number of CPR Edit Time days (under the Department Settings) to make their corrections before the system will lock the payroll for editing again.

Prime Approver
When an Agency has turned on the Prime Approver functionality, each project will require that a Prime Approver be assigned, and all payrolls to first be reviewed and approved by the assigned Prime Approver before going to the Agency for acceptance. The Prime Approver can filter on the Approved / Not Approved Prime Approval status.
An Agency does have the ability to approve the Prime Contractor’s payrolls and only require that a Prime Approver conduct the approval function on lower-tier subcontractors.
Your LCPtracker Implementation Project Manager or Account Manager will go through the various settings available when helping setup your database.

Refer to the Prime Approver Guide under Training Materials for more information.
When assigning a Prime Approver, you can assign based on Departments or Projects.
Assigning Prime Approver by PROJECT (Best Practice):
- Prime Approver will only have access to those projects that are selected and assigned
- Department must be left as “None Selected”
- If Prime Approver should have access to all projects within your database, then select the box that says “Assign to All Projects”

Assigning Prime Approver by DEPARTMENT (Not typically used):
- Prime Approver will have access to all projects that have that Department assigned
- Assigning by Department will override any per project assignments
- Using this will assign the Prime Approver to view and have access to ALL projects that are associated with the Department(s) selected

Final
This function allows the administrator to change the FINAL status of a CPR quickly without having to get the contractor to do it and go through the entire edit and re-submittal process. Your internal procedures as an Administrator will determine if this function is useful to you.
It is typically recommended, though, that the changes to the Final status of a payroll be done by the contractor on their own as they are putting their eSignature to their certified payroll. There are cases when a contractor cannot be reached to make changes on their own and so this Final Status filter can then be utilized by the Administrator to make any corrections needed.
View Details
The “View details” link provides a view of the data associated with the CPR, like the entire history of the payroll from the time it has been initially submitted into the system.

It allows you to enter Administrator Comments, view various versions of the CPR report if it has been edited and resubmitted more than once, as well as view any associated emails, or Admin Notices that were sent via the system regarding the payroll, for example, if it has been Rejected. The Administrator Comments are not visible to the Contractor.
You can change the Process Status, Accept Status, and Final Status from this screen also. Administrator Notices are created automatically by LCPtracker when a payroll is REJECTED.
You as the Administrator can create your own admin notice types. For example, you may want an admin notice requesting explanation of OTHER deductions for a specific employee.
Violations
Any hidden Notices or Warnings that exist when the Contractor submits the CPR are listed under the Violations tab. Administrators can review these potential violations, act, or delete as needed.
The Violations screen displays the current potential violations from all the Contractors and all the Projects if not set as a hard stop for the Contractor.

When viewing violations, it is beneficial to use the filters to only view the violations by Department, Project and the Contractor then click Load Data. As the administrator you can delete the violation, or you can view the violation and choose to resolve it if applicable.
Once an Agency/Admin loads the violations for a particular department, project, or contractor, you will see the number of violations displayed and then can view the specific violations for each line. The chart will display the last viewed date.

Flagged CPRs
LCPtracker has developed an additional APP setting that will display a yes on the certification tab if triggered violations are present on the certified payroll.

Reports Tab
Many useful reports have been developed by LCPtracker for use by Administrators for a variety of purposes. A thorough review of the standard reports is recommended for Administrators. We also offer a standard webinar class by LCPtracker to educate new and existing users on some of the most-often used reports. There are many filters that can further modify most reports that Administrative users find useful. Additional reports are being developed on an ongoing basis.
Many of the reports have filters that allow you to restrict the report to one Project and/or one Contractor. Other filters on reports may exist as appropriate to the report.
LCPtracker has also developed a Reports Catalog to help showcase the various standard reports available to our Full Admins. This catalog is located under our Training Materials >> Manuals/Quick Start Guides. Feel free to use this as a resource when searching for a particular report to use for your workforce reporting needs.
Only a Full Admin Administrator role will see all the standard reports available within LCPtracker. A Full Admin can add roles to each standard report should this be needed. Refer to the Set Up section within this guide for instructions on how to perform this step.
Admin Tab
The Admin tab provides access to a collection of tools designed to support the Labor Compliance administrative process.

Edit Employees
The Edit Employee function can be performed under the Admin tab, by clicking on the Edit Employees button. Administrators can edit employee data to reflect:
- Address Exemptions- When an employee address is validated, it will be compared to the US Postal Service database and a possible match may be suggested. The contractor is prevented from submitting a certified payroll report when an address is not validated if Validation 59 is set to yes/notice/enforce. If an address has not been validated by the US Postal Service database but is confirmed accurate by the Contractor, Administrators can provide an address exemption. It will allow the contractor to proceed with the certified payroll process. To provide an address exemption, select the employee from the drop-down list and check the ‘Exempt Address’ box. The Contractor can now move forward with entering and certifying records for that employee without receiving a Payroll Notice. Reference the Address Validation Guide for additional information on this setting.

- Apprentice Approvals - The Approve Apprentice portion of the Edit Employee screen provides the ability for the Administrator to approve Apprentices. The Contractor enters the Apprentice ID, Apprentice Rate Percentage, Period/Level/Step, and the Apprentice Registration Date. An Administrator or a Prime Approver, if given the ability, can approve the Apprentice by selecting “Approved” under the Apprentice Approval dropdown.

Once this is selected, the system will record the User ID of the person who approved the Apprentice and the Approved Date for the day the Apprentice was approved. The Expiration Date will need to be entered before the record can be saved. You can use this feature in conjunction with the eDocuments feature to upload apprentice certificates.
If the Admin chooses to reject the Apprentice, an additional box will be shown allowing the Administrator to send a message to the Contractor that will be sent via email.

- Set geographic location- You as the Administrator can assign employees to a geographic area of the city under the Admin tab; scroll down to the bottom of the page. You can select a Ward or City Council area, a defined community area, or a project area. Project areas may be overlapping so an employee can be assigned to several areas.

Site Visits
This section has been replaced with the OnSite module, which is available for purchase.
Admin Notice Processing
Once an Admin Notice template has been setup (refer to the Set up tab above), an Admin or Prime Approver can send email messages to the contractors and subcontractors.
Under Admin > Admin Notice Processing, you can load the notices you want to view. Using the filters will allow you to narrow your search down accordingly. You also have the ability to use the “Hide Closed” checkbox to manage your Admin Notices dashboard and show only active notices in the system.

Once you have made your selections, click Load Data to view all active notices.
Send A Notice
You can send a notice to a contractor directly from the database by clicking on Admin >> Admin Notice Processing >> Add New Notice.
To send a notice:
- Select the Contractor
- Select the project
- Select a specific CPR date (optional)
- Enter a case number (optional)
- Enter a Notice Title (Subject line of email)
- Select the Notice Type
- Enter the Notice Message (pre-populated from template but can be modified)
- Enter an Administrator note (not visible to the Contractor)
- Enter today’s date in the Notice Date Field
- Click Save

The notice is then sent to the Contractor and copied to the Prime if specified in the set up.
The main contact for the Contractor receives an email and the notice appears in the 2. Notices >> Administrator Notices section of the Contractor’s login.

Track a Notice
To track and edit notices, click on Admin >> Admin Notice Processing.
Administrator actions available are:
- Edit Admin Notice: This allows full edit capabilities of the admin notices such as adding a time stamped message in edit Notice Message and to add Confidential Admin Notes. After edits are performed, you will need to resend the Notice to contractor.
- Resend Admin Notice: System will resend the Notice via e-mail to contractor in addition to previous notice sent.
- Close Admin Notice: Closing an Admin Notice changes its status to close.
Log Paper CPRs
Under Admin tab, select Log Paper CPR to keep track of manual payroll reports.
Logging of paper payrolls is not a recommended practice within LCPtracker.
This process will not feed hours, wages, and/or demographics to the standard LCPtracker reports for workforce reporting.

eDocuments
The eDocuments feature has three basic functions:
- Administrators can provide useful document templates to Contractor users.
- How Agency/Admins and/or Prime Approvers receive documents from Contractors.
- Viewing previously uploaded documents. Admins can Accept/Reject submitted documents using this tool.
eDocument Types for Upload
The Administrator or Agency specifies what documents are allowed/required to be uploaded. The list of documents will show in the Document Types for Upload table. Each document will have one of the following requirements set by the Admin/Agency:

- N – Not Required; meaning that they are sent on request from the Agency/Administrator and/or Prime Approver.
- Y – Yes; meaning that that they are required
- R – Required; meaning that they are required by every contractor/subcontractor before you can submit CPR’s.
Expire Frequency controls how often a document must be submitted. For example, a quarterly report would expire every three months.

eDocument Templates
The eDocument template functionality allows the Administrator / Agency to post documents, forms, instructions, or other material in an editable Word or PDR format for the contractors to download. This will allow the Contractor to save to their computer, fill in the proper fields, re-save and then upload the completed document under Upload Documents.
To define an eDocument Template, go to Set Up >> Add/Edit eDocument Templates.
To access templates that have been loaded, click on Download Document Templates. The following are examples. Only templates loaded by the Agency/Admin will be available to select.
Simply click on the underlined link and your browser will start the viewing/download process.

Upload Documents
The Upload Documents feature allows your contractors as well as an Admin to upload documents that the Administrator/ Agency requests. The Upload Documents button provides the ability to upload documents directly from your computer into the Administrator’s database. To upload a document, you will need to have the document available on your computer. The document can be almost any type that can be viewed by internet browser: txt, pdf, xls, doc, tif, etc.
On the following page, you can find a short description of each field. Unless specified by a red asterisk, these fields are optional.

Project Name - you will need to choose the project the document is for (some documents may be for all projects based on Admin set)
Sub To - this will filter by who you are a sub to on a specific project (this may have options to select if multiple assignments have been enabled by the Administrator)
Document Type - you will choose the document name from the drop down based on the titles the Admin/Agency has defined.

Document Date - this is always a required field. You may use the calendar icon to choose your date, or type it in MM/DD/YYYY format
Expiration Date - some Admins/Agencies may require that this be filled in; again, use calendar icon or type in date.
Description - some Contractors may choose to use this field for their own notes (this is still viewable by your Administrator)

Select employee the document relates to if appropriate – Employee specific forms may have this set as a requirement by the Admin/Agency.
Week-end date the document relates to if appropriate – Link the document to an appropriate week-end date.
Comments - some Contractors may use for their own notes and comments. This section is viewable by the Contractors and Administrator.
Confidential Comments – allows the Admin or Prime Approver to enter comments not visible to the Contractor.
Select the file to upload - browse your computer to find the document you want to upload.
Click Save once everything is completed and ready for upload.

View Documents
Administrators utilize this function to view documents that have been uploaded by Contractors and Subcontractors. Only Administrators can delete eDocuments that have been uploaded.
When you click on the View Documents button, you can select filters from the drop-down lists to only show the documents you are looking for. The following list can be filtered on:

- Project
- Contractors
- Sub To / Contract ID
- Document type
- Status of the document
- Dates – Document date or Submittal date.
- Employee Name – Available if you are filtered to a specific Contractor.
Once filters have been selected, click on Load Data to view the documents that have been uploaded.

Some fields are editable when clicking on Details.

Within the details tab, the Administrator and/or Prime Approver can accept or reject the uploaded eDocument.
The Contractor Notes section will show contractor’s comments, time stamped.
The Administrator Notices section will show Administrator comments, time stamped, which contractors can view.
A Confidential Admin Note can be added and will not be available for the Contractor to view.
Clicking on View will bring up the actual document that was uploaded.

Admin/Agency View


Contractor eDocument Function
Contractors can:
- View/download Document Templates
- Upload Document for themselves
- View their own documents and those of their subcontractors.
This function is often used by Administrators to receive required documents rather than hard copy.
Contacting LCPtracker Support
Should you need additional assistance please contact our LCPtracker support team:
- Call 714-669-0052 option 4,
- Live Chat, or
- Email Support@LCPtracker.com
Was this article helpful?
That’s Great!
Thank you for your feedback
Sorry! We couldn't be helpful
Thank you for your feedback
Feedback sent
We appreciate your effort and will try to fix the article