Add/Edit Projects
When adding a new project, the fields flagged with a red asterisk (*) are required before the entry can be saved. All other fields are optional. Once you have completed your entry, click “Save”.
To edit your project information, choose the project from the drop-down menu, edit the information, and click Save. After the initial project setup, you will not be able to change the Budget amount. To do so, email support@lcptracker.com and they will be able to assist you with your written request.
If you are using B2GNow to sync your projects over to LCPtracker, please reference the B2G Sync Instructions guide under training materials which explains the steps you need to take.
Note: when syncing over from B2Gnow, it is imperative that after you have synced over your project, the Project Code field should NEVER get modified.
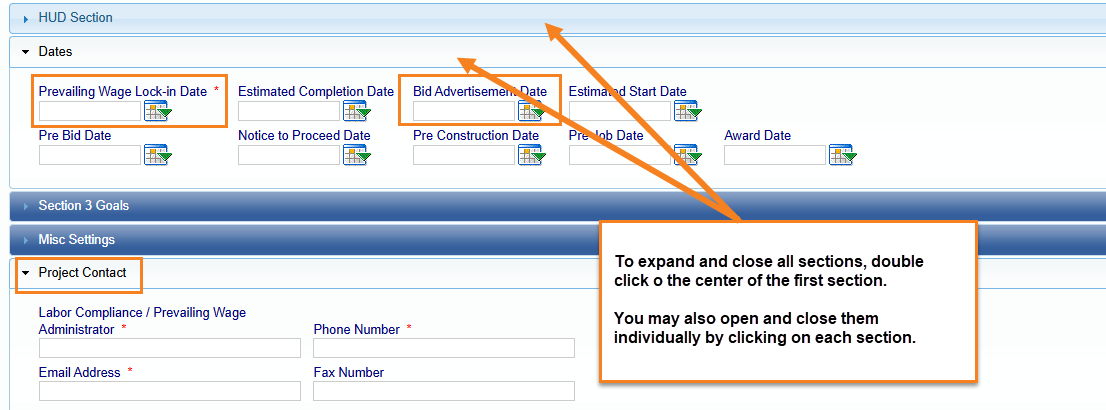
Tips:
- Double click the center of any blue section to expand all sections.
- Double click again to collapse all sections.
- Single click to open/close each section separately.
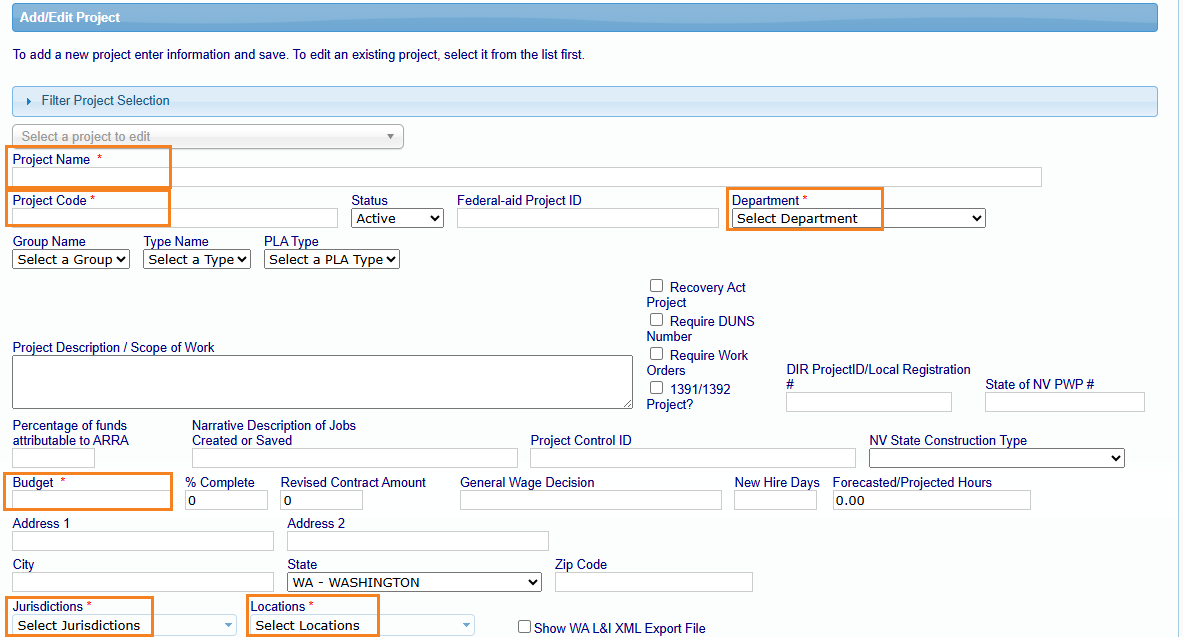
The Agency/Admin would complete the project setup by navigating through the required fields below that are inside the orange boxes.
The orange highlighted field is a requirement for projects located within the state of California ONLY and requires checks against CA state prevailing wages. 
The following information will explain the required fields highlighted above.
- Project Name – This field identifies the project that is being entered. You may choose to repeat the project code in front of the project name if your contractors identify the project more by the code.
- Project Code – This field should be a unique identified code for each project. The project list will sort by the project code. Please note when using B2Gnow that the project code cannot be modified after the project sync.
- Department – This is a feature that can be used if you have various types of projects. The LCPtracker Implementation Project Manager or Account Manager will help explain the benefit to utilizing different departments.
- Budget – The awarded contract amount should be entered in this budget field. If you made a mistake during your entry, you would need to reach out to support@lcptracker.com and include the following:
- Project Name.
- Current dollar amount listed in Budget field for the above noted project.
- The new dollar amount requested for the above noted project.
- Reason for this requested change.
- Jurisdiction – The jurisdiction is typically setup to be equivalent to the type of funding for your project. If you have a new type of project with different funding, i.e., state prevailing vs federal prevailing, you will need to fill out the Jurisdiction/Location Request Form located within the Training Materials to have a new one entered.
- Jurisdiction: Dual/Multiple Funded Projects
Selecting two or more Jurisdictions will prompt the "Default Jurisdiction to Show First on CPRs" box. You can choose which jurisdiction craft/classification is listed first on your certified payroll reports.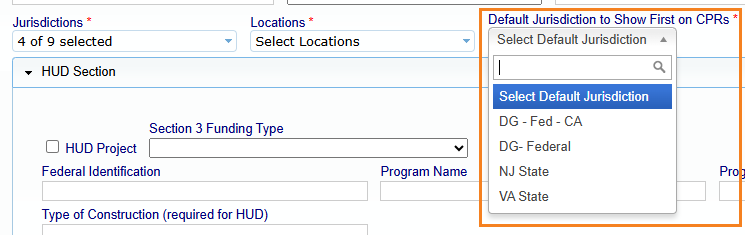
- Jurisdiction: Dual/Multiple Funded Projects
- Location – The location will typically be the county where the work will be performed. For California projects, the locations will already be pre-loaded. Any other locations will need to be requested by filling out the Jurisdiction/Location Request Form located within the Training Materials.
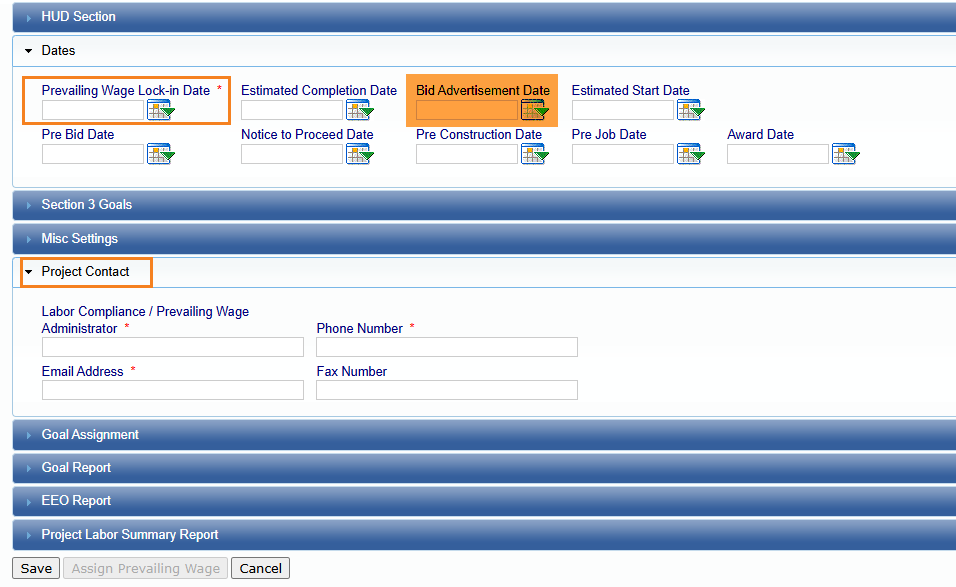
- Prevailing Wage Lock-in Date – This date is sometimes referred to as the Bid Advertisement Date or the Bid Opening Date. The date entered here is what date locked the wages into your particular project.
- Bid Advertisement Date – Some accounts located within the state of California may require this field be entered and other date fields.
- Project Contact section – This section requires name, phone number and email address of the Labor Compliance/Prevailing Wage Administrator. It may also be the Prime Approver if using that functionality. The information entered here will be visible to the Contractor on their landing page.
The remainder of the project setup screen allows you to set a variety of goals for each individual project. Apprentices, Minorities, Women, etc. There is also the ability to assign Wards, Districts, Community areas or Disadvantage for projects with these goal settings. These fields are not required to save the Project Setup and may be left blank if you so choose.
Once you have confirmed that all the data entered is correct, click the Save button to record your data input. Our system always allows you to go back and edit the data as needed except as noted above.
After you have saved your project, depending on your contract terms, you may see that your project status is set to “Suspended”. To activate your project, go to the projects tab and click on “Pay Now” to initiate the invoice. Once you have clicked on the box for your project you want to activate, you should be able to create the invoice then click the x button to take you back to your projects page. Your project should now show active. If you have problems, please reach out to support@lcptracker.com for assistance.
Was this article helpful?
That’s Great!
Thank you for your feedback
Sorry! We couldn't be helpful
Thank you for your feedback
Feedback sent
We appreciate your effort and will try to fix the article