Workforce Manager Landing Page
Structure
Depending on the organization or account, the landing page may look different. Workforce Manager is divided into modules, meaning not all organizations will have the same modules. However, the general elements are the same, which are:
- Top Navigation Bar
- Blue Left-Side Menu
- Modules
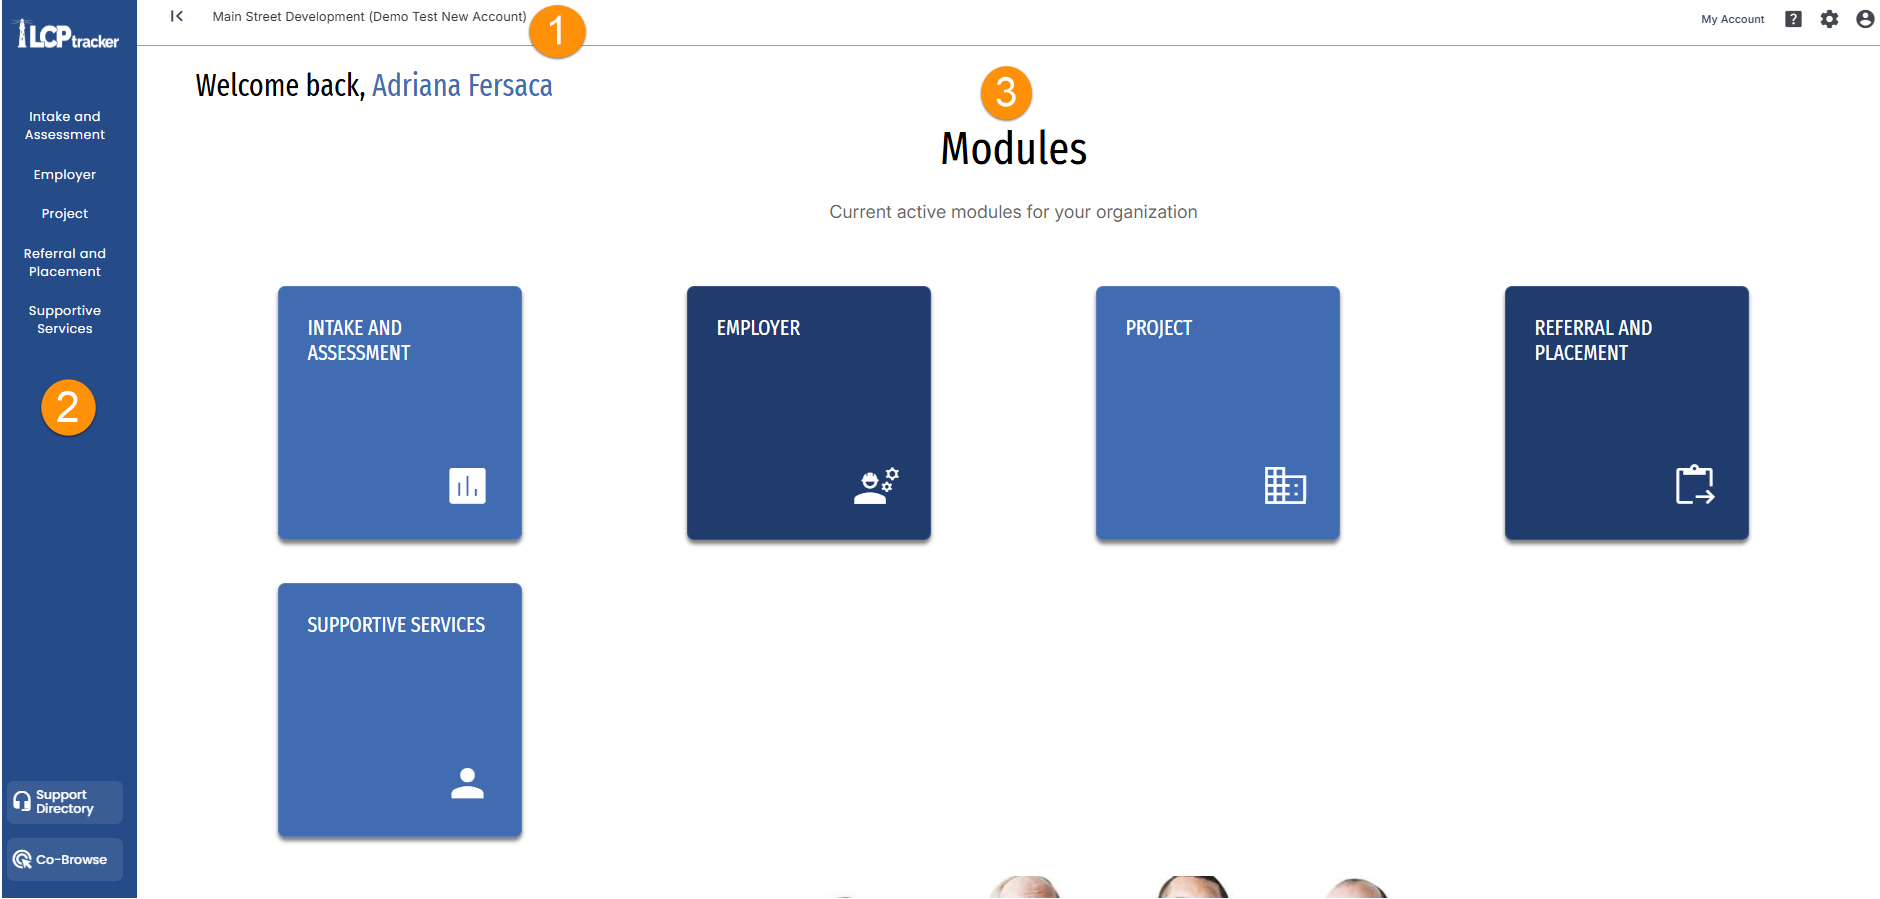
Top Navigation Bar
- Menu icon: Used to hide/view the blue navigation menu on the left-hand side.
- Account Selector: The name of the organization will appear here as well as the ability to switch between accounts.
- My Account: this will take you to the main dashboard with the tiles/products from LCPtracker. Save any work before proceeding.
- Knowledge Base: the question mark icon will take you to our library, known as Knowledge Base, and you can also reach out to support for assistance from this page as well
- Account Settings icon: Clicking on this icon will show the Administrator Account Settings, in which you can edit you profile, manage Account Users, Configure your dropdown menu options for your Modules, and Additional Form Settings.
- Profile Icon: clicking on this icon will show a dropdown menu showing who you are logged in as, your name, and your Sign Out option.

Left Side Navigation Panel
The blue menu on the left-hand side of the screen displays any other LCPtracker products available through the portal, for example Case Manager. The menu allows for easy navigation between products.
- LCPtracker products
- Navigates to Support Directory
- Co-browse functionality enabled
Note: Once inside a module, the blue menu changes and will show the active modules.

Modules
The purpose of the landing page is to show the user what modules are available for their organization. The user logging in will be validated and their name will appear on the landing page. Each tile on the landing page represents a Module. Clicking on any of the tiles will navigate to that specific module.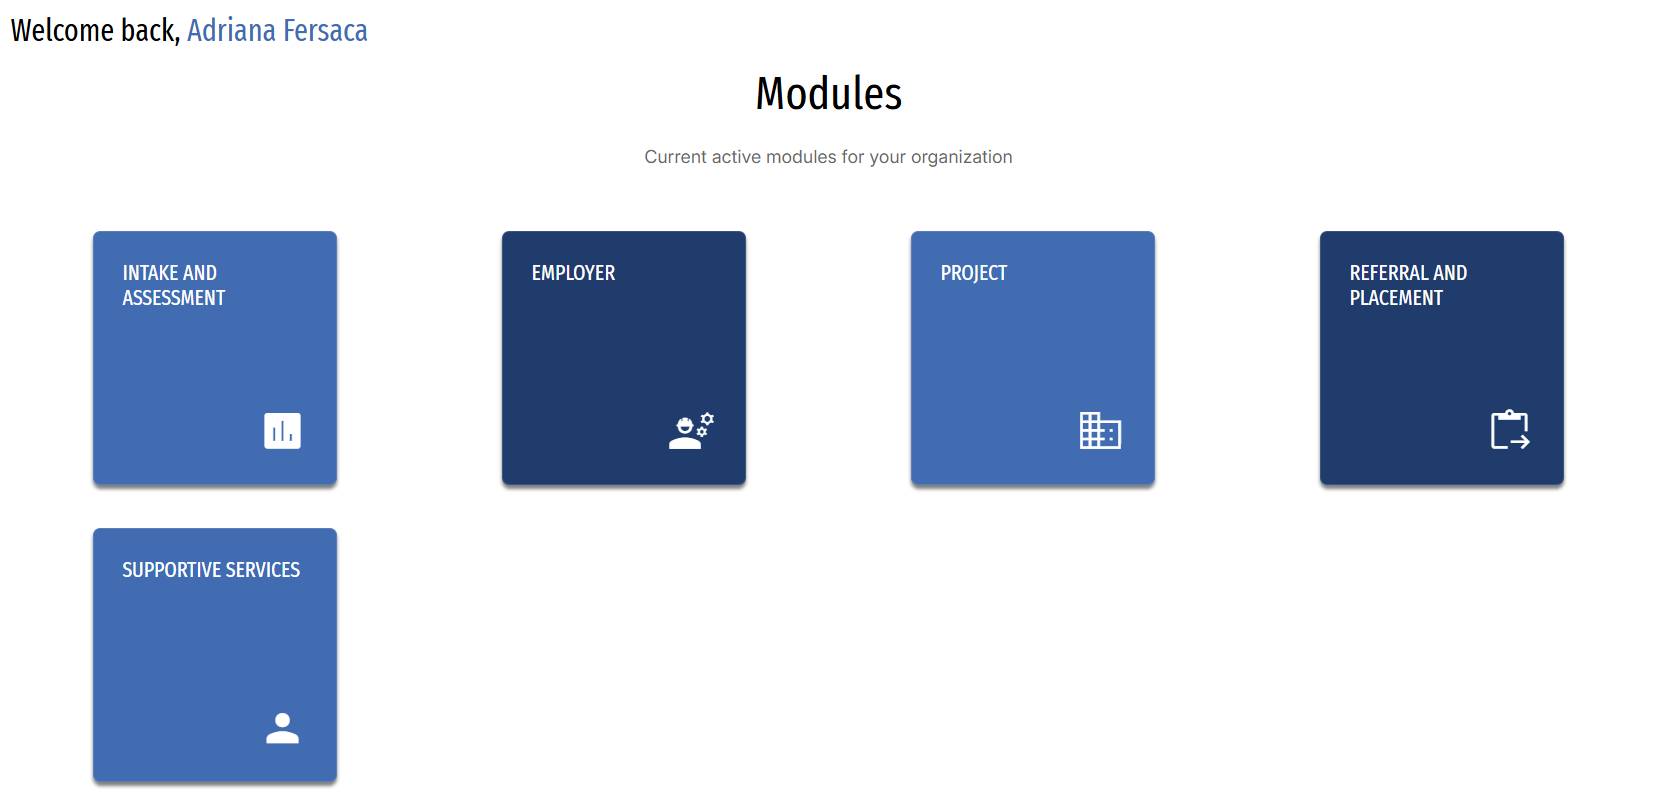
Intake and Assessment Module Structure
Portfolio Records Main Table
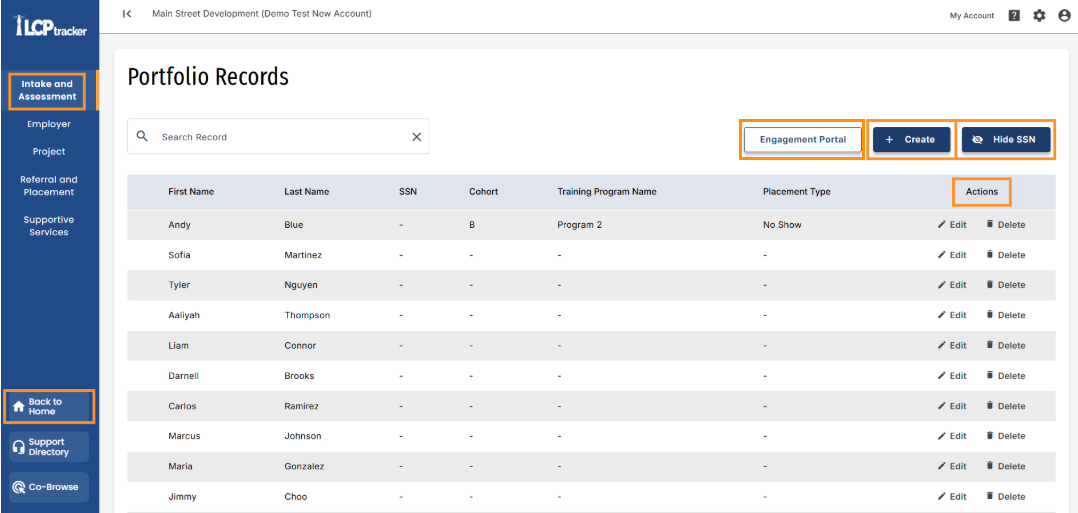
- From the landing page, the user will navigate to the Intake and Assessment Module by clicking on the Intake and Assessment Tile. A table listing all portfolio records will display, the table is sortable and searchable.
- The headings of each column on the table are standard for the module and cannot be customized.
- The blue navigation menu on the left-hand side is different once inside a module. When working on any module, the blue menu will show all available modules that user has. This allows for easy navigation between modules, a Back to Home button is added to navigate back to the landing page.
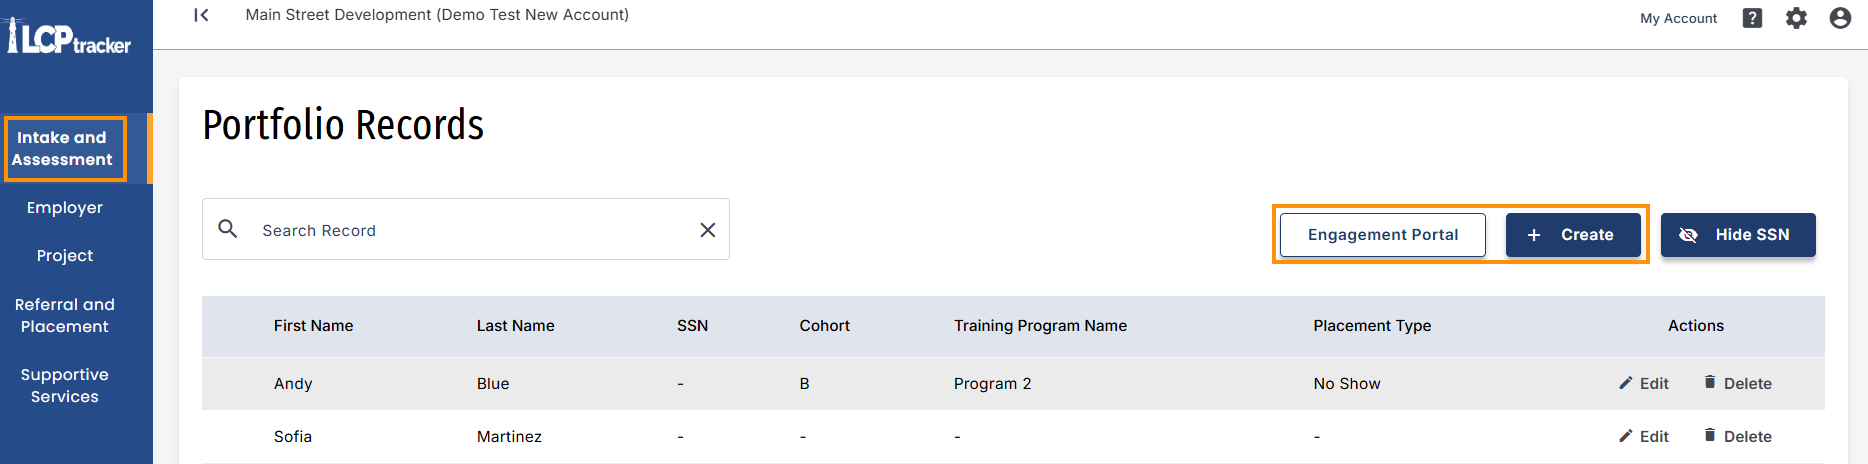
- From the main table, there is the option to Create new portfolios and navigate to the Engagement Portal.
- Hide SSN is also available from the main table.
- Clicking on any part of the table rows will allow the user to view that portfolio’s information.
- Depending on the user permissions, there will be an option to Edit/Delete under the Actions row.
Creating a New Portfolio Record
- To create a new record, select the Create button on the Portfolio Records main table.
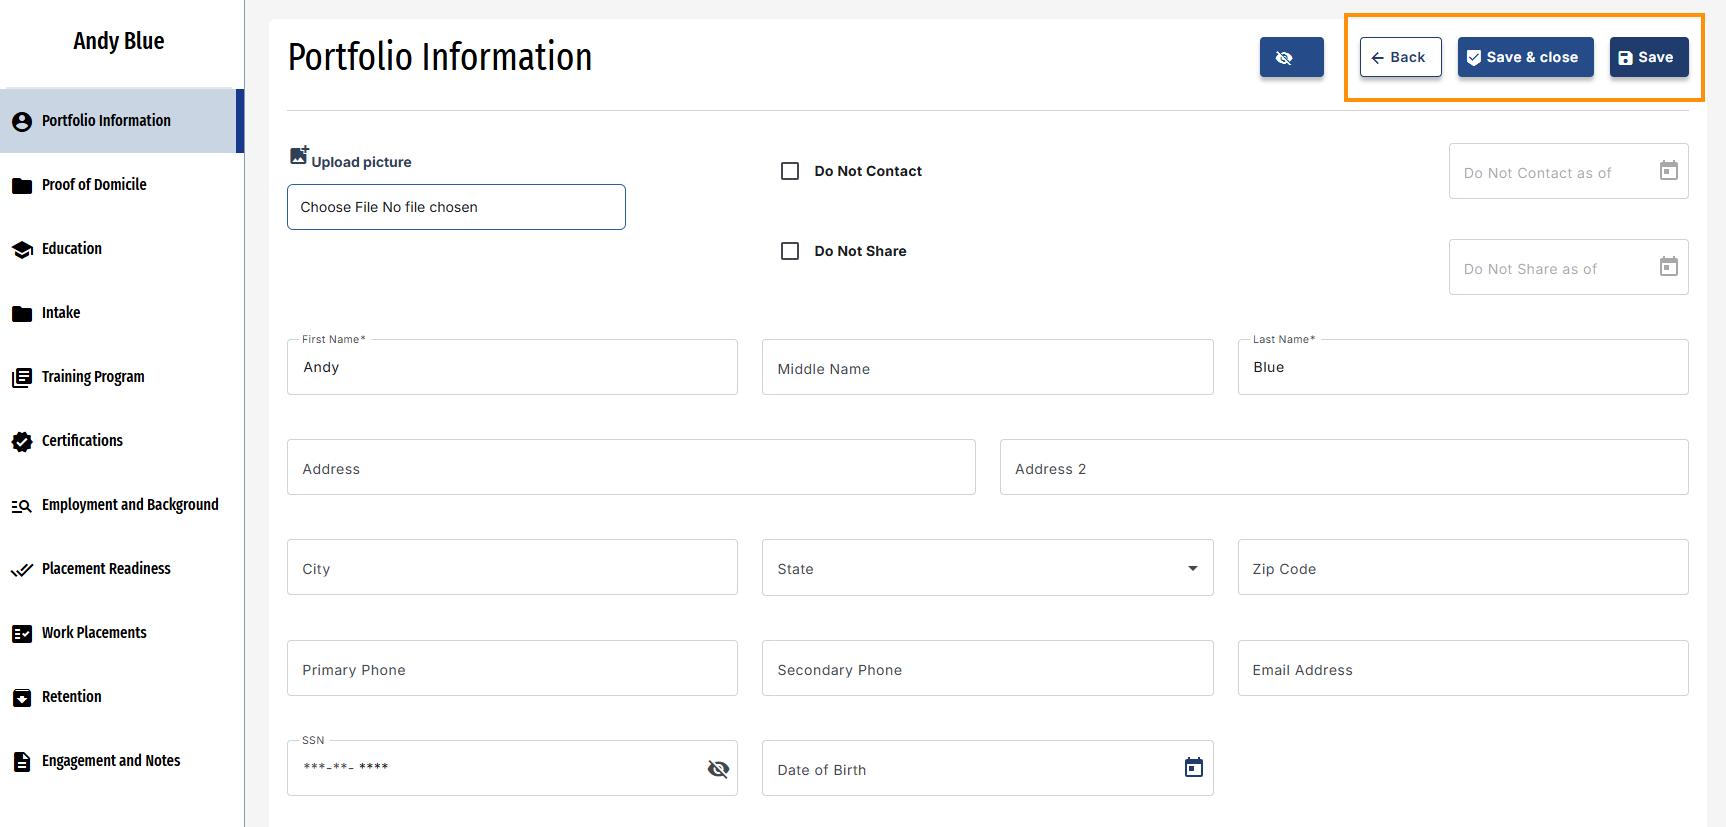
- Navigate to the Portfolio Information form, this form will request specific information about the individual.
- When creating a new portfolio, a new menu will be visible to guide the user through each of the form sections. The sections will appear as disabled until the Portfolio Information fields are filled, and the Create button is pressed. Pressing the Create button saves the record.
- The only required fields on this form are First Name and Last Name.
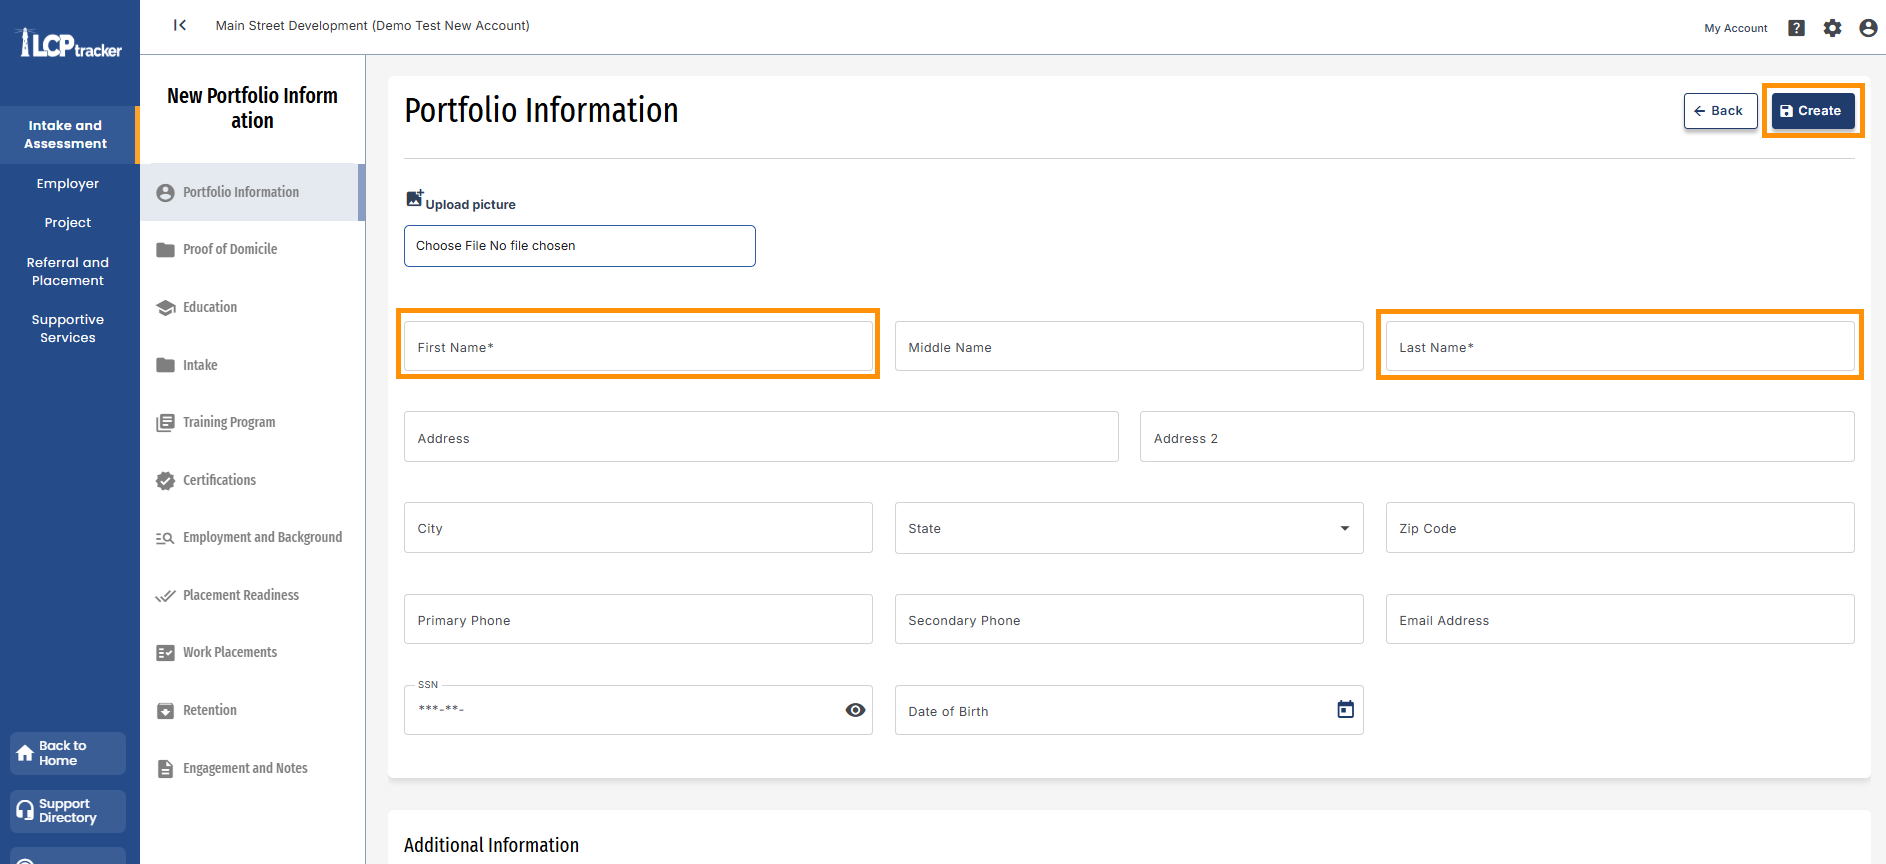
- The form fields are standard; however, it is important to note the following fields:
- SSN: Only the last 4 digits are required.
- Unique ID: This is a system-generated unique identifier and is available only for certain accounts.
- City Council District, County of Residence, and County Supervisorial District fields are configurable dropdowns depending on the accounts decision to utilize. The fields can be defined at the time of onboarding.
- Once the form is saved, the rest of the sections will become active, and the user can continue adding more information. The Save button is to continue adding more information, Save & Close will save changes and return to the main table. The Back button will to the home screen return without saving.
Additional Sections
Proof of Domicile
This section is to save the information regarding proof of addresses. The required fields are:
- Certification Status
- Proof of Identity
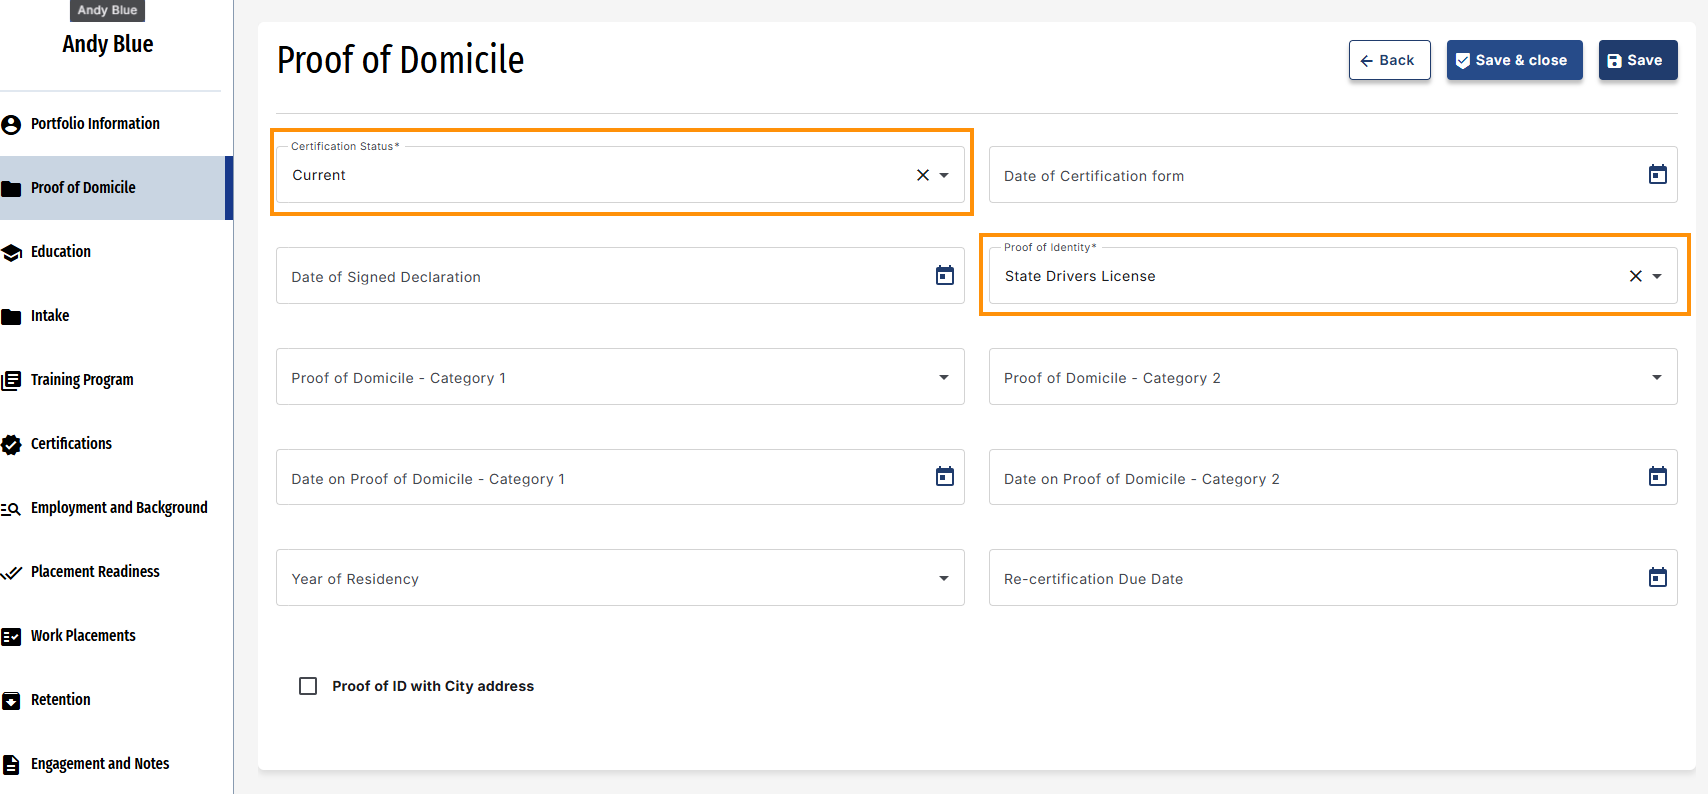
Once the required fields are filled, the form can be saved. Once saved the user can also add attachments.
Education
This section is where the current education status can be recorded. It’s a short form; however, some things to note:
- The Highest Level of Education field is required.
- The College Program Name dropdown options will vary depending on account and are setup during onboarding.
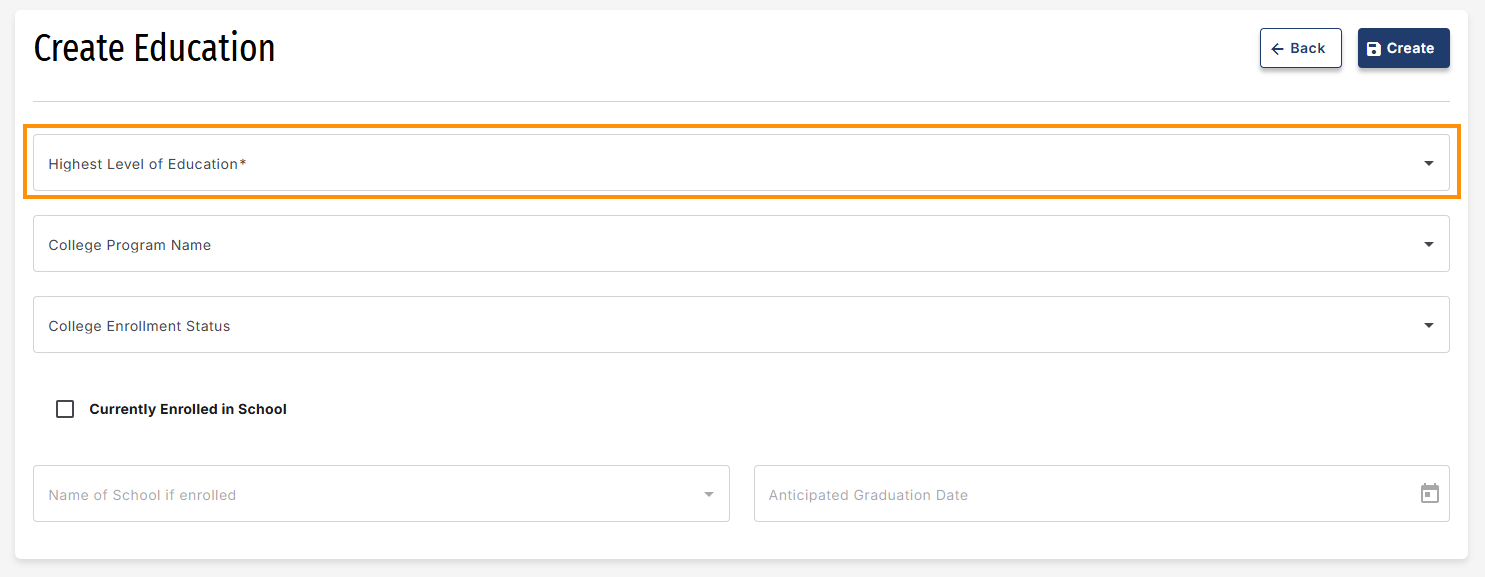
- When selecting the checkbox Currently Enrolled in School, the Name of School if Enrolled and Anticipated Graduation Date fields become available.
- Name of School if Enrolled is also a dropdown that is setup during onboarding using configurable field feature.

Intake
The intake form consists of several checkboxes and nuances, the most important details are:
- The Government Assistance dropdown is multi-select, meaning more than one option can be selected, and there are no limits to the amount that can be selected.
- When selecting the checkbox Disclosure of Disability the corresponding dropdowns become enabled for selection.
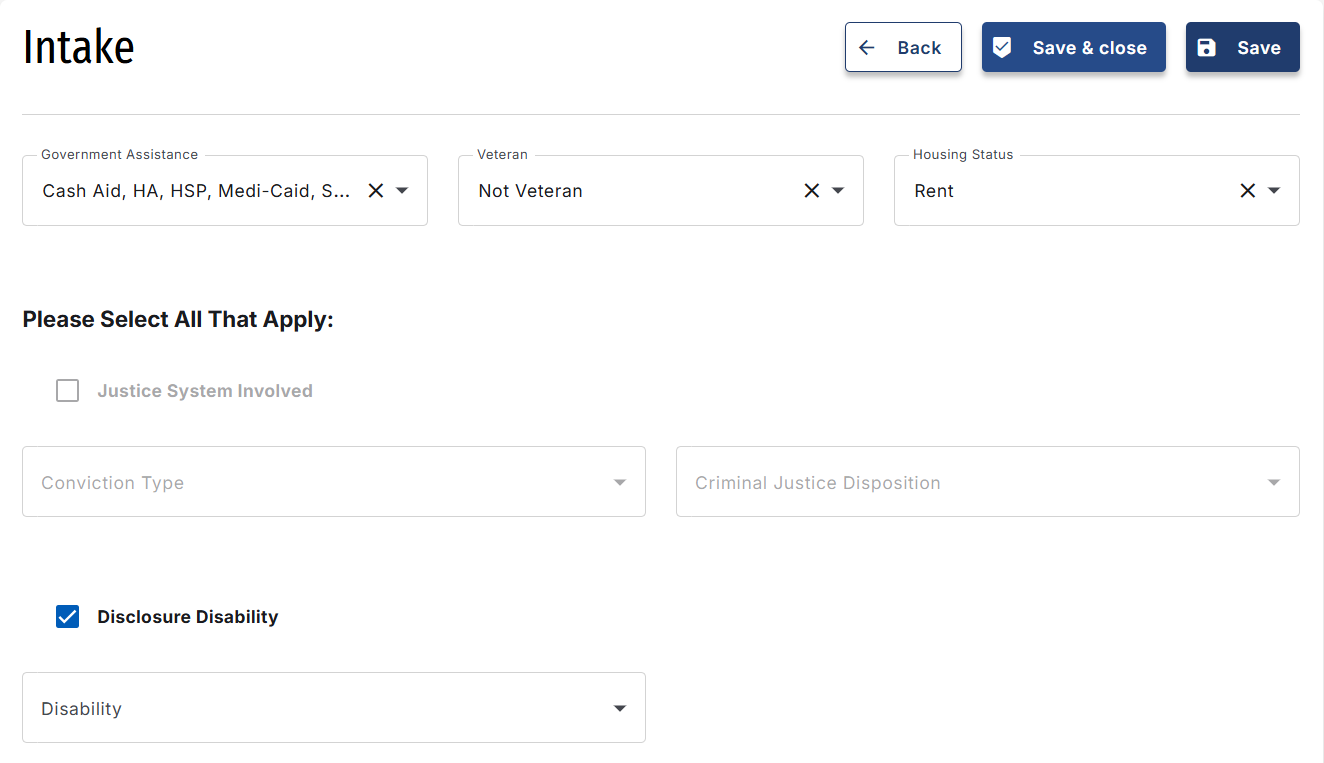
- Justice System Involved, there is a short guide on enabling this feature.
- The ‘Other Programs’ dropdown is multi-select.
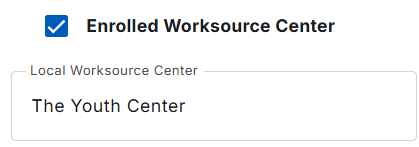
- Selecting the checkbox for Enrolled in Worksource Center will enable the field to type in the name of the local work source center.
- Selecting the checkbox for Pre-Apprentice Training will enable the field to insert the name of the Pre-Apprentice Program and enable the Pre-Apprentice Graduate checkbox.

- Selecting the checkbox for Apprentice Program Enrolled will enable Apprentice Graduate checkbox and also enables Apprentice Program Name, Apprentice Trade, Apprentice Level, and Apprentice Wage.

Training Program
The Training Program is multi-response, which means that there can be more than one record added. When selecting this section, the first screen will be of a table where the different records are listed. The table is searchable, sortable, and has pagination. From this screen, new records can be added.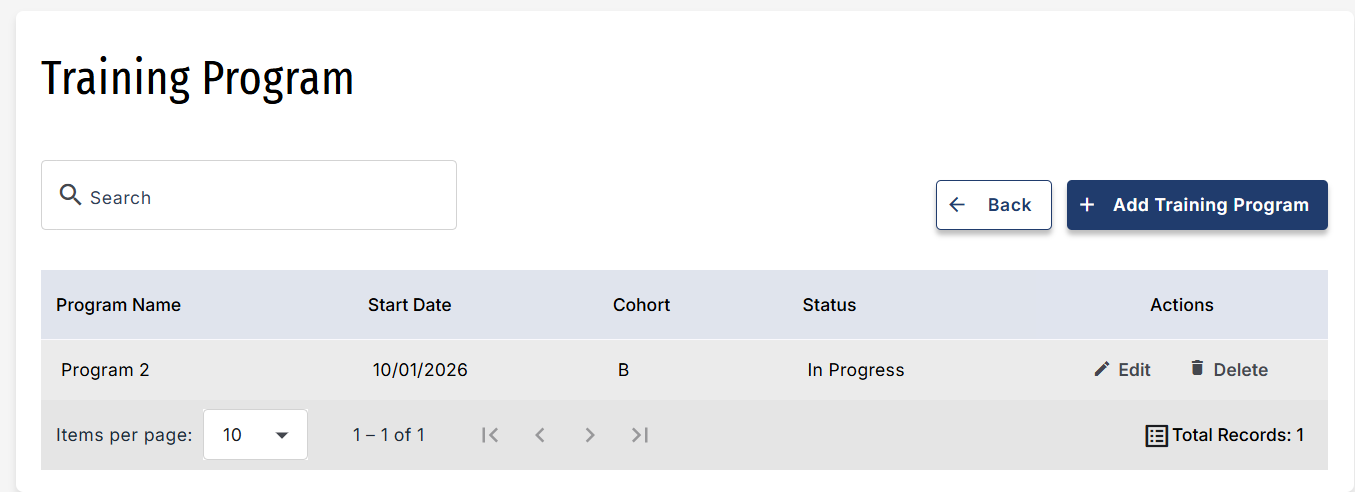
Adding a Training Program
- Select Add Training Program.
- Fill out form, the required fields are:
- Training Program Name
- Training Program Type
- Program Start Date
- Program Status
- Select the Create button to save the new entry.
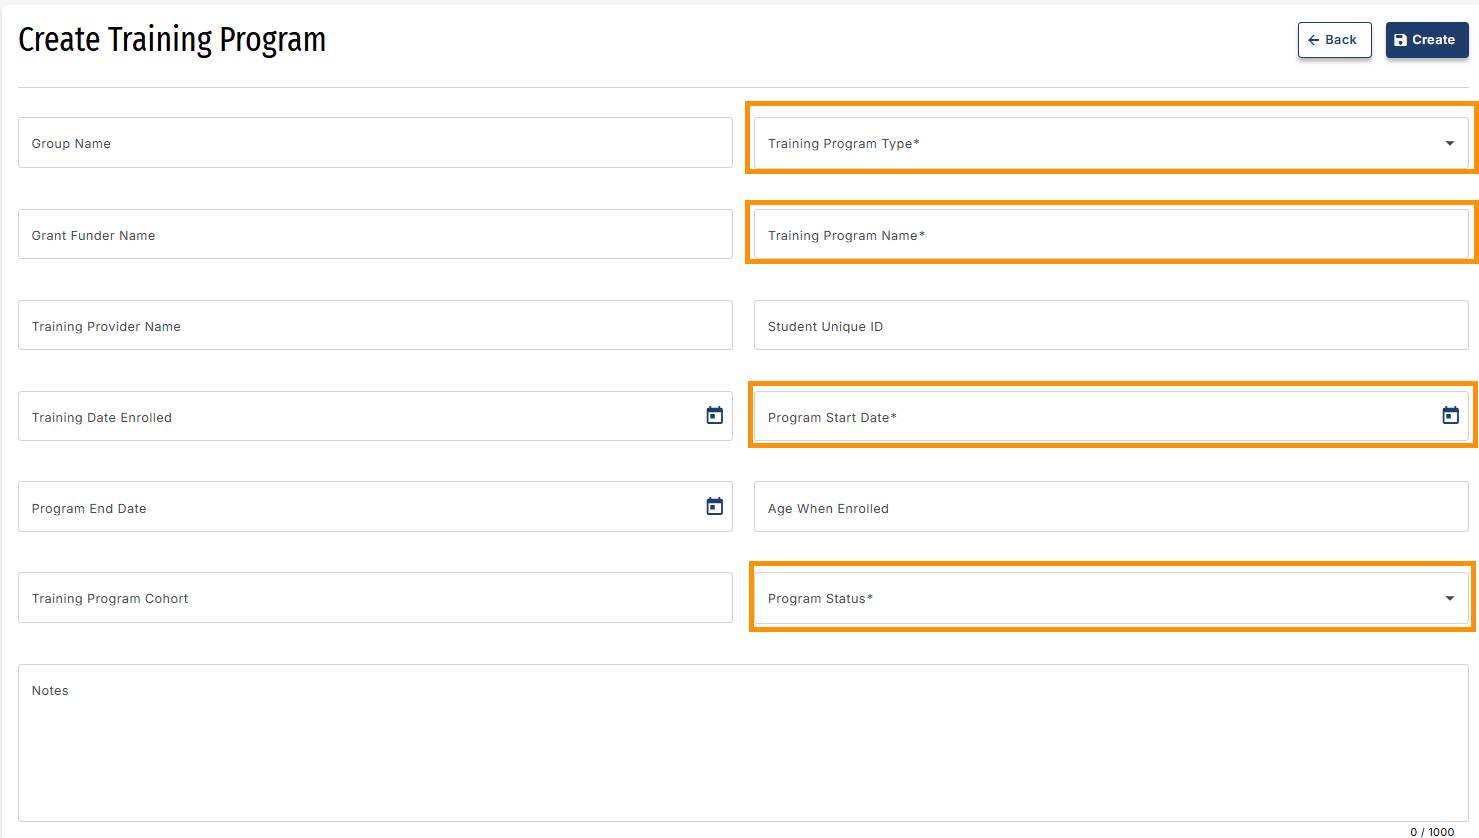
- Once a new entry is created, the ability to add attachments is enabled.

Editing and Deleting a Training Program
- From the training program multi-response table, locate the 'Actions' column.
- Depending on the user role, and permissions, there will be two options: ‘Edit’ and ‘Delete’.
- To edit an entry, click on the ‘Edit’ button.
- The 'Training Program' form will be shown, and changes can be made to any of the fields.
- Click on ‘Save’ or ‘Save and Close’ to go back to the Training Program table.
- To delete an entry, click on the ‘Delete’ button.
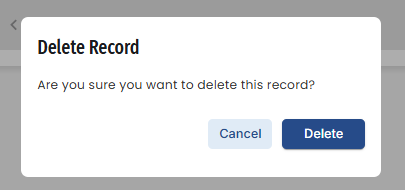
- A confirmation dialog box will appear to confirm the action.
- Click on ‘Delete’ to confirm the action and delete the selected record.
Certifications
The Certifications section is multi-response, which means that there can be more than one record added. When selecting this section, the first screen will be of a table where the different records are listed. The table is searchable, sortable, and has pagination. From this screen, new records can be added. 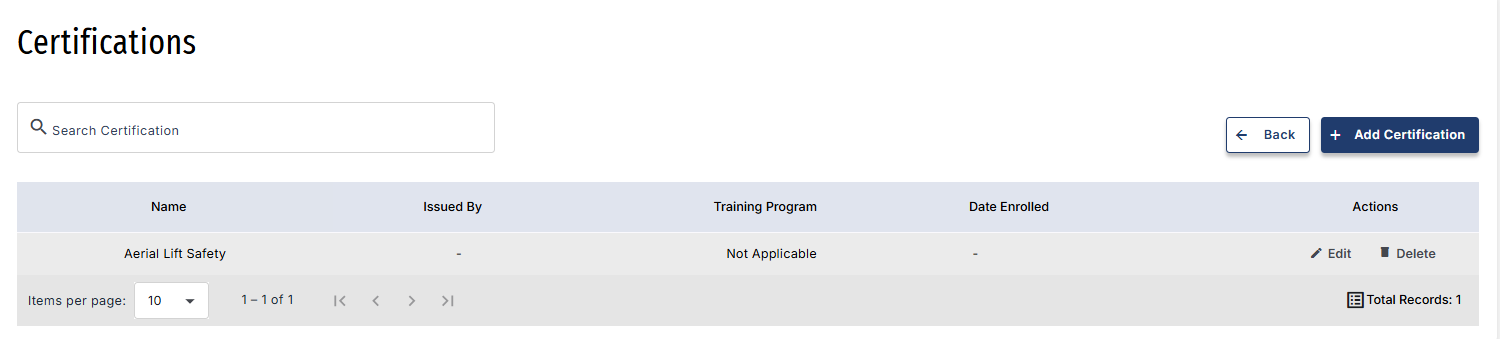
Adding a Certification
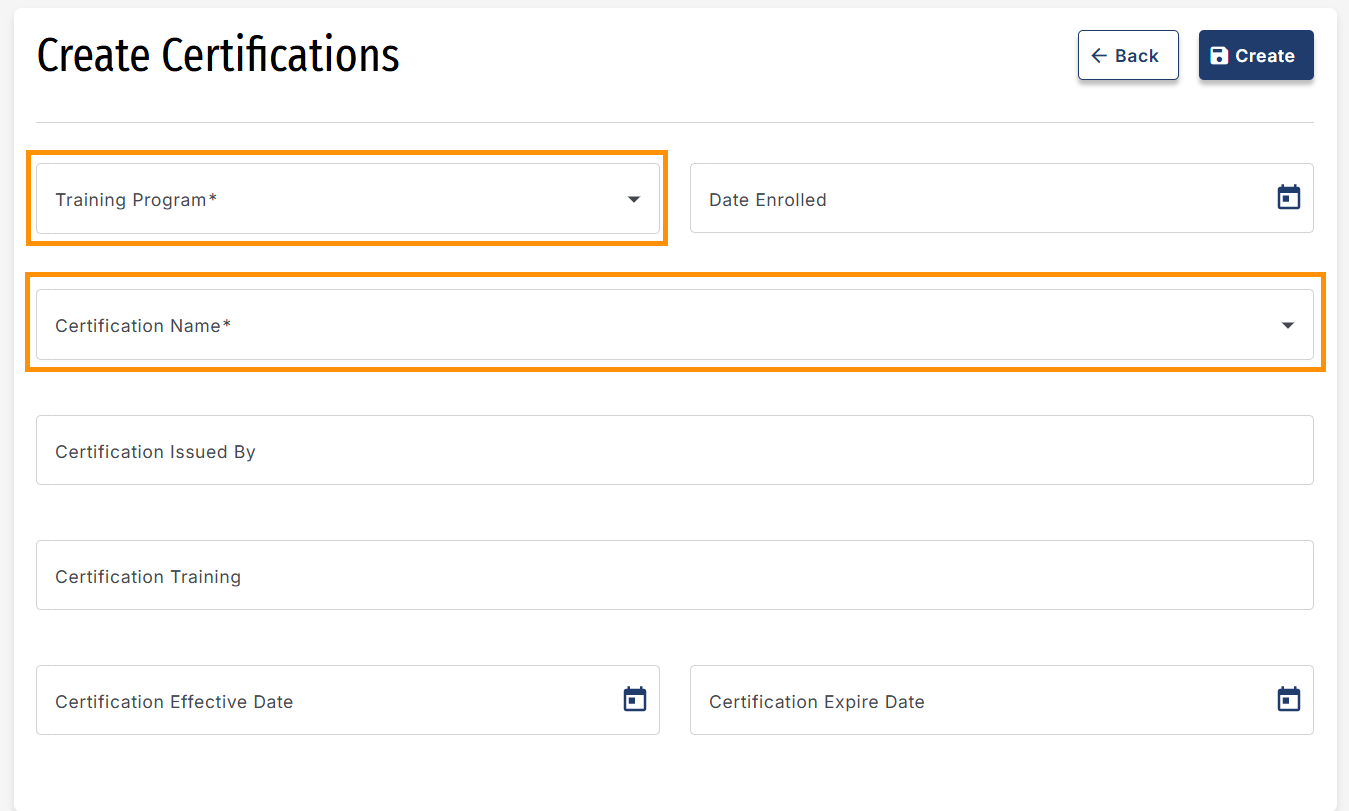
- Click on the Add Certification button.
- Fill out form, the required fields are:
- Training Program – these are setup during onboarding
- Certification Name
- Click on the Create button to save the new entry.
- Once a new entry is created, the ability to add attachments is enabled.
Editing and Deleting a Certification
- From the certifications multi-response table, locate the 'Actions' column.
- Depending on the user role and permissions, there will be two options: 'Edit' and 'Delete'
- To edit an entry, click on the ‘Edit’ button.
- The 'Certifications form' will be shown, and changes can be made to any of the fields.
- Click on ‘Save’ or ‘Save and Close’ to go back to the Certifications table.
- To delete an entry, click on the ‘Delete’ button.
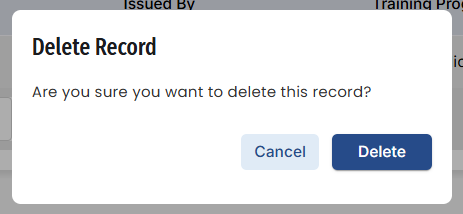
- A confirmation dialog box will appear to confirm the action.
- Select ‘Delete’ to confirm the action and delete the selected record.
Employment and Background
This form is divided into four sections:
- At Intake.
- At Intake Construction Pathway.
- Program Completion Construction Journey.
- Programs.
The required fields are:
- Current Job Title
- Occupation of Interest
- Experience in Interested Trade
Once the employment and background form is saved, the ability to add attachments is enabled.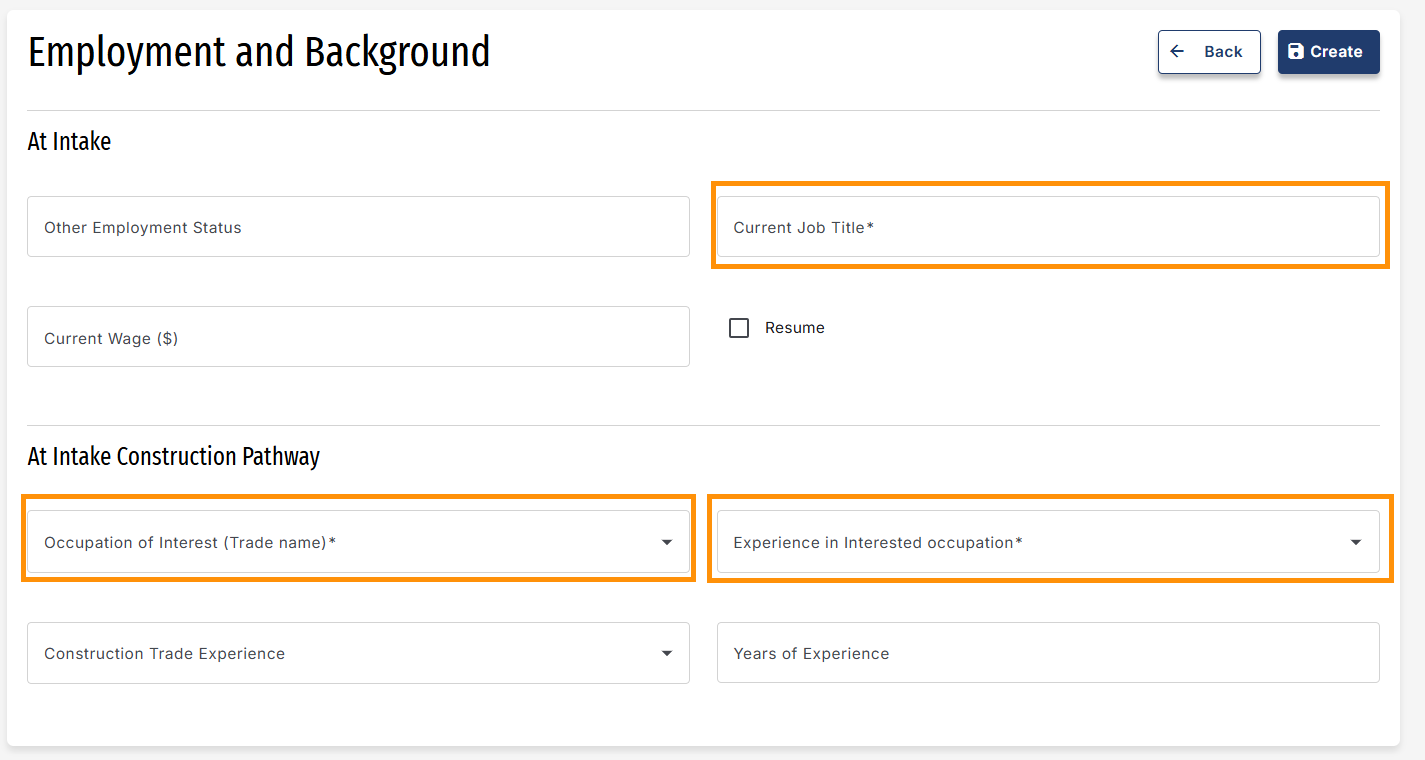
Placement Readiness
The Placement Readiness section is multi-response, which means that there can be more than one record added. When selecting this section, the first screen will be of a table where the different records are listed. The table is searchable, sortable, and has pagination. From this screen, new records can be added.
Adding a Placement
- Click on the 'Add Placement Readiness' button.
- Fill out form. The required fields are:
- Preferred Trade
- Preferred Trade – Second Choice
- Click on the Create button to save the new entry.
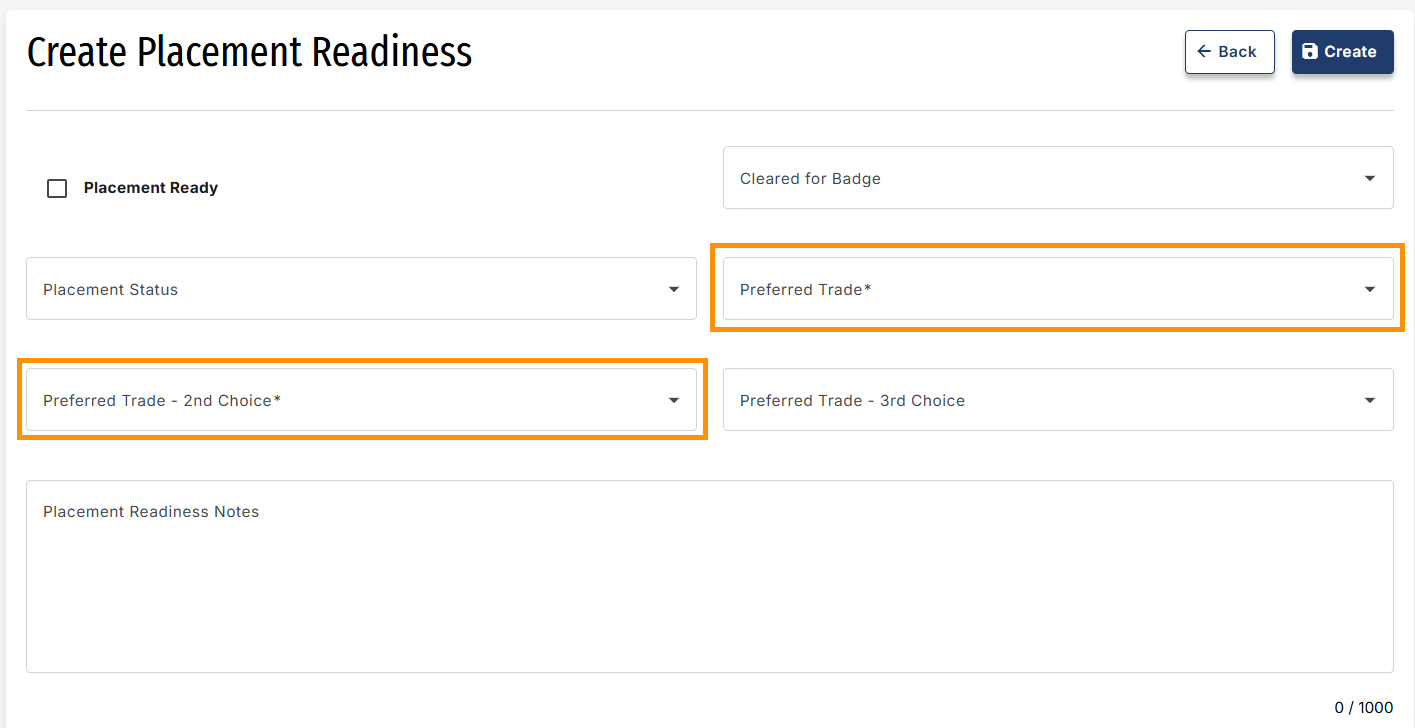
- Once a new entry is created, the ability to add attachments is enabled.
Editing and Deleting a Placement
- From the certifications multi-response table, locate the 'Actions' column.
- Depending on the user role and permissions, there will be two options: 'Edit' and 'Delete'.
- To edit an entry, click on the ‘Edit’ button.
- The Certifications form will be shown, and changes can be made to any of the fields.
- Click on ‘Save’ or ‘Save and Close’ to go back to the Readiness Placement table.
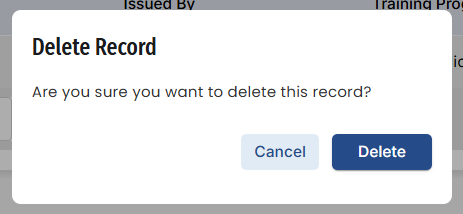
- To delete an entry, click on the ‘Delete’ button.
- A confirmation dialog box will appear to confirm the action.
- Click on Delete to confirm the action and delete the selected record.
Work Placement
The Work Placements section is multi-response, which means that there can be more than one record added. When selecting this section, the first screen will be of a table where the different records are listed. The table is searchable, sortable, and has pagination. From this screen, new records can be added.
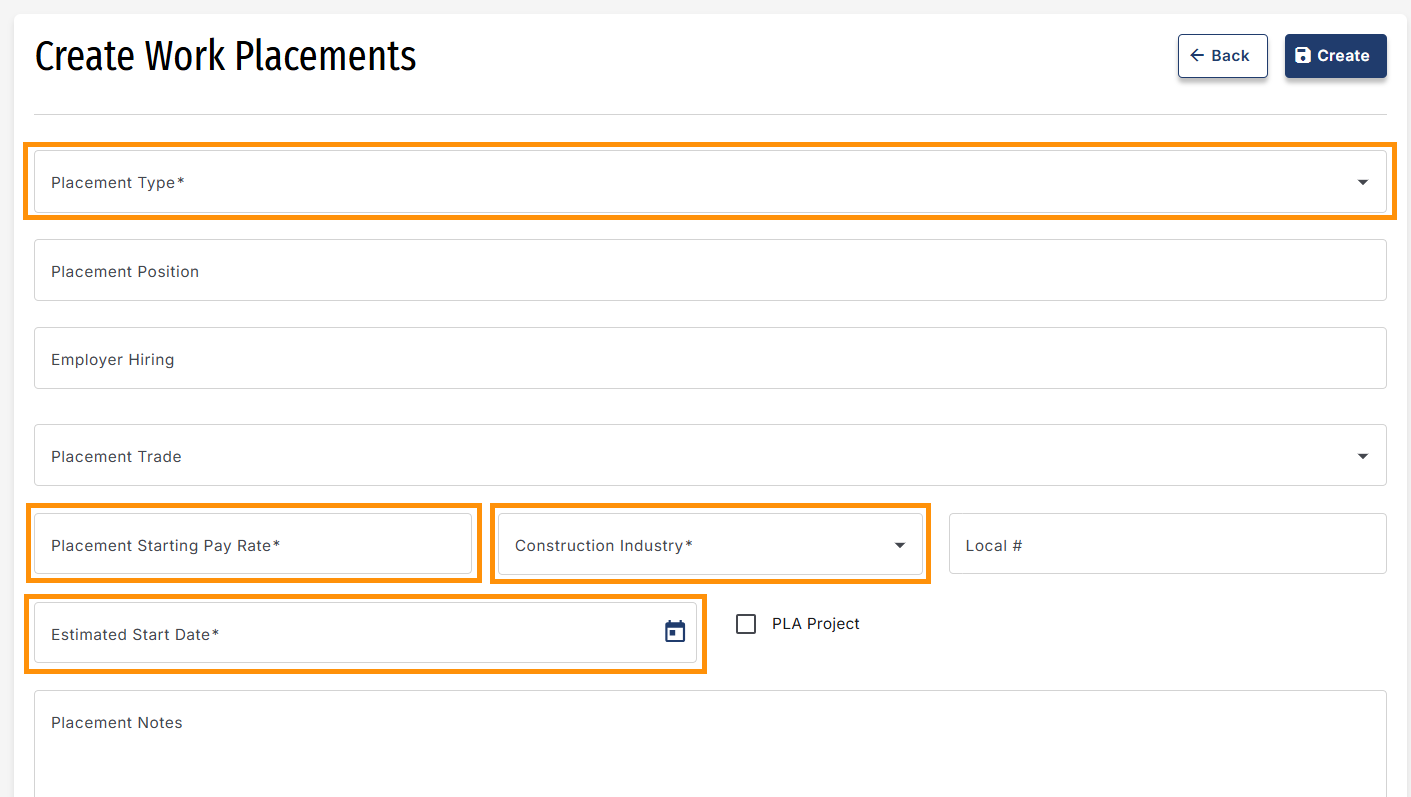
Adding a Work Placement
- Click on the ‘Add Work Placement’ button.
- Fill out form. The required fields are:
- Placement Type
- Placement Starting Pay Rate
- Construction Industry
- Estimated Start Rate
- Click on the Create button to save the new entry
- Once a new entry is created, the ability to add attachments is enabled.
Editing and Deleting a Work Placement
- From the certifications multi-response table, locate the 'Actions' column.
- Depending on the user role and permissions, there will be two options: 'Edit' and 'Delete'.
- To edit an entry, click on the ‘Edit’ button.
- The Certifications form will be shown, and changes can be made to any of the fields.
- Click on ‘Save’ or ‘Save and Close’ to go back to the Certifications table.
- To delete an entry, click on the ‘Delete’ button.
- A confirmation dialog box will appear to confirm the action.
- Click on ‘Delete’ to confirm the action and delete the selected record.
Retention
The Retention section is multi-response, which means that there can be more than one record added. When selecting this section, the first screen will be of a table where the different records are listed. The table is searchable, sortable, and has pagination. From this screen, new records can be added.
Adding a Retention Record
- Click on the ‘Add Retention’ button.
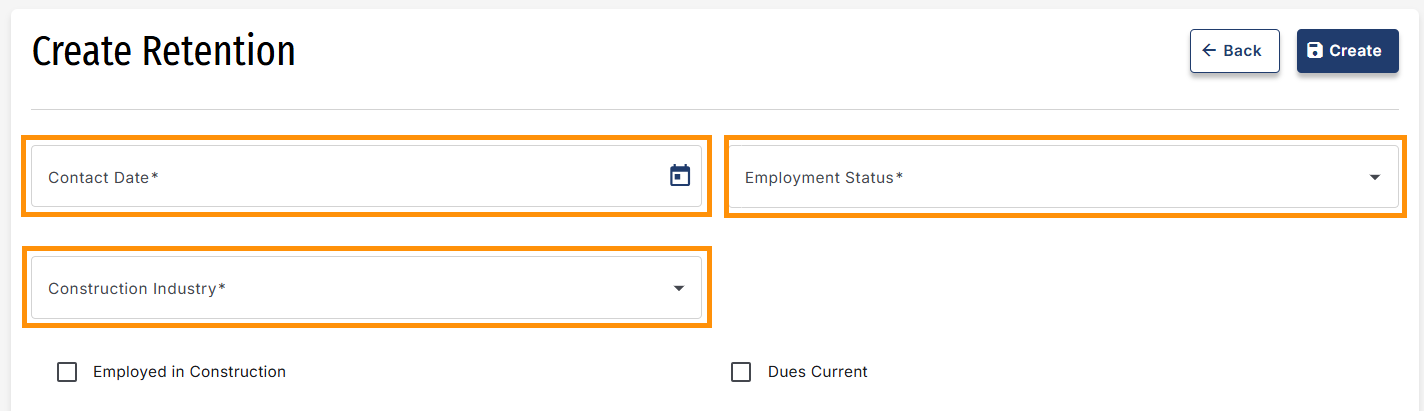
- Fill out form, the required fields are:
- Contact Date
- Employment Status
- Construction Industry
- Click on the Create button to save the new entry.
- Once a new entry is created, the ability to add attachments is enabled.
Engagement and Notes
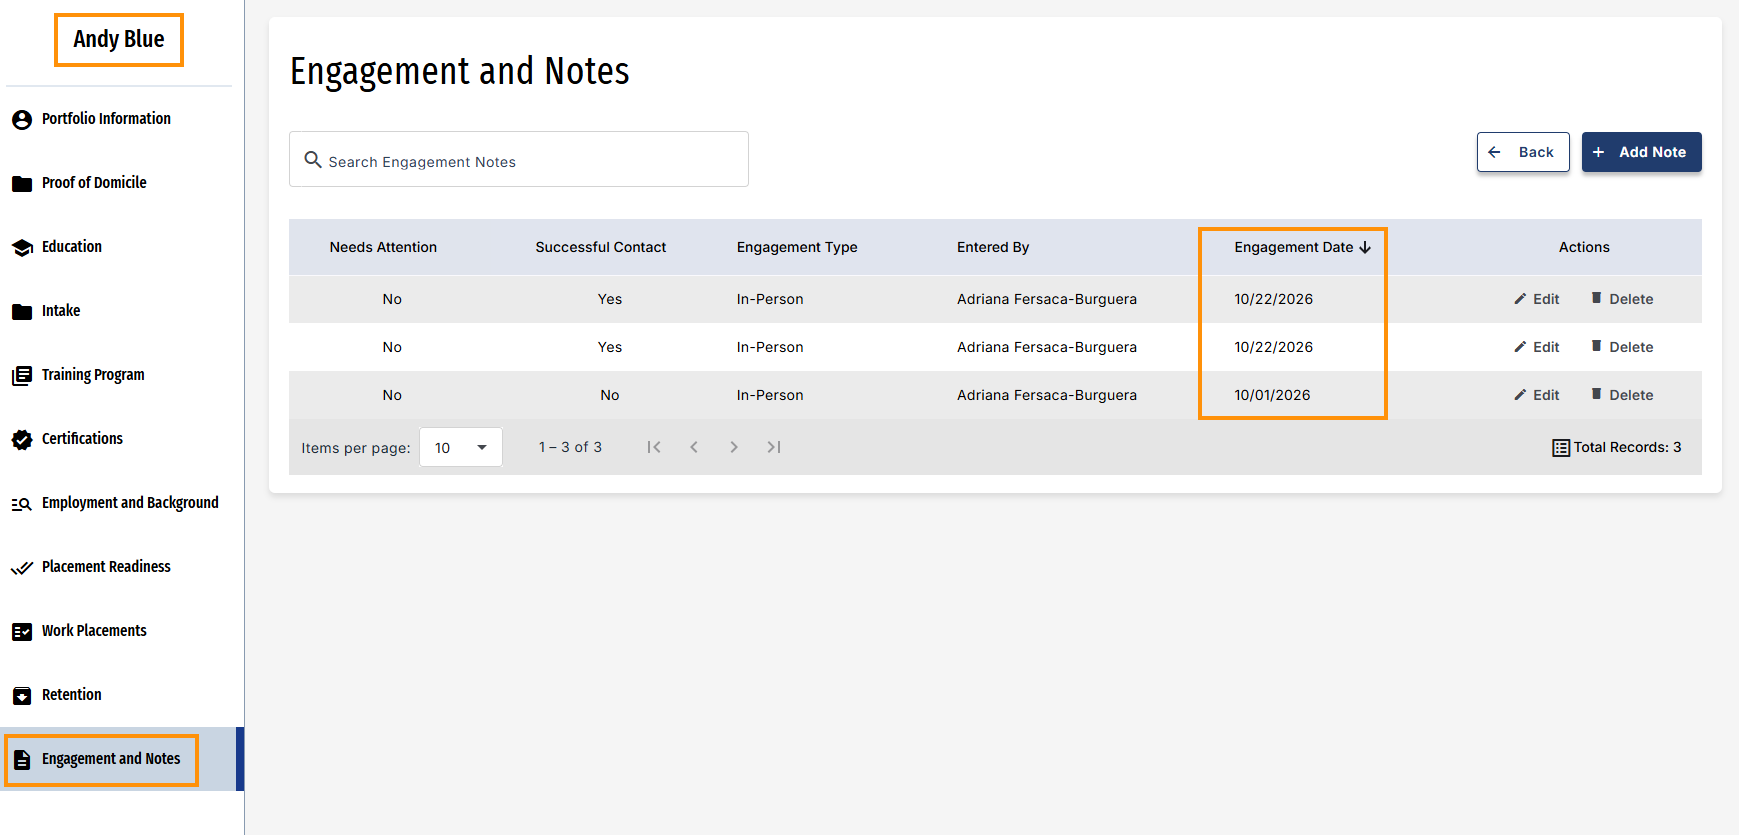
The Engagement and Notes section is multi-response, which means that there can be more than one record added. When selecting this section, the first screen will be of a table where the different records are listed. The table is searchable, sortable, and has pagination. From this screen, new records can be added. Things to note, there may be records in this section coming from the Engagement Portal, if that feature is actively being utilized.
Adding an Engagement Note
- Click on the ‘Add Note’ button.
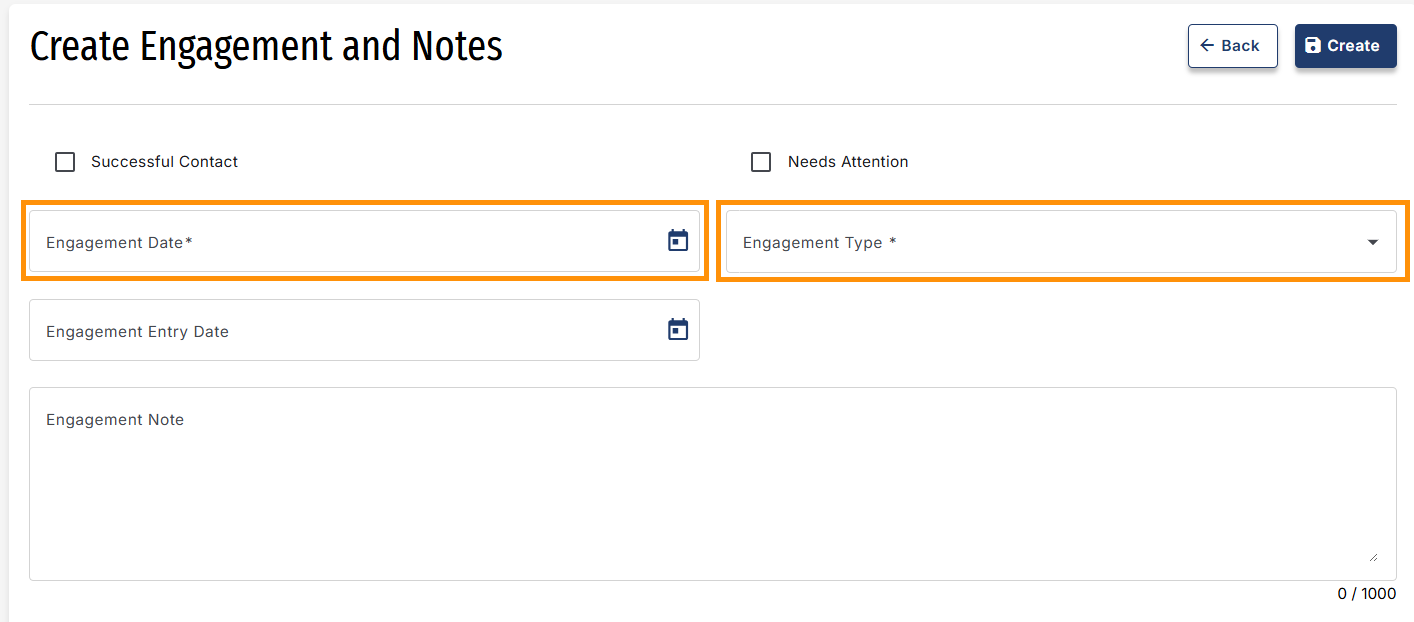
- Fill out the form, the required fields are:
- Engagement Date
- Engagement Type
- Click on the Create button to save the new entry.
- Once a new entry is created, the ability to add attachments is enabled.
Editing and Deleting an Engagement Note
- From the certifications multi-response table, locate the 'Actions' column.
- Depending on the user role and permissions, there will be two options: 'Edit' and 'Delete'.
- To edit an entry, click on the ‘Edit’ button.
- The Engagement Note form will be shown, and changes can be made to any of the fields.
- Click on ‘Save’ or ‘Save and Close’ to go back to the Certifications table.
- To delete an entry, click on the ‘Delete’ button.
- A confirmation dialog box will appear to confirm the action.
- Click on ‘Delete’ to confirm the action and delete the selected record.
Engagement Portal
The Engagement Portal is available as an Intake and Assessment add-on. The purpose of the portal is to easily engage with several workers at the same time while on a job site and record the date of the engagement using a mobile device (tablet). The use-case is for in-person visits out on the field. The information is then added to each of the workers' portfolios, under the Engagement and Notes section.
How to Use the Engagement Portal
- If the account has the Engagement Portal active, its button will appear above the Intake and Assessment main table, next to the Create button.
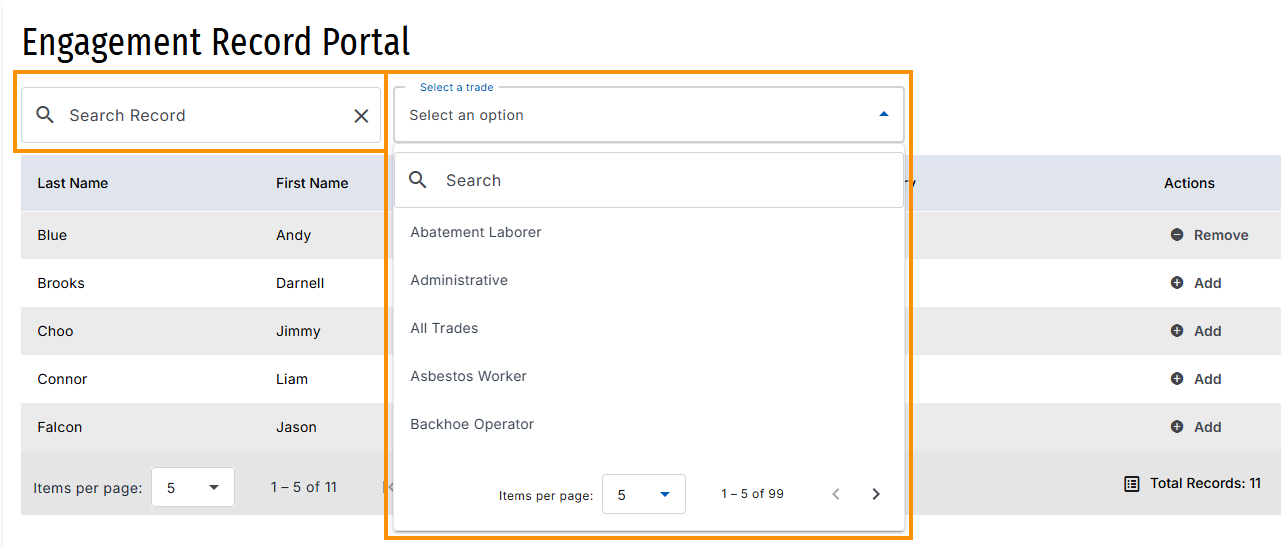
- The portal consists of a table with a list of all the account’s portfolio records. Next to the table is a container where the workers selected will be listed for Check-in upon clicking Add from the Actions column.
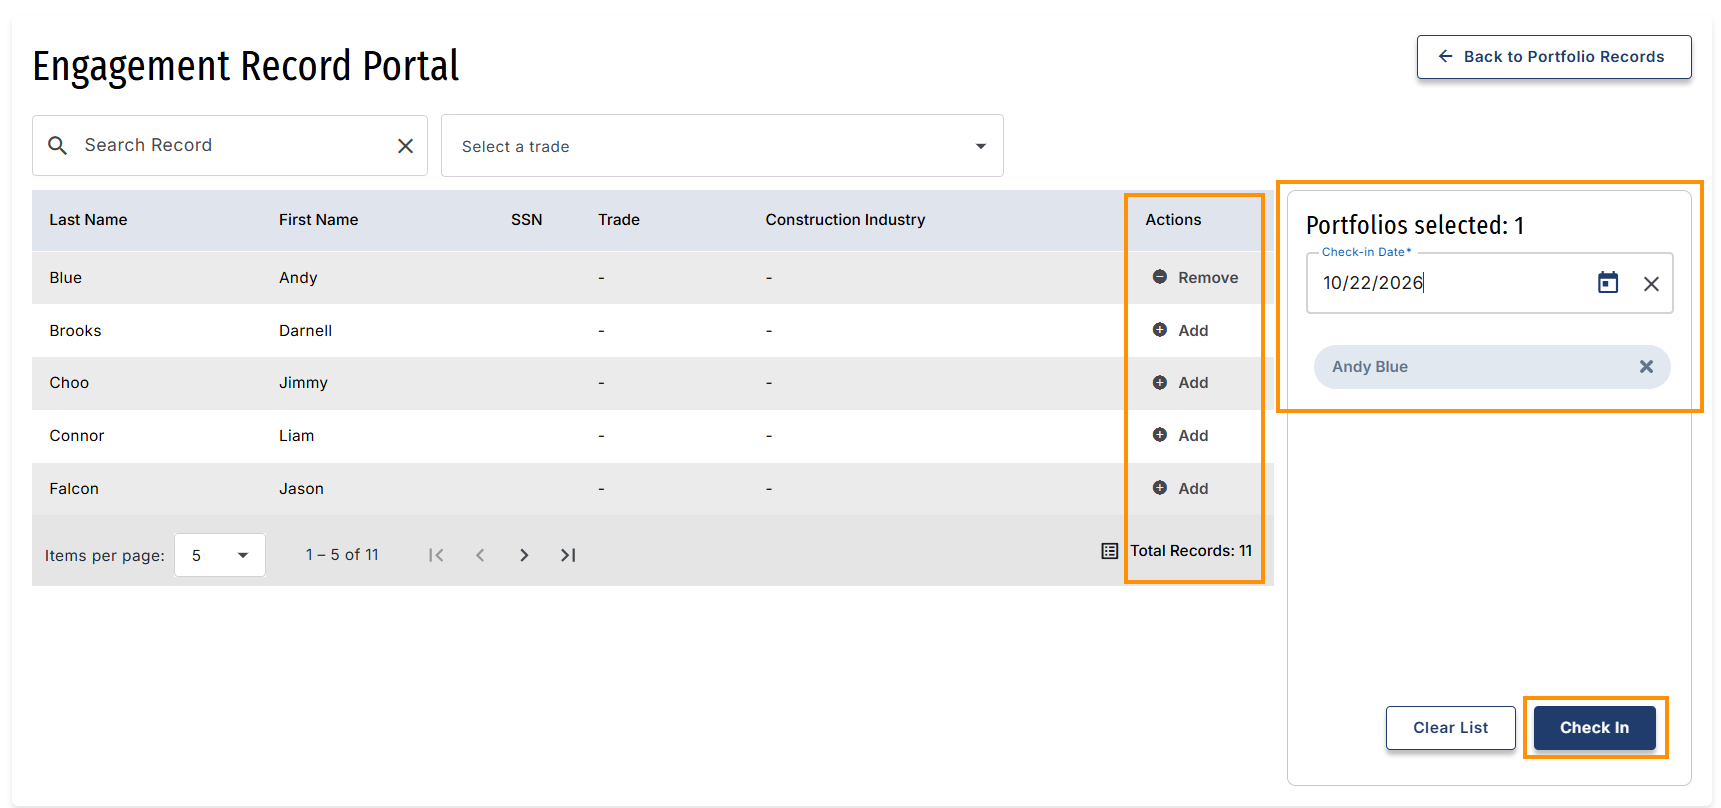
- The table is searchable and sortable. It can also be filtered by trade, meaning if the engagement will only be with a specific trade, that specific selection of records will be shown for your account. They are easily added to the list, see example below.
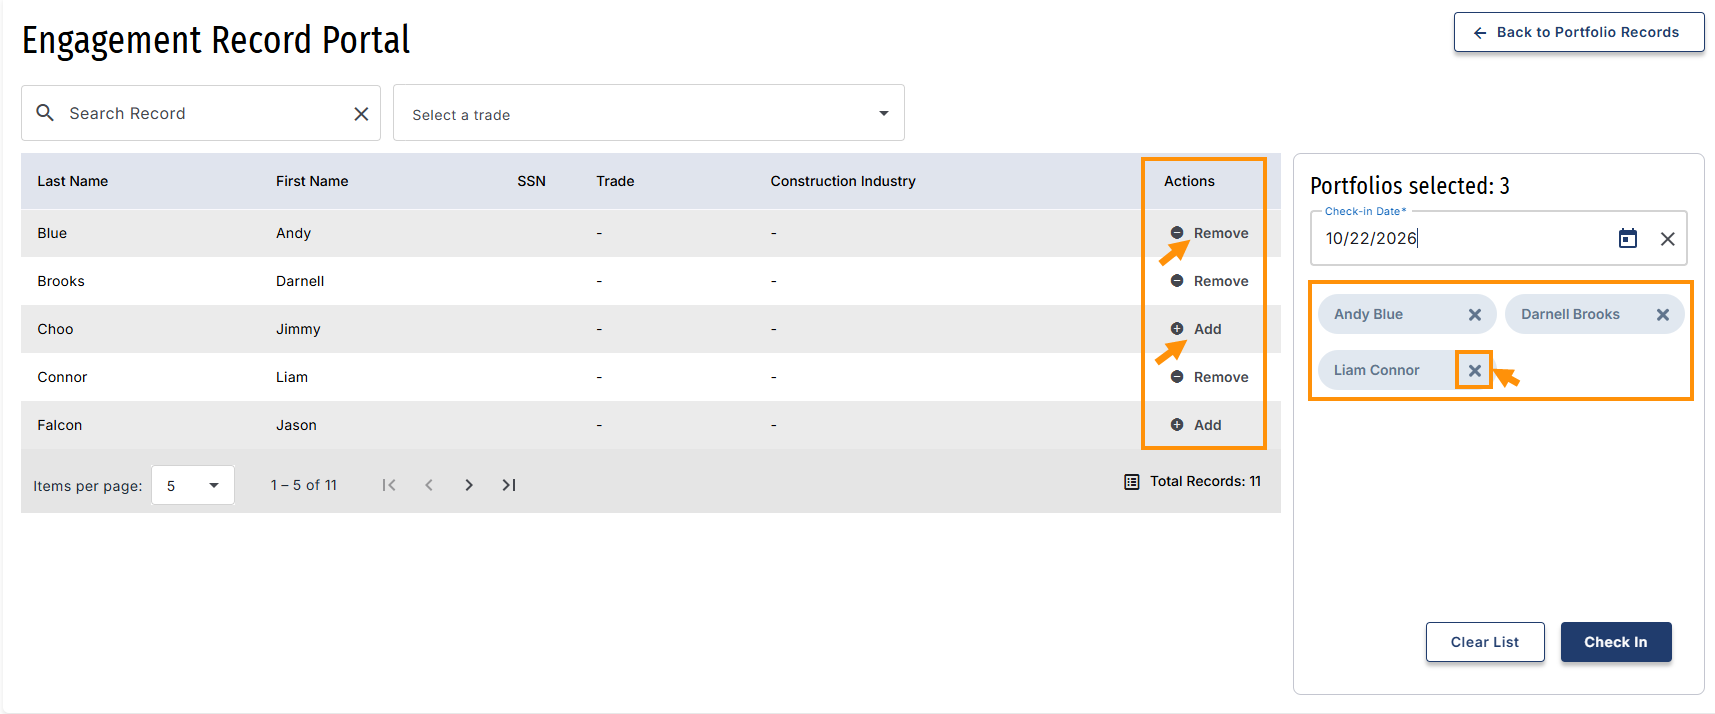
- To select a worker, click on the Add button from the Actions column of the table. When clicked on, the name of the worker will then appear on the Portfolios Selected area. The Add button will change to Remove in case that selected worker needs to be removed from the list. Clicking on the X on the worker’s name will also remove it from the Portfolios Selected list.
- NOTE: there is a maximum of 24 records that can be added on the list at a time. If more than 24 workers need to be added, then the process would be done as many times as needed.
- NOTE: there is a maximum of 24 records that can be added on the list at a time. If more than 24 workers need to be added, then the process would be done as many times as needed.
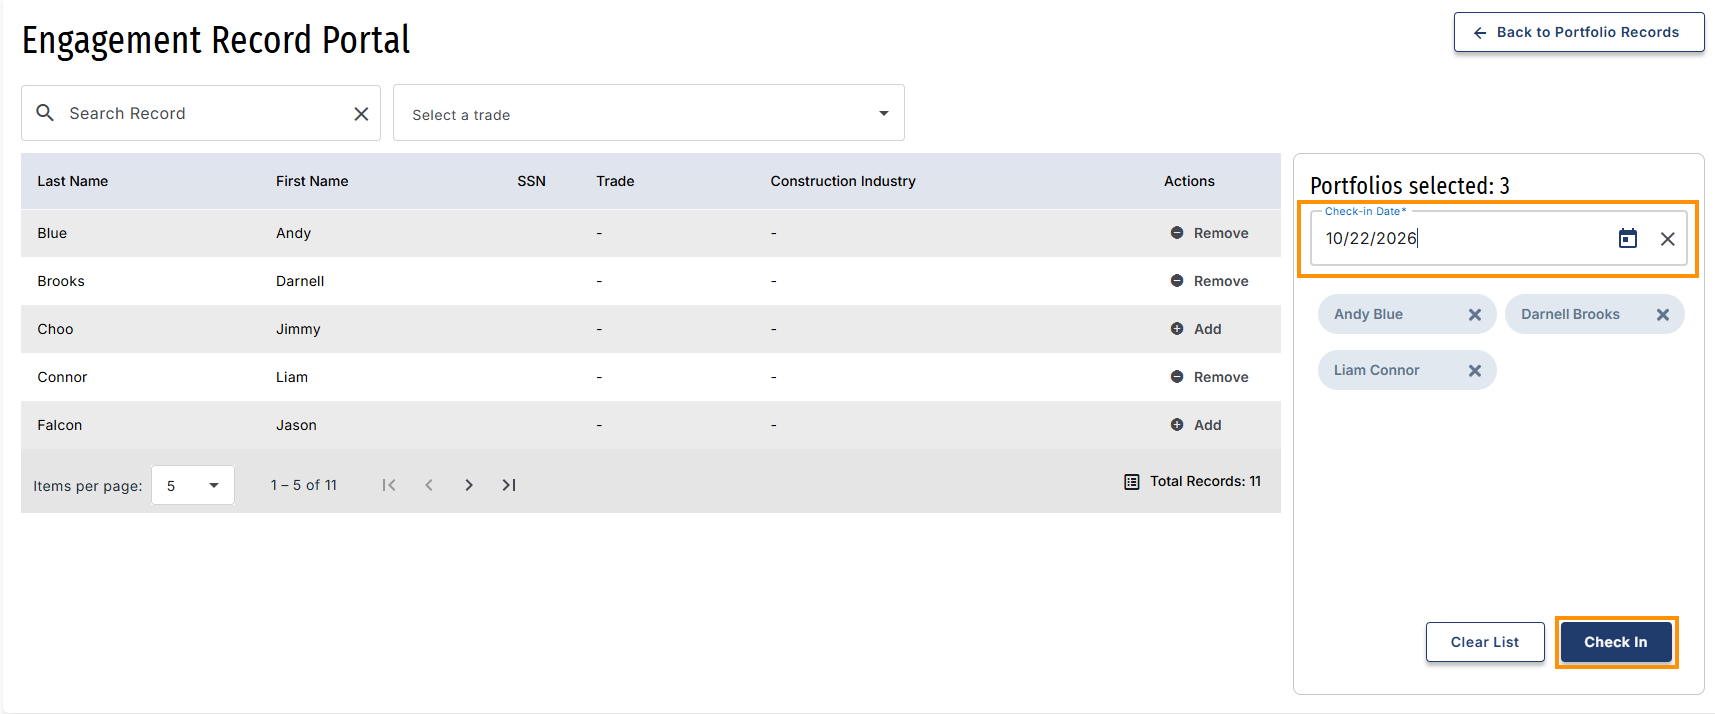
- Once the workers are added, select the Check-in date, in which the engagement will take place. It can be past dates, but not future dates. Once the date is selected, the check-in button is enabled.
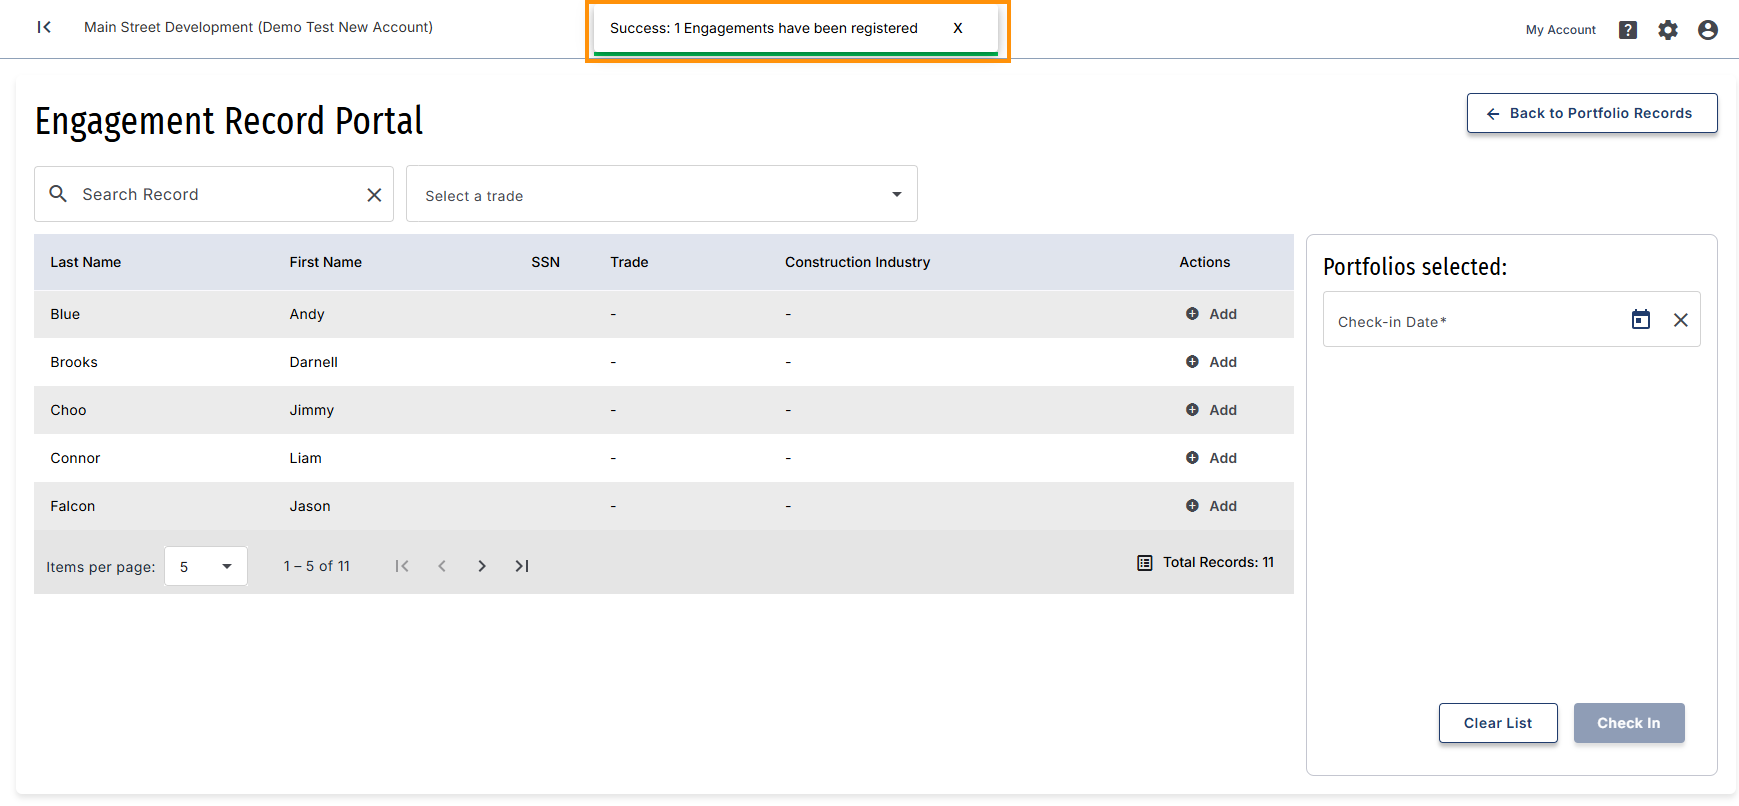
- When 'Check-In' button is selected, a success message appears at the top of the page. Also, the recorded check in will appear on the worker’s Engagement and Notes Record.
Was this article helpful?
That’s Great!
Thank you for your feedback
Sorry! We couldn't be helpful
Thank you for your feedback
Feedback sent
We appreciate your effort and will try to fix the article