Workforce Manager — Intake & Assessments — Portfolio Records
1. Overview
The Bulk Import tool lets you add or update many worker/participant records at once by filling in an
Excel template and uploading it, instead of entering each record one at a time through the record
forms.
Bulk Import is available only on the Portfolio Records list (Intake & Assessments) and only for
accounts configured as one of the following program types:
- Module 1 Standard
- Module 2 Standard
Both modules share the same tool and the same overall workflow. The only difference is the template
itself: Module 2's template has four extra columns that Module 1's template does not have. Everything else — every other column, every dropdown list, every format rule, and the upload/results process — is identical between the two modules.
Quick Start — the four steps, if you just want to get going:
- Download the template from the Portfolio Records list — already built for your account's module.
- Fill in one row per worker, using the dropdowns and date format the file already has.
- Upload the completed file from the same list page.
- Read the results dialog that appears — it tells you what imported and what didn't.
Everything below covers each step in more detail, plus every field and every message you
might see.
2. Before You Start
- You need sufficient permission on the Portfolio Records section of your account. If you don't see the import buttons described below, ask your account administrator to check your permission level.

- The file picker filter allows both '.xls' and '.xlsx', but in practice only '.xlsx' (Excel 2007 and later) files can be processed. A genuine LCPtracker Pro Classic (formerly known as Legacy) '.xls' file (Excel 97–2003 binary format) will pass the file picker, but always fail on upload with "File is not a valid Excel format or is corrupted" — if your Excel is set to save as '.xls' by default, use "Save As" and choose the '.xlsx' format instead.
- Beyond the file format, only the template generated for your own account is accepted — the upload is validated against the exact module, version, and column headers of the file you download in Step 1. A hand-built spreadsheet, a template edited to add/remove/reorder columns, an outdated template, or a template downloaded from a different account/module will all be rejected (see Troubleshooting § 8.2).
- Each row in the template represents one worker/participant.
- Always start from a template freshly downloaded from the app (Step 1) — it contains the dropdown lists and format rules your data must match and, is the only file the system will accept.
- First time using this tool? Fill in just 2–3 rows for your first upload and confirm the results look right before importing your full worker list. It's much faster to fix a formatting mistake in a 3 row file than to track it down across fifty.
3. Step 1: Download the Template
- Go to the Portfolio Records list page (Intake & Assessments).
- Click Excel File – Template (next to the search bar, above the records table).
- A file named "wfm-template.xlsx" downloads automatically. It is pre-built for your account's module (Module 1 or Module 2) — you don't need to select which one; the app already knows based on your account.
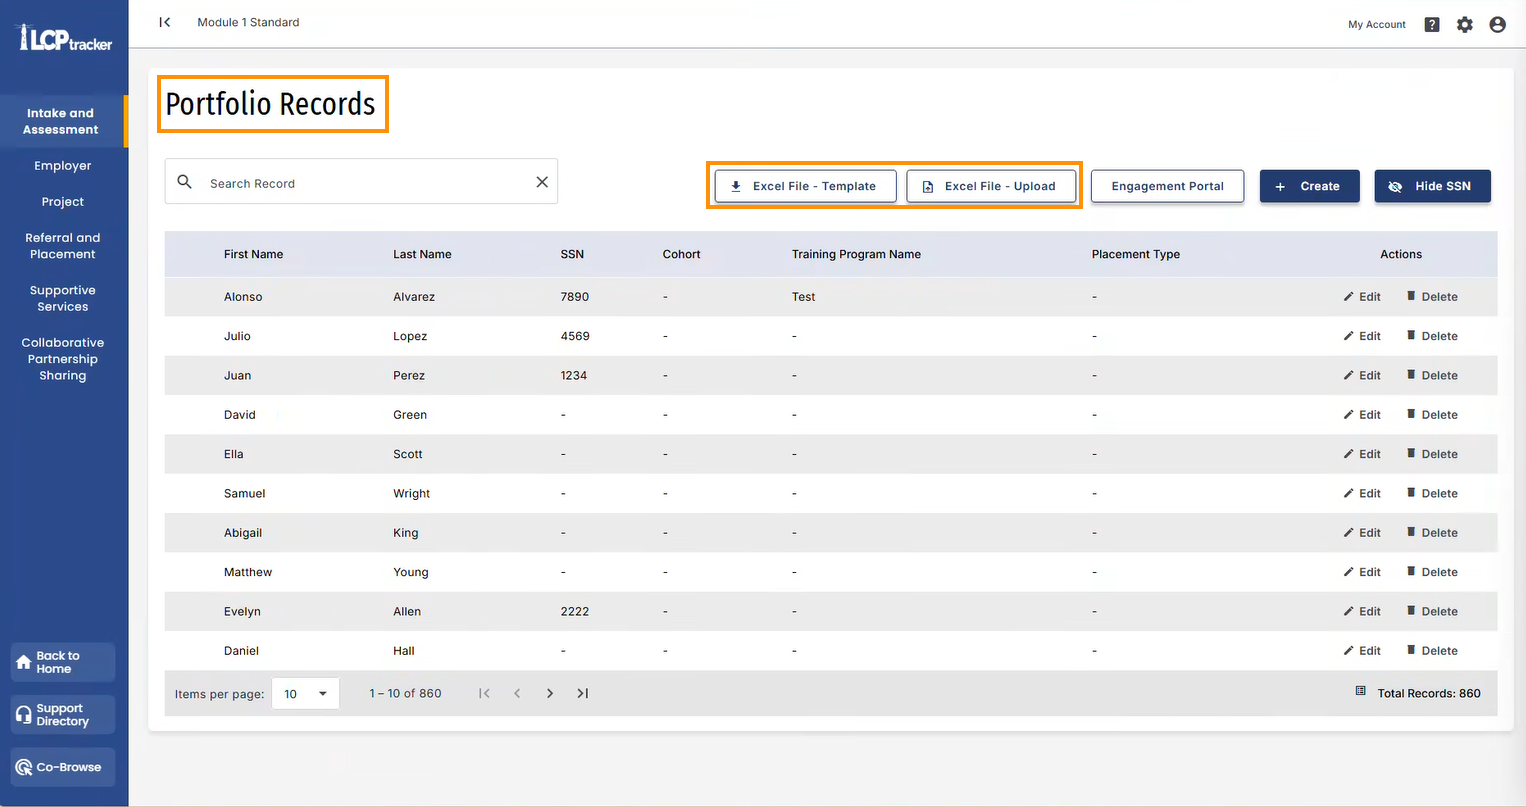
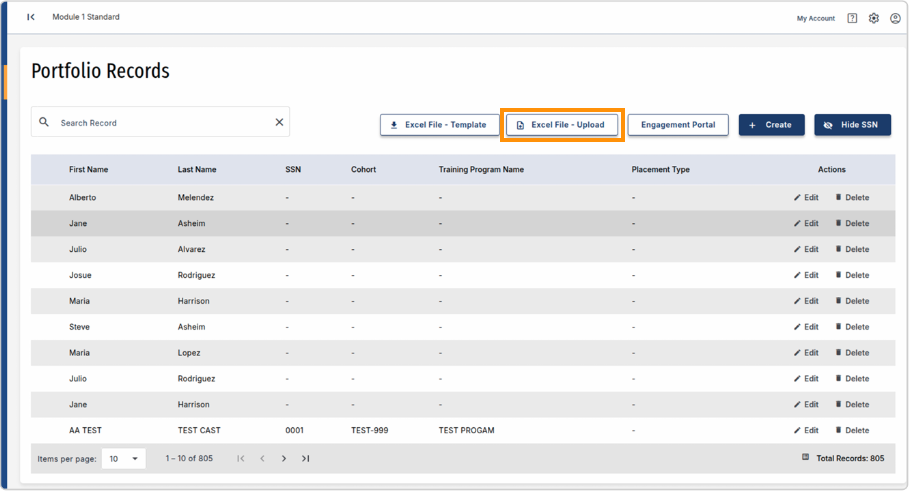
The Excel File Template and Excel File Upload buttons are on the Portfolio Records list toolbar.
4. Step 2: Fill In the Template
Open the downloaded file. Row 7 contains the column headers — start entering data on the row
directly below the headers, one worker per row.
The template has built-in Excel data validation:
- Dropdown fields — click the cell and choose a value from the dropdown arrow. Typing a value that isn't in the list will be rejected by Excel itself. Most dropdown lists are built from your account's own data at the moment you download the template, so always check the dropdown in your current file rather than a value from a previous download (see 5. Field Reference).
- Format-restricted fields (phone numbers, postal code, SSN last-4, wage rate, etc.) — Excel willreject entries that don't match the required digit count or number format.
- Date fields (dob , date_of_certification_form , cohort_start_date ,cohort_end_date ) — required format is mm/dd/yyyy (e.g. month, day, and year in that order — don't use 01/15/1990 ). Enter the dd/mm/yyyy or other regional date formats.

Worked example — one row, start to finish:
- Take the first filled-in row in the screenshot above.
- 'first_name/last_name' are typed directly.
- 'state' is picked from its dropdown, not typed.
- 'postal_code' and 'primary_phone' are digits only (no dashes).
- 'dob' is entered as an actual date, "01/15/1990".
- If this worker's 'Training Program' info is also being filled in, all four of 'arp_program_name', 'cohort_start_date', 'pass_fail', and 'type_of_program' are filled together, not just one or two of them (see the callout in 5. Field Reference for why).
- Every other cell in that row is left blank because that worker doesn't have data for it — blank cells are fine except where a column is explicitly marked required.
Note:
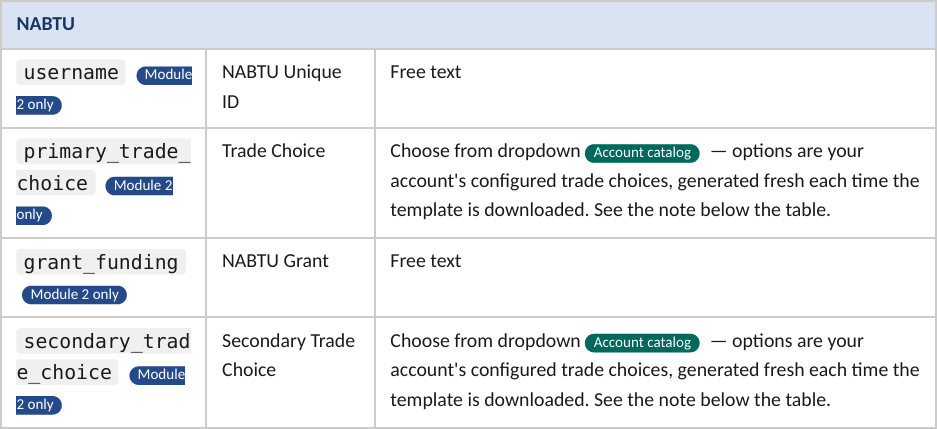
- Module 2 only: the fields 'username', 'primary_trade_choice', 'grant_funding', and 'secondary_trade_choice' only appear in the Module 2 template. If you're filling out a Module 1 template, you won't see these columns at all — that's expected.
5. Field Reference
The table below lists every column in the template, grouped by the WFM section each one saves into once imported (e.g. a value in the 'state' column lands on the worker's 'Information' record; 'certification_status' lands on 'Proof of Domicile').
This is not the same as the color banding you'll see across the header row in the spreadsheet itself — the coloring in the file is a visual grouping 'Module 2 Only' and doesn't line up one-to-one with these WFM sections. Columns marked 'Module 2 only' exist only in the Module 2 template.
Not every WFM section can be bulk-imported. Only the sections listed in the table below ('Information', 'Intake', 'Proof of Domicile', 'Education', 'Employment' and Background', 'Training Program', and (Module 2 only) 'NABTU') have columns in this template.
'Certifications', 'Placement Readiness', 'Work Placements', 'Retention', and 'Engagement and Notes' have no
corresponding columns and cannot be populated through this import; enter data for those sections directly on the worker's record after importing.
Fill in a section completely, or not at all — partial sections are silently skipped. For five sections, the whole section is only saved if a specific few of its columns are all filled in for that worker. If even one of those columns is left blank, the entire section is skipped for that worker — with no warning, no row-skip entry, and no field flag; the row still reports as a success.
The gatekeeper columns per section are:
- Proof of Domicile — needs certification_status AND proof_of_identity both filled (otherwise proof_of_domicile_1, proof_of_domicile_2, and year_of_residency are skipped too).
- Education — needs highest_level_of_education filled (otherwise ajcc_enrollment is skipped too).
- Employment and Background — needs employment_occupation_industry, experience_in_occupation_industry, AND current_job_title all filled (otherwise employer_name, current_wage_rate, employment_status, and the experience/trade fields are skipped too).
- Training Program — needs type_of_program, cohort_start_date,arp_program_name, AND pass_fail all filled (otherwise cohort_name and cohort_end_date are skipped too).
- NABTU (Module 2 only) — needs username filled (otherwise primary_trade_choice, grant_funding, and secondary_trade_choice are skipped too).
If you intend to fill in any part of one of these sections for a worker, fill in all of its gatekeeper columns for that row — see the 'FAQ', at the end of this article, for what this looks like when it happens.
Columns marked 'Account catalog' are dropdowns whose available choices are not fixed. Only five dropdown fields (valid_cdl, transportation_barriers, inability_pass_drug_screening, ajcc_enrollment, construction_trade_experience) always offer a plain 'Yes/No' choice, and 'state' always offers the same nationwide list (see its own row below).
Every other dropdown listed below is populated by looking up your account's current records the moment you click 'Excel File'>'Template'. So, the exact options can differ from one account to another, and can change over time as your account's data changes. Open the dropdown in the file you just downloaded to see the current list rather than relying on a list written down elsewhere.
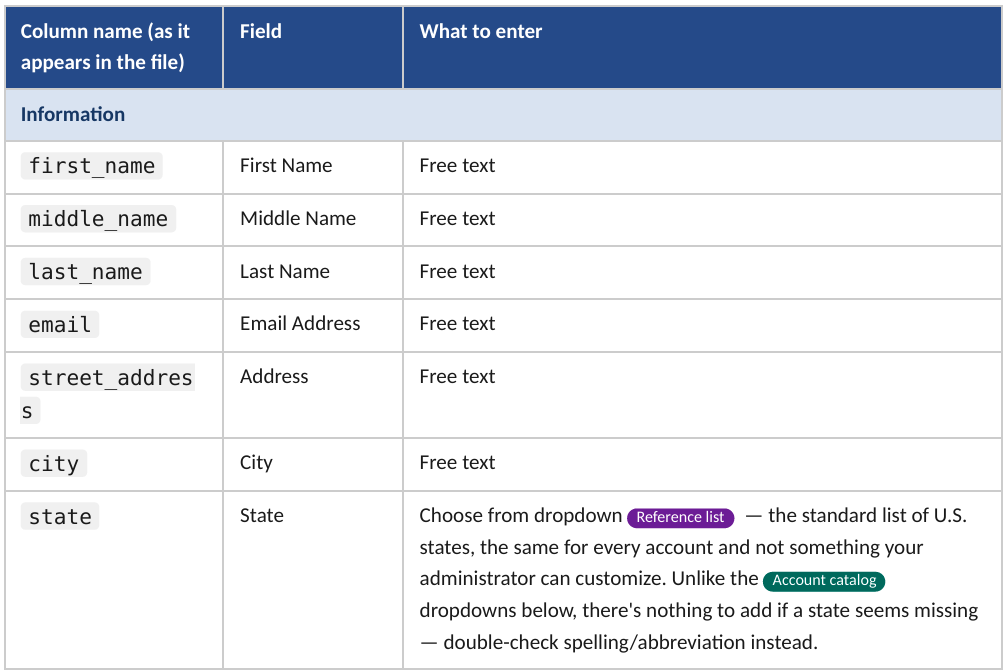
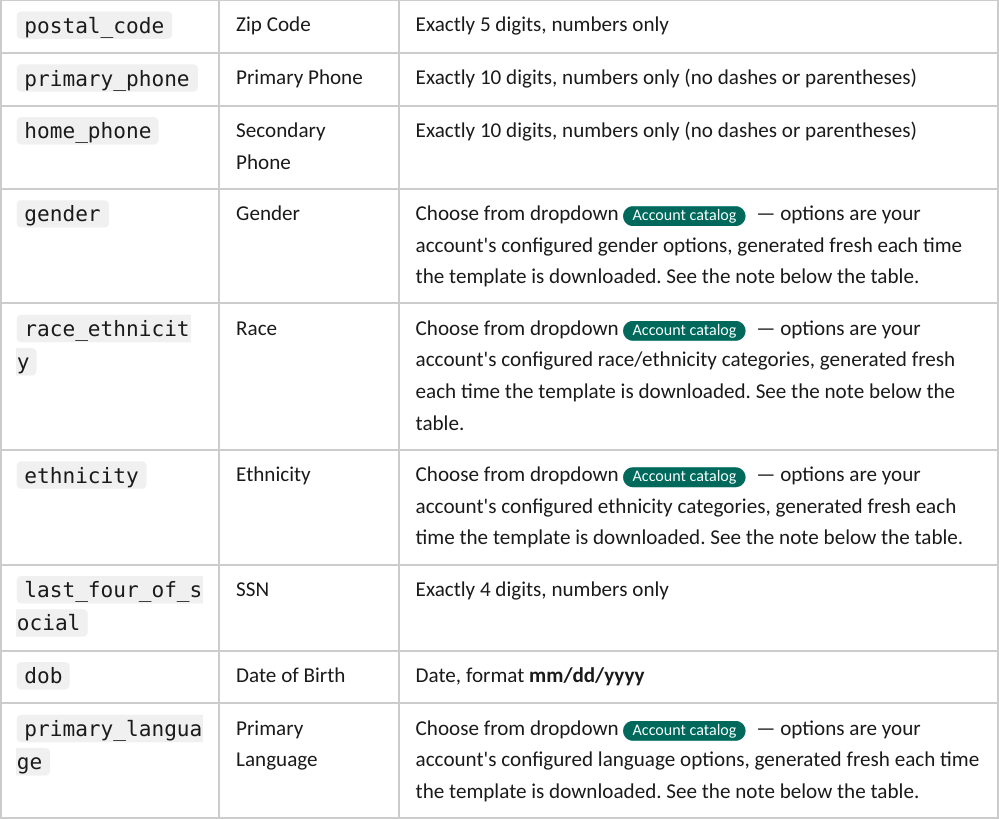
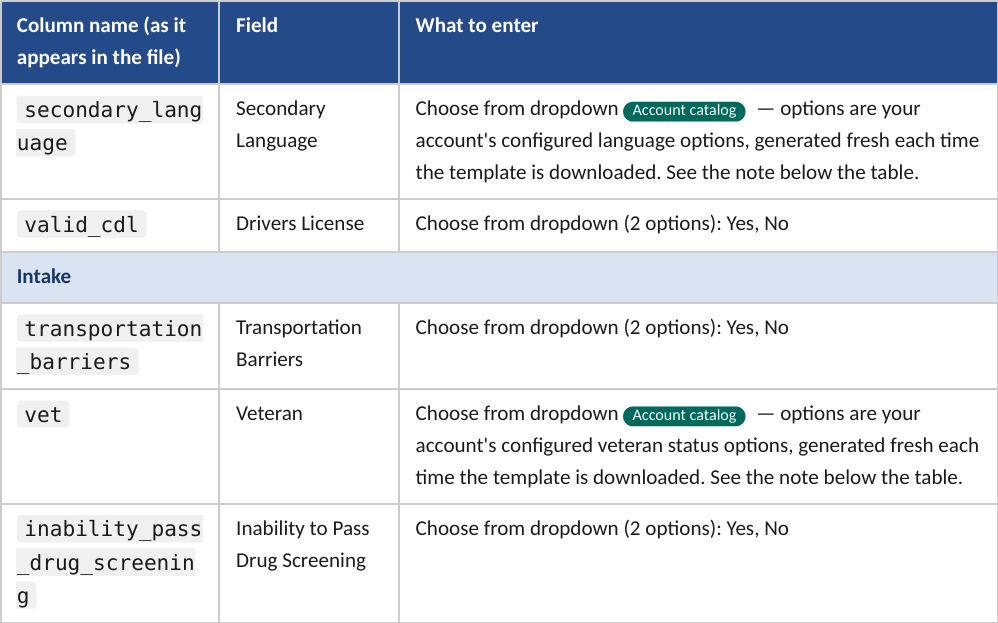
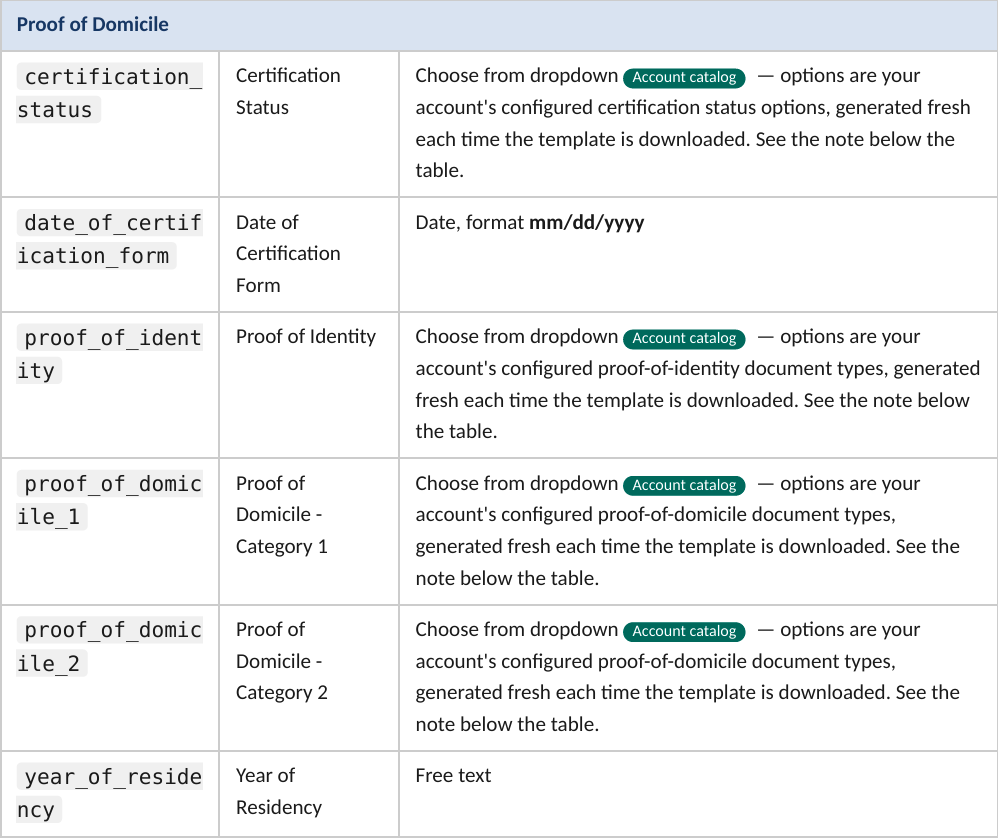
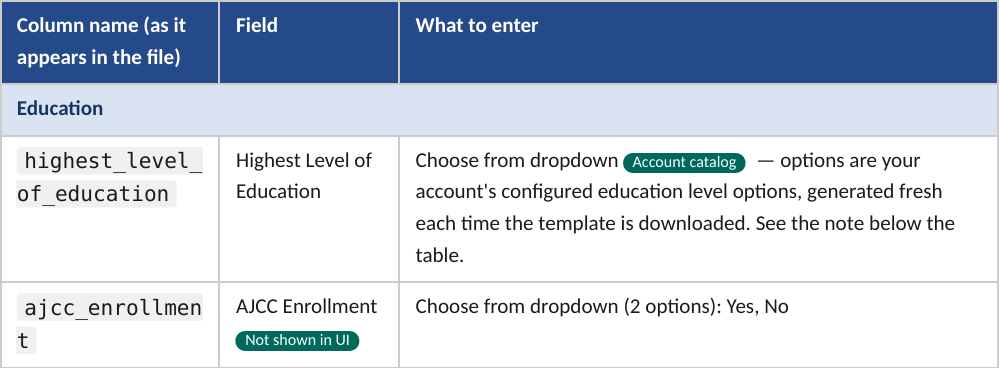
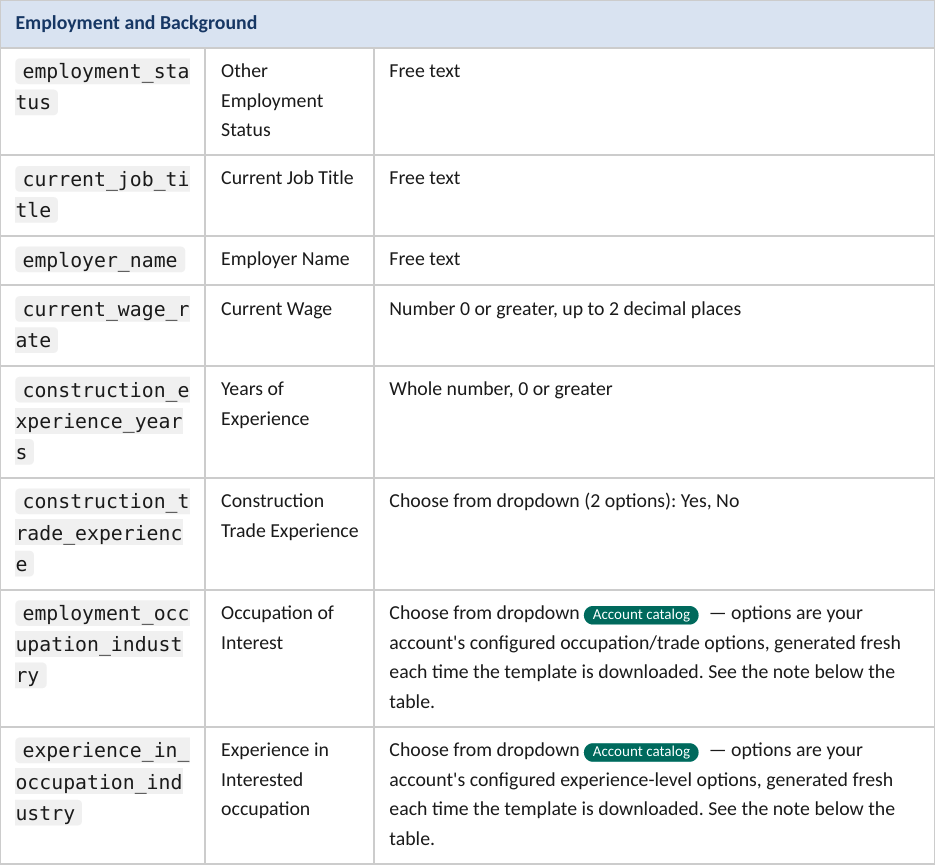

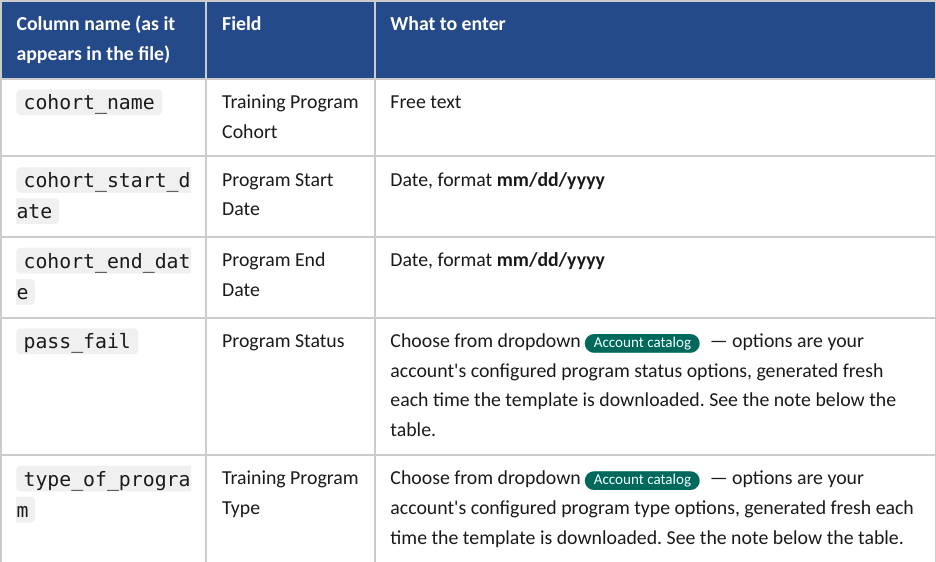
Note on 'Account catalog' dropdowns:
- These lists are generated on demand from your account's own data at the moment you download the template — they are not hard-coded into the file and are not the same for every account.
- If a value you expect isn't in the dropdown, it likely hasn't been added to your account's records yet; contact your account administrator rather than typing it in manually (typed values that don't match the list will be flagged, see Troubleshooting 8.4). This does not apply to 'state', which is the same nationwide list for every account — see its own row above.
Note on 'ajcc_enrollment':
- Not shown in User Interface: this column saves to the worker's 'Education' record, but the 'Education' tab in the app has no on-screen field for it — there's nowhere to see or edit this value except by re-importing. Confirm with your account administrator whether this value is still needed before relying on it.
6. Step 3: Upload the File
- On the Portfolio Records list, click Excel File – Upload.
- Choose your completed '.xlsx' file — the same file you downloaded and filled in during Steps 1–2. Only one file can be uploaded at a time.
- A loading indicator ('Uploading file…') appears while the file is processed — don't navigate away or close the tab during this time.
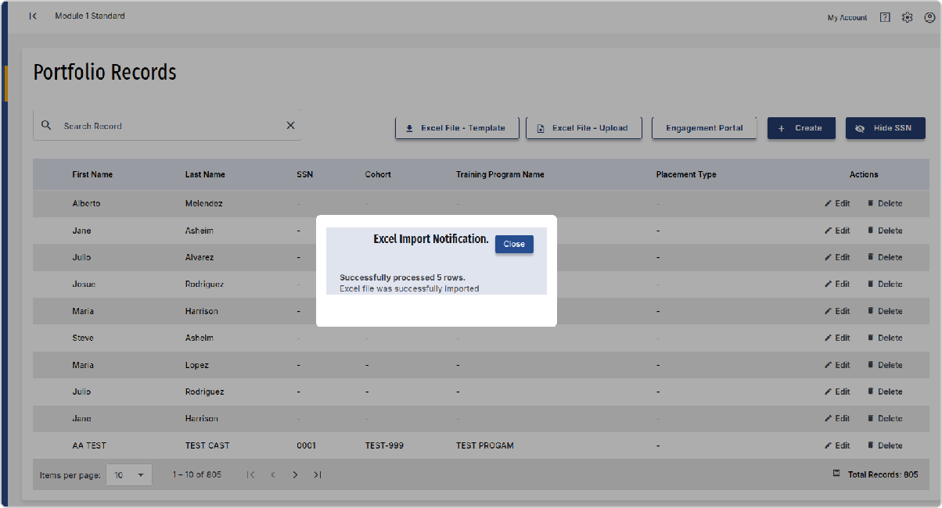
- When processing finishes, an 'Excel Import Notification' dialog opens summarizing the results (see next section).
- If at least one row was successfully imported, the Portfolio Records list refreshes automatically to show the new/updated records. Portfolio Records list after the import — new/updated records appear without a manual page refresh.
7. Understanding the Results Dialog
The Excel Import Notification dialog can show up to three things:
- Rows processed summary — a count of how many rows were successfully imported (e.g. 'Successfully processed 12 rows.').
- Rows not processed — a list of rows that were skipped entirely, each with a reason and the worker's name/identifier so you can find them in your file.
- Workers imported with issues — workers who were imported but had one or more fieldsflagged as invalid; the dialog names the specific field and the value that didn't pass validation.
'Excel Import Notification' dialog — a row skipped with its reason, e.g. "Missing required first_name and/or last_name."
Close the dialog with the Close button once you've reviewed the results. For the exact message text you may see in each of these cases and what it means, see 'Troubleshooting' below.
8. Troubleshooting
This section lists the actual messages the system can show you, grouped by where you'll see them,
with what each one means and what to do about it.
8.1 File rejected outright (nothing was imported)
These stop the upload before any row is looked at. 'Portfolio_rows_processed' will be 0 and there is nothing to fix row-by-row — the whole file needs to be corrected and re-uploaded.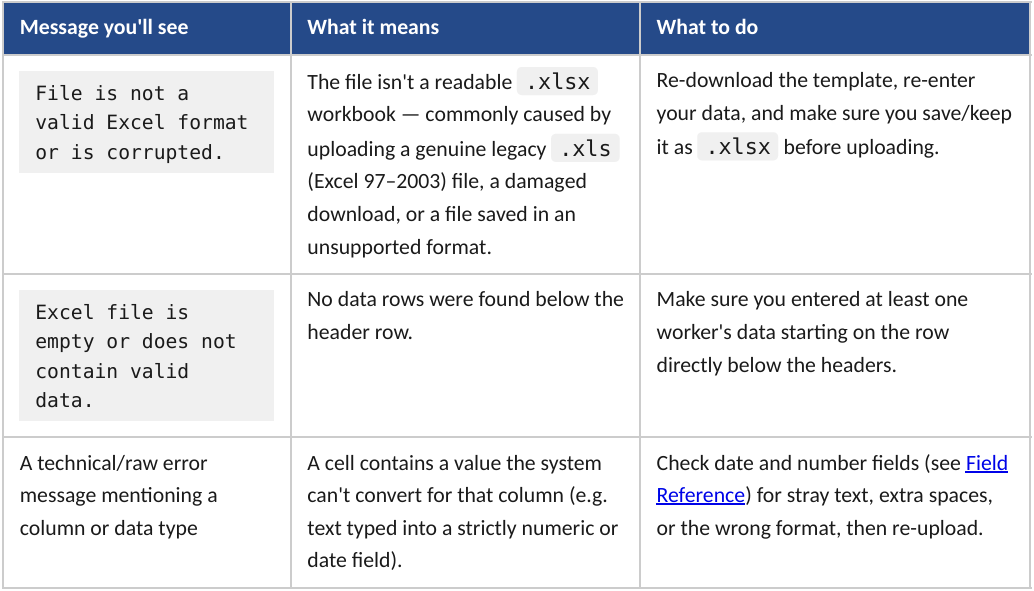
8.2 Wrong or outdated template (nothing was imported)
These mean the file's header row doesn't match what the system expects for your module — usually
because the template was edited, columns were reordered/renamed, or you're using an old or wrong
module file. Like the errors above, none of your rows get processed when one of these appears.
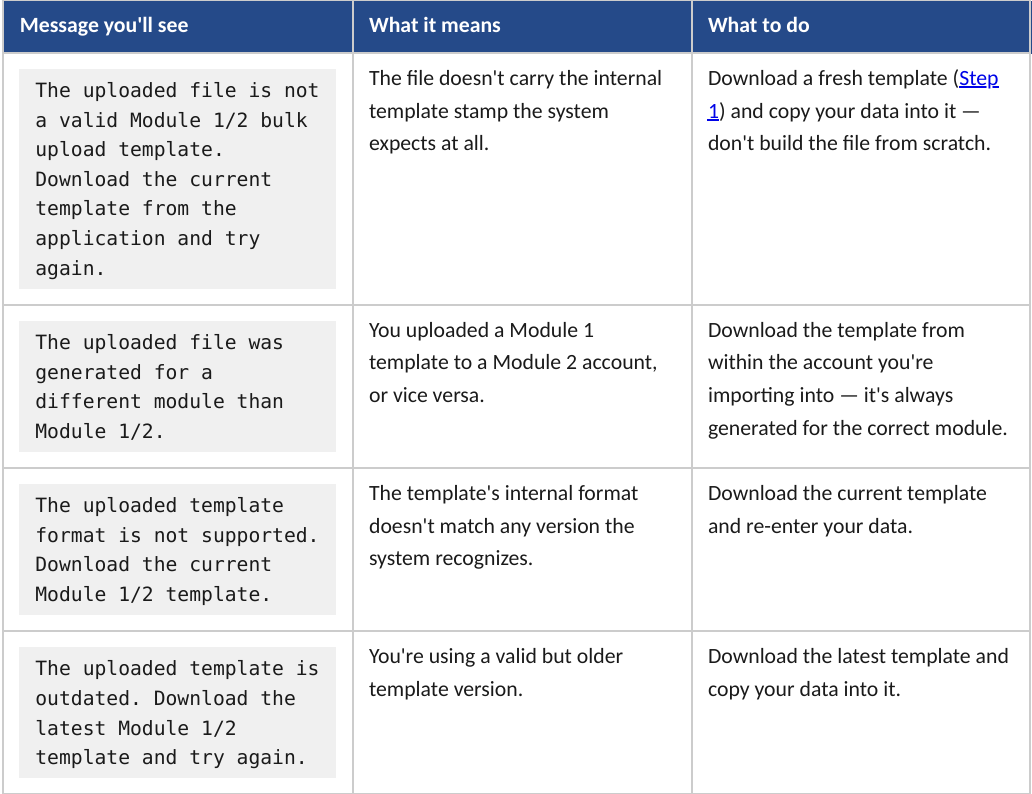
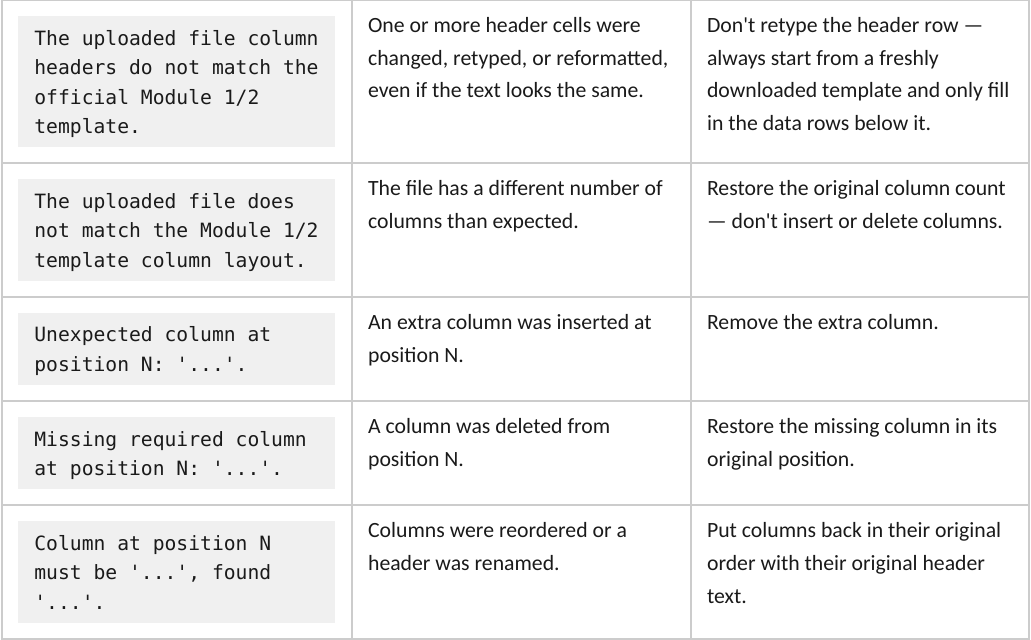
Bottom line: never edit, reorder, rename, insert, or delete columns in the header row. Only enter data in the rows below it.
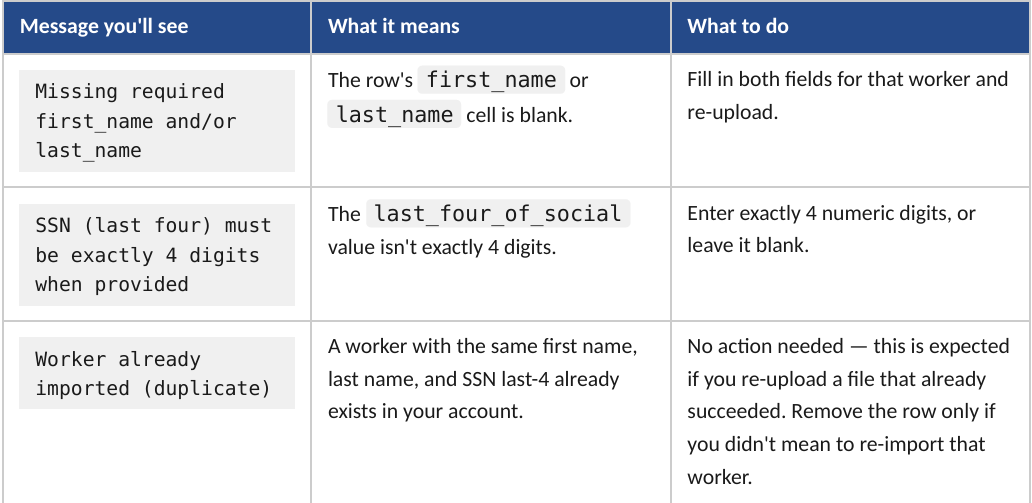
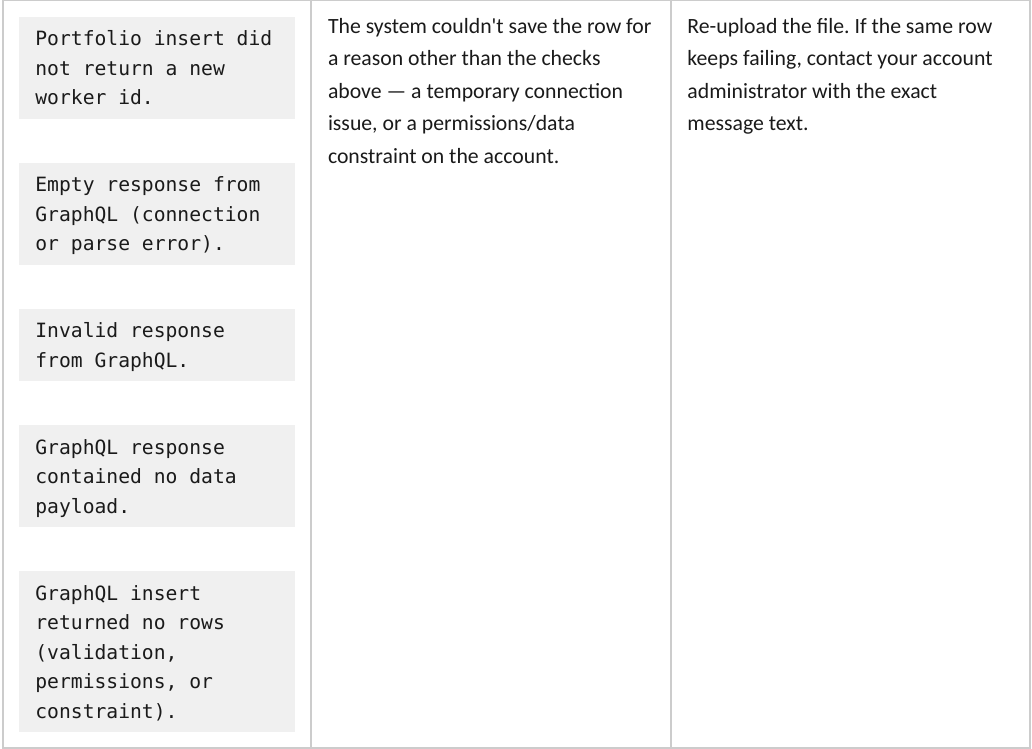
8.3 Row skipped (listed in "Rows not processed")
These affect one row at a time — the rest of the file still imports normally.
8.4 Worker imported but flagged with issues
These appear per field, worded as: 'Verify field <field name> <value> is not a valid record' or 'Verify field <field name> Empty is not a valid record' if the cell was blank).
This only happens on 'dropdown fields' — state, gender, race/ethnicity, languages, valid CDL, certification status, proof of identity/domicile, transportation barriers, vet status, drug screening, pass/fail, type of program, AJCC enrollment, highest level of education, construction trade experience, employment occupation industry, experience in occupation industry, and (Module 2 only) primary/secondary trade choice.
Why it happens: the system checks the cell's value against that field's list of valid options (trimmed
and case-insensitive). If it doesn't match exactly, the field is skipped for that worker — but the rest of
that worker's record is still imported.
What to do: almost always caused by typing a value instead of choosing it from the dropdown,
extra/trailing spaces, or copying a value from the other module's template (their trade/option lists
differ slightly). Open the worker's record and re-select the correct value from the dropdown, or fix the
cell in your file and re-upload just that row.
8.5 Quick fixes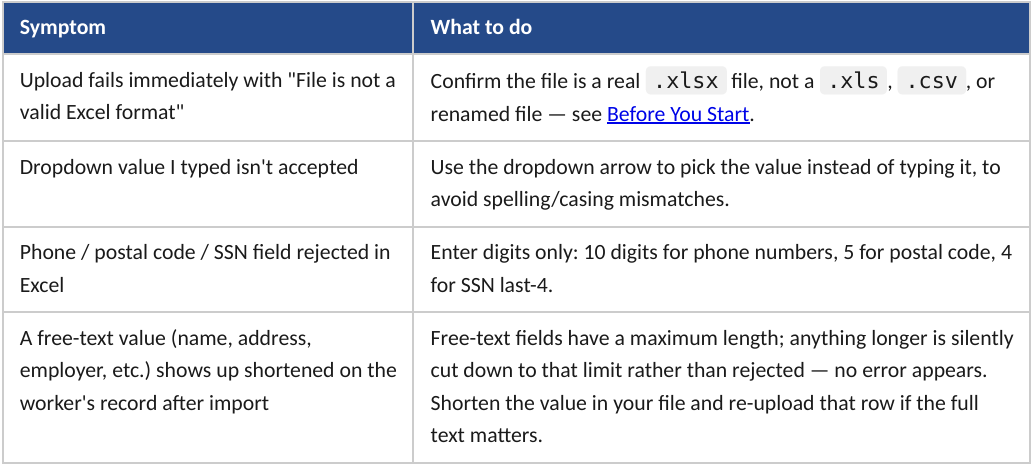
9. FAQ
What happens to rows that fail?
They are skipped and not saved. They will not create a partial or incomplete record — fix the row in your file and re-upload.
Can I re-upload the same file after fixing errors?
Yes. You can re-upload a corrected file; rows that previously succeeded do not need to be removed before re-uploading.
Does the upload create duplicate workers if I upload the same file twice?
No. Before importing a row, the system checks for an existing worker with the same first name, last name, and SSN last-4. If it finds an exact match, that row is skipped with Worker already imported (duplicate) instead of being inserted again.
Can I use a template downloaded for Module 1 on a Module 2 account (or vice versa)?
No. Always download the template from within the account you're importing into — the app
generates the correct template (Module 1 or Module 2) for that account automatically.
The import said it succeeded, but a worker's Training Program (or Proof of Domicile, Education, Employment and Background, or NABTU) info didn't show up — why?
Those five sections are all-or-nothing per worker: a specific few columns in each section must all be filled in, or the whole section is skipped silently (no error shown) for that row. See the callout in the Field Reference section for the exact columns each section needs, fill in all of them for that worker, and re-upload.
Is there a limit to how many workers I can import in one file?
The template's dropdown lists and format rules only extend through row 107 (100 data rows, starting at row 8). Rows added beyond row 107 will still be sent to the server if you fill them in, but they won't have the built-in dropdown/format checks to catch mistakes before you upload. For files with more than 100 workers, split into multiple files (each downloaded fresh from Step 1) rather than extending a single file past row 107.
Was this article helpful?
That’s Great!
Thank you for your feedback
Sorry! We couldn't be helpful
Thank you for your feedback
Feedback sent
We appreciate your effort and will try to fix the article